How to Record a PowerPoint Presentation

Knowing how to record a PowerPoint presentation with audio and video can provide viewers with an engaging experience. Whether you're creating a tutorial , a lecture, or a business presentation, combining visuals with narration helps convey your message more effectively.
In this guide, we will walk you through the step-by-step recording process in PowerPoint . From setting up your equipment and recording your screen to editing the final video, you'll learn everything you need to know about creating narrated PowerPoint presentations.

Prepare everything
- Presentation . Ensure your slides are complete and in the correct order. Update PowerPoint to the latest version for the best performance and features.
- Microphone . Use a good-quality microphone to record clear audio . A USB or headset microphone is recommended.
- Webcam (Optional) . If you want to include a video of yourself, use a built-in or external webcam.
- Script . Outline what you want to say for each slide. This will help you stay on track during the presentation recording.
How to record a PowerPoint presentation?
1. set up a screen recorder.
Download and install the free screen recording software for Windows from the official website. Launch the video recorder on your computer.
Easy to use free screen recorder for PC. Record desktop, take screenshots, upload the created content to the cloud for easy and fast sharing.

2. Configure settings
Go to " Settings " to set recording preferences .
- In " Video ", choose the desired output quality and format. Make sure the toggles next to " Record mouse movements " and " Animate mouse clicks " are enabled if needed.
- In the " Audio " tab, adjust the sound levels and select the desired input devices.

3. Record your presentation
Click the " Capture video " option in the side menu and select the mode. Choose the entire display if your presentation is in full-screen mode. You can also manually adjust the screen recording area to show the desired content.
Open your PowerPoint and press the F7 hotkey or click the " Rec " button to record the presentation with audio . Navigate through your slides while speaking clearly into the microphone.
Use drawing tools in the presentation recorder to highlight key points during your narration.
If you need to take a break, use the pause button to temporarily stop the recording. When you've completed your presentation, press the F8 hotkey or click " Stop ".

4. Editing the final video
Use the built-in video editor to trim any unwanted parts of the presentation recording. You can also adjust the playback speed, change the format, and resize the video.
If you need to make more changes, you can import your recorded clip into third-party video editing software . Add transitions, effects, background music, or other enhancements as needed.
Save your edited video in the desired location. It is also possible to upload the recording to the cloud and share it via a link .

FAQ on how to record a presentation
PowerPoint screen recording with audio and video is a powerful way to enhance your message and engage your audience. By following the steps outlined in this guide, you can create professional and polished videos that combine your slides with a voice-over .
Whether you're an educator, business professional, or content creator, knowing how to narrate a PowerPoint presentation recording can significantly boost your impact. Remember to practice your delivery and utilize editing tools to refine your final product.
Expert Tech Writer
Like the article? Share it!
- Presentations
- Most Recent
- Infographics
- Data Visualizations
- Forms and Surveys
- Video & Animation
- Case Studies
- Design for Business
- Digital Marketing
- Design Inspiration
- Visual Thinking
- Product Updates
- Visme Webinars
- Artificial Intelligence
How to Create a Narrated Presentation With Voice Over Using Visme

Written by: Nayomi Chibana
If you've ever taken weeks, even months, to painstakingly prepare for an important presentation, you know how useful it is to have a recording of your memorable delivery to share with others.
Here at Visme , we're excited to tell you that you can easily record your own voice over right within this online presentation design tool .
This allows you not only to create self-running presentations or stand-alone slide decks but also narrated software tutorials, audio presentations and visual stories with narration.
All of these can be easily shared across all social media platforms with just the click of a button or embedded into your own website or blog.
You can also repurpose written content into a narrated presentation, which is one of the best ways to make the most of every marketing dollar you spend. To learn more about repurposing, you can read our post on 11 smart ways to repurpose your content.
To get started, follow this simple step-by-step tutorial on how to create a narrated presentation in Visme by adding a voice over. We'll also help you learn how to add background music to your presentation to make it more dynamic and engaging.
Video: How to Make a Presentation in Visme
The video tutorial below will walk you through the process of creating a presentation in Visme. Keep scrolling for a detailed, step-by-step guide on how to create a narrated presentation.

1 Create a Visme Project

To create a slideshow with voiceover, you'll need to log in to your Visme account and create a new project. If you don't already have an account, you can easily create one here for free.
Enter your name, email and password to register. Once you're inside the dashboard, click on the "+ Create" button on the left-hand side of your screen.
Create a stunning presentation in less time
- Hundreds of premade slides available
- Add animation and interactivity to your slides
- Choose from various presentation options
Sign up. It’s free.

2 Choose a Presentation Template
Find the perfect template for your next presentation! Browse Now
Click on the "Presentations" tab to view all the customizable templates inside Visme. Pick a presentation template that best fits your content and industry, and click on "Edit."
You can also choose to start with one of our presentation themes. Each theme is packed with hundreds of fully designed slides that you can mix-and-match for your own use.
3 Customize Your Slides

Customize this presentation theme now! Edit and Download
Next, edit and design your presentation using all the graphic assets Visme has to offer, including icons, images, text and interactive elements such as video and maps.
Add charts, maps and data widgets to visualize boring numbers. You can also upload your own images and fonts or embed third-party content, such as surveys, quizzes and polls.
4 Click on Add Audio

Now, open the Media tab in the left-hand panel, and click on "Add Audio".
Visme offers dozens of free audio clips you can attach either to individual slides or set as background music for your entire presentation. If you've subscribed to a paid Visme Plan, you'll have access to all of the free audio files in the library.
To create your voice over slides, you can also upload your own audio file from a voice actor or record your voice over directly in Visme.
5 Attach an Audio File

To attach an audio file to the current slide, click on the gear icon next to it and select "Attach to Current Slide". You can preview each clip by clicking on the Play button next to it.
If you decide to choose another file or want to remove an audio clip from a slide, you can detach it by clicking on the gear again and selecting "Detach."
6 Record Your Voice Over

Here’s how to do a presentation with voice over using Visme.
Record your own audio by clicking on the "Record" option to the top right of the "Add Audio" tab. Once chosen, you will see a red record button appear below your slide.
To start recording your own narration within Visme, simply click on the red button and speak into your microphone. Make sure your microphone is working properly before recording.
You can preview your recording before saving it to the library by clicking on the Play button. Once you're satisfied with your recording, click on "Save to Library."
Your audio will automatically be converted to MP3 format, added to your Audio Library and attached to your current slide. You can then rename it by double clicking on the file name or detach it from the slide by clicking on the gear and selecting "Detach."
7 Customize Audio Settings

If you’re looking to make an audio presentation, the process is super easy. After adding your video to the library, you can customize how it is played.
To customize the way your audio presentation is played, simply click on "Audio Settings" at the top. You'll see options at the bottom to trim your clip or adjust more settings by clicking on the gear icon.
In Visme, you can also customize the time your audio takes to fade in and out. For example, if you want your audio to quickly fade in at the beginning, you can set it for 1 second. Or, if you want your audio to slowly fade out, you can set it for 3 or 4 seconds.
Also, you can set the time at which your audio will begin. If you want your narration to start 5 seconds into your presentation, you type in a value of 5 in the "Start Playing After" setting.
You can also reduce or increase the volume of your audio by inputting any value up to 100%. Finally, you can have the audio loop automatically by enabling the "Loop Audio" setting.
The advantage of having the option to tweak the settings for each individual audio track is that it allows you to customize it according to the content presented on each slide. For example, for slides with long animations, you might want to enable the "Loop Audio" setting.
8 Preview Your Audio

To see if your audio narration or voice over is effectively complementing your visuals, select the "Present" option at the top-right corner of the screen to preview your slides.
9 Add Background Music

Along with your audio narration, you can add background music to your presentation.
Click on "Share" at the top of your screen and select "Advanced Settings" at the bottom-right of the window. Click on the "Sound" tab and then enable the "Background Music" setting.
Here, you'll be able to select your uploaded or recorded audio file from the drop-down menu or choose one of the free audio clips from the library.
10 Publish Your Project

Once you're satisfied with your voice over, you can share your presentation with the world by clicking on the "Share" button at the top and then choosing one of the three options below:
- Publish for Web: This will publish your Visme project on the web and generate a shareable link, which will enable anyone on the internet to find and access your presentation.
- Share Privately: This will generate a private link to your Visme project that you can share with specific people.
- Embed: This will generate an embed code for your presentation that you can add to your web pages or email.
You can also choose to download your narrated presentation as an HTML5 or editable PowerPoint file to present offline or share with a pre-recorded voice over.
Five Tips for Adding a Good Presentation Voice Over
Ready to nail your audio presentation? Here are five useful tips for adding a voice over to your presentation.
Practice Before Recording
This is a critical step when prepping for your presentation voice over. Start with vocal warm and breathing exercises. Then do the initial takes and record them to identify and fix any issues that could hamper your delivery. These activities help warm your vocal cords, ease you into the right voice and ensure excellent delivery.
Use a Good Microphone
When recording your audio, you want to avoid poor production quality. Otherwise, you risk losing your audience's attention. According to Statista , 33% of people said they’ll abandon a video if it had poor audio quality.
Invest in high-quality microphones that produce balanced audio and clear dialog and eliminate background noise. The good news is that you don’t have to blow your budget on a full studio setup with expensive mics. You can find budget-friendly microphones to help provide professional-grade audio quality.
The best part? With a PowerPoint voice over software like Visme, you’re sure to have top-notch audio quality. The software comes with features that take your audio and voiceover recording to a whole new level.
Find a Good Place to Record
Where you record your presentation voice over can make a big difference in your audio output.
Microphones tend to pick up lots of background noises. So even if you don’t have access to a professional studio, find quiet and ambient environments. Also, opt for spaces with less reverberation and echo.
We get it. No place can be entirely silent, but you’ve got to be ingenious. For example, if you’re at home, you can stay away from the windows. You could even drive to a remote location and record in your car. It’s all about thinking outside of the box.
Sound Confident & Relaxed
Speaking with confidence can be a game-changer when it comes to presentations. It creates a great first vocal impression and ensures your audience pays attention to you.
One way to sound confident is to speak in a relaxed voice and moderate pace. Get rid of the tension by engaging in exercises that relieve stress. Then practice repeatedly to get familiar with your content, transitions and visual aids. Where necessary, infuse a bit of humor to lighten the mood and get you more comfortable.
Take Vocal Breaks In Between Slides
During the presentation with voiceover, you need to pause between slides.
This won't appear odd. Rather these pauses will give you a chance to catch your breath, calm down and organize your thoughts. Pausing also helps speakers avoid filler word like um, uh, er, which can make them sound uncertain.
Another upside of pausing is that it allows the audience to think, reflect and take in everything you’ve said.
Create Your Own Narrated Presentation With Visme
Creating a narrated presentation with your own voice over in Visme is super easy. All it takes is a few clicks and your presentation is ready to be shared with the world.
Sign up for a free account today and take it for a test drive.
Have you created an interactive presentation in Visme yet? Don't hesitate to share your best projects with us or tell us about your experience using the Audio Library and Record features.
Just drop us a comment below, and we'll get back to you as soon as possible.
Create beautiful presentations faster with Visme.

Trusted by leading brands
Recommended content for you:

Create Stunning Content!
Design visual brand experiences for your business whether you are a seasoned designer or a total novice.
About the Author
Nayomi Chibana is a journalist and writer for Visme’s Visual Learning Center. Besides researching trends in visual communication and next-generation storytelling, she’s passionate about data-driven content.
Video Presentation Maker
Create memorable video presentations that drive your message home. Start making a video presentation with your own content or generate one with AI.

Everything you need to make a presentation you’re proud of
Start creating a video presentation without having to set up any equipment. With a screen recorder and a microphone, you can record video presentations online yourself. Or, browse the stock footage library to craft the perfect presentation video.
Visualize your presentation with Video Generator
Easily experiment with different visual elements using the AI video generator . Spark inspiration from each generated video or choose one to edit directly.
Perfect for slideshows, reviews, video presentations
Make a video presentation your audience will remember. This video presentation maker is perfect for creating any kind of presentation from slideshows to talking head videos.

How to Make a Video Presentation
.webp "how to create a video presentation with audio")
Open a new project with a blank canvas. Choose the size you want your video presentation to be; apply preset aspect ratios 9:16, 4:5, 1:1, and vice versa.
Open the “Record” tab in the left-hand side and choose your recording settings to start recording. Or, browse the stock footage library to create a presentation without recording.
(Optional): Use the AI video generator to create a video presentation for you with subtitles, background music, and an AI voiceover.
Trim, crop, or add subtitles to your video presentation. Apply subtle background music to fill in silences, or remove silences automatically with Smart Cut.
Export your video presentation, download a video file, and share its unique video link. Have others leave comments at specific points in your video—all in real time.
The best way to create video presentations without feeling overwhelmed
Unless your racing against the clock and coming up on a deadline (we've all been there), create video presentations online without feeling overwhelmed by a complex-looking video editor.
Kapwing's video presentation maker offers you a full creative suite of video editing tools with a user-friendly interface. Start creating video presentations without a learning curve.
Professionalize your video with AI-powered features
Use the AI voiceover generator to add an AI voice so you don't have to record narration yourself. (TIP): Apply text-to-speech for both subtitles and a voice over.
Store brand colors and logos in a shared Brand Kit
Easily access brand assets to have consistent branding across different social media platforms. Create video presentation templates and save them for your team to create the next video presentation in a breeze.
Make a video presentation in under 10 minutes
Jump directly into the editor and generate a video presentation using the slideshow generator. Edit the generated subtitles accordingly and make any additional changes to your video. Create and edit a video presentation all on one platform—no download or software installation required.
Collaborate with your team in real-time
Leave feedback at key points directly on the playback timeline. Share your video presentation with just a link. Never see a "file upload limit" notification on your screen again.
What's different about Kapwing?

Kapwing is free to use for teams of any size. We also offer paid plans with additional features, storage, and support.
What is Genially?
Genially is a cloud-based platform for building interactive learning and communication experiences.
Product Overview
Explore Genially's authoring and content creation features.

What's New
Discover our latest product updates and releases.

Discover how teams use Genially for eLearning, Marketing, and Communications.
K12 Schools
Explore how teachers use Genially to bring interactive learning to the classroom.
Higher Education
Discover how Learning Design teams and Faculty use Genially to build interactive courses.
Contact Sales
START CREATING
Build interactive images
Discover how to make interactive visuals and graphics.
Create interactive slides
Engage your audience with interactive slides and presentations.
Make interactive infographics
Learn how to design interactive data visualizations and diagrams.
More formats
From resumes to reports, make any kind of content interactive.
eLearning templates
Interactive resources for eLearning and corporate training courses.
K12 teaching templates
Interactive classroom resources for primary and secondary education.
Gamification templates
Escape games, quizzes, and other game-based learning activities.
Marketing templates
Interactive microsites, brochures, videos, and branding materials.
Explore all Genially templates
Browse over 1,500 pre-built designs. Save time and create professional interactive materials in minutes.

Explore Genially pricing and plans.

Plans for Teachers
Create interactive learning materials and use Genially in class with your students.

Make an awesome slideshow
Great stories are told visually. Use Genially to create a video presentation with animation. Without complicating your life. Without downloading anything. Capture everyone’s attention with dynamic content.
Video presentations that have it all
You don't need to call a production company to create videos. Just do it online with Genially.
Corporate Video
Are you introducing your organization to the world? A video presentation will make sure you stand out.
For video that’s easy, make a genially
Forget saying “I need a million hours to create an animated video for my presentation.” More and more people are using Genially to create original video presentations in a flash.
DON'T START FROM SCRATCH
Templates that’ll make it easy for you
To finish your video presentation in record time, use Genially's templates. They’re designed by professionals with predefined animations. Just edit the content to your liking.
Create a video presentation in 4 steps

Step 1: Choose an awesome template
The first step to success is to choose a great template. Think about the theme of your video presentation and select the one you like most. You can also start with a blank canvas.

GET INSPIRED
Looking for new ideas? Look no further
If we’re proud of anything, it’s of having the largest community of interactive content creators in the world. Check out all the most creative video presentations. You’ll love them.
What is a video presentation?
It’s a presentation that plays automatically and has animation effects. It can also have sound. Genially's video presentations stand out because they’re original and full of motion. It’s almost impossible for them to fly under the radar. Plus, they're made online with no need to download anything.
How do I make a professional video presentation? Can it be done with Genially?
Sure! Genially is the most comprehensive tool for getting what you’re looking for. By simply using one of our great templates and adding your content to it, you'll create an impressive, professional video presentation. It’s faster than you think.
Where do I find templates for video presentations? Are they editable?
In Genially there are many templates for video presentations. There are free and premium templates, but all of them promise professional designs, predefined animations, and the ability to edit just about everything about them. Choose a template, and modify it to your liking.
How do I make a video presentation with audio?
In Genially, you can add audio files to your presentation or record your own voice within the Editor. Try it! Everything's better with music and so are your geniallys.

At 360Learning we use and recommend Genially for an innovative and effective learning experience.
Alix Huille
Alix Huille, Learning Engagement Coach, 360 Learning
WANT TO CREATE MORE?
Even more content
Genially has everything you need to always amaze and get your audience’s attention. Discover other interactive formats that may be useful for your day to day.

Presentations

Infographics

Gamification

Interactive images

Training materials

Making an animated video presentation is easy
To live to tell the tale, make it online with Genially. It’s free.
The ultimate guide to making video presentations
Heads up! This content is relevant for Clipchamp for personal accounts. Try this link If you're looking for information about Clipchamp for work accounts.
On this page
What is a video presentation?
Benefits of video presentations, popular video presentation formats , how to plan your video presentation, branding for video presentations, crafting voiceovers for video presentations, how to create an engaging video presentation , downloading format options for video presentations, repurposing video presentations, bonus tips to make your video presentations stand out .

Are you looking for innovative ways to share information with your team, students, or followers? Engage your audience with captivating video presentations they can watch anytime, anywhere.
Did you know that 83% of people prefer watching videos over reading or listening to information? This makes video presentations more impactful than traditional slides. Luckily, creating a video presentation is easy with a little planning and an online video editor like Clipchamp . Read on to learn how to make fun and effective presentation videos.
A video presentation combines videos, images, webcam footage, voiceovers, and animations to deliver a message. It’s a great alternative to tried-and-tested formats like PowerPoint.
Presentation videos are useful to share with groups and remote teams working asynchronously, to enliven online learning and even generate customized marketing and sales presentation pitches. Depending on the content, video presentations can be created to be shared and repurposed or be edited to match the presenter’s needs.
Video presentations are becoming increasingly popular due to their ability to engage audiences and convey information in a dynamic and visually appealing manner. Here are some key benefits.
Enhanced engagement
Visual and auditory elements in video presentations capture and hold viewers' attention more effectively than static text or images alone.
Interactive features, such as clickable links or embedded quizzes, can further increase engagement.
Versatility
Video presentations suit various purposes, including education, marketing, business pitches, and more.
They can be tailored to different audience needs and preferences, making them a flexible communication tool.
Improved accessibility
Videos can be easily shared and viewed across multiple devices and platforms, making them accessible to a wider audience.
They can be hosted on websites, shared via social media, or distributed through email, ensuring broad reach.
Retention and understanding
Combining visual and auditory information helps improve comprehension and retention of the presented content.
Using storytelling techniques and clear visuals can make complex information easier to understand.
Professionalism
Well-crafted video presentations can enhance your professional image, making your message appear more polished and credible.
High-quality visuals, animations, and voiceovers can elevate the production value.
1. Slideshow presentation video
We’re all familiar with making PowerPoint slides. A slideshow presentation video takes this to the next level. Instead of static backgrounds and tiny bullet points, a slideshow presentation video allows you to tell a story. It's a creative way to present information.
Start by arranging stock video backgrounds to create the foundation of your video and place smooth transitions between slides or topics. Share your key messages using animated texts, lower thirds and graphics which make your video memorable. You can stop here, or add a webcam recording or record an audio voiceover .
It’s a popular format for school projects, corporate intro videos, and even product launches, and the process can be simplified even further by using an online video presentation maker.
2. Video presentation with audio narration
Another effective video presentation format is when you create a screen recording of a website, process, workflow or PowerPoint presentation and add a voiceover to guide viewers. It’s comparatively low effort to a slideshow presentation video, but still ensures engagement from viewers. With new tools like lifelike text to speech generators , narrations can be created in global languages in just a few minutes.
Effortlessly record your screen online, trim away unnecessary frames and use graphics like arrows and circles to highlight key points. Next, type your ideal video voiceover and let AI create a flawless voiceover that explains your video well.
This is a great video solution if you’re trying to whip up a group presentation by collecting information from different team members as it can help you make a consistent and high-quality video. It’s also super useful if you’re hosting an online learning session, webinar or creating a demo video .
3. Video presentation with talking head
Wait, what’s a “talking head”? It simply refers to when a webcam recording is inserted into a presentation video to make it easy to follow. This may be bad news for the camera-shy presenters out there–adding your friendly face captures the attention of your audience while building interest and trust in your presentation.
The good news is that such videos are super easy to create. Simply record your webcam footage online and layer it on top of your slideshow presentation video . Finetune the size of your webcam video, overlay the video in a corner or place it side-by-side with your presentation visuals. Don’t forget to add captions to make your video stand out even when played on mute, like on social media feeds.
Sales, explainer videos, and even video resumes can benefit from the personal touch of a talking head presentation video.
4. Animated presentation video
Evoke emotions from your viewers when you create an animated presentation video. While there are whiteboard animation softwares out there, that’s not the only option in this format. If you think a cartoon character could educate your class, tell your business story or simplify a big idea, consider this video format. If you’re wondering how that would suit your budget (or lack of), explore free cartoon stock videos and turn up your creativity to make them suit your needs.
Remember that choosing the right background music, adding your brand logo and adjusting the aesthetics of your stock video (like adding a filter) can truly help your video look custom-made.
Identify your main audience: Choose your key audience, whether it’s potential or existing customers, colleagues, or others. Map their needs, interests, and pain points to help you create valuable content.
List your key messages: Identify the main points to convey in the video, and prioritize them based on how relevant they are to your viewers. Make sure they match your video’s goal and are crafted in a way that’s useful to your main audience.
Consider your video’s lifetime: Consider where you’ll host, post, or share your video, how long it will stay current and relevant, and whether it will need revisions.
Decide your branding needs: Don’t miss a good branding opportunity. Think about adding your logo , brand colors or other elements that link your presentation video closer to your brand.
Create a script or storyboard: Structure matters! Plan out the content and flow of your video in advance to help achieve its goals. A storyboard is a shot-by-shot outline of what main frames in your video will look like. If your video only needs a voiceover, write a script so your visuals match the audio narration .
Consider audio and video tools: If you aim for a professional look and feel, choose your toolkit wisely. Clipchamp is an easy online tool that can record your screen and webcam , generate voiceovers, and even has royalty-free stock and video elements to confidently edit video presentations.
Nothing says "we've got our act together" like using your company’s logos, colors, and fonts throughout your presentation videos to reinforce your brand recognition. Adding your branding shows attention to detail and commitment to quality, which makes a good impression on your viewers.
Incorporating strong calls-to-action (CTAs) with logos into presentation videos can encourage viewers to take the next step and boost your conversion rates. According to a study by Lucidpress, consistent branding can increase revenue by up to 23% . That's why Clipchamp makes it easy to customize videos to match your corporate identity using our brand kit feature , ensuring your presentation maintains a professional and cohesive look.
Use branded fonts and colors to make your slideshow videos and presentations easy to identify, no matter where they are shared.
A well-crafted voiceover script is key to delivering a clear and engaging presentation. Here are some tips to help you write an effective script for a presentation.
Keep your script conversational: write your script as if you’re speaking directly to the audience. Use simple language and avoid jargon to make your narration relatable and understandable. If you need help with writing, try these useful AI prompts to write video scripts .
Be concise: assume your viewers have short attention spans and keep your sentences short and to the point. Break down any complex information into bite-sized pieces.
Emphasize key points: repeat or summarize key points to highlight the most important information.
If you're recording your own voice, leverage the simplicity of the voice recorder feature in Clipchamp to produce voiceovers with ease. It's good to practice your delivery to sound more natural and confident during the actual recording.
Voice recordings not your thing? Try our AI voiceover generator instead .
Step 1. Create video slides or record your screen and webcam
To import your own presentation videos, photos, and audio, click on the import media button in the your media tab on the toolbar to browse your computer files, or connect your OneDrive.

You can also use free stock media like video clips, photos, video backgrounds, and GIFs. Click on the content library tab on the toolbar and click on the visuals drop down arrow, then videos, photos, or backgrounds. You can also use the search bar to search through the different stock categories.

If you would like to record your presentation, click on the record & create tab on the toolbar, then record using either screen and camera, camera, screen or audio options .

Drag and drop your media onto the timeline side-by-side to create a slideshow video.

Step 2. Edit your video presentation
To trim the length of your video , click on the video on the timeline so it’s highlighted green. Move the handles to the left of the timeline to trim the video length. If you trim too much footage off your video, just drag the handle back to the right to recover your footage.

To crop your assets , click on the video so it’s highlighted green on the timeline, then click on the crop button on the floating toolbar. Here, you can freely crop away unwanted areas of your video using the cropping handles. Click on the done button when you’re finished.

Step 3. Add transitions, animated text and stickers
Add transitions between clips by clicking on the transitions tab on the toolbar. Drag and drop a transition onto the timeline between two videos. Repeat this process for the rest of your videos added to the timeline.

Place text and titles on your video by clicking on the text tab on the toolbar. Drag and drop a title onto the timeline above your video. Use the text tab on the property panel to customize your title.

Overlay stickers onto your video by clicking on the content library tab on the toolbar. Next, click on the visuals drop down arrow, then select stickers, shapes & annotations, frames & borders, or overlays . Search through the categories then drag and drop an asset onto the timeline above your video.

Step 4. Preview and save your video presentation
Before saving your new video, make sure to preview using full-screen mode . When you’re ready to save, click on the export button and select a video resolution. For the best quality, we recommend saving all videos in 1080p. Paid subscribers can save in 4K video resolution.

Once your video presentation is complete, it's important to know how to export and share it effectively. Clipchamp offers multiple exporting formats such as MP4 and GIF.
We recommend saving video presentations in 1080p video resolution for high-quality playback wherever you choose to share it, including social media, website, and email. You can also explore different exporting options (like seamless OneDrive integration ) in Clipchamp to find the right balance between quality, convenience, and file size.
Get the most bang for your video presentation buck by repurposing it for different uses. Here are some ideas.
Presentation teaser
Create a short highlight video from your presentation to share with external customers or internal employees. This gives them a sneak peak of what to expect from attending the meeting or watching the video presentation.
Embed into email campaigns
Embed your video presentation into newsletters to provide additional value to your readers. Repurposing content in this way extends its reach and impact.
Video clips for websites
Trim and create video snippets that could support users searching for information on your website. This can also drive traffic back to your full presentation.
Adjust the colors or apply a filter to help your webcam videos look and feel consistent, especially if you are combining webcam footage from more than one speaker.
Share additional information to support your visuals, from locations, names of speakers, or key takeaways using animated lower thirds .
Highlight important sections in your screen recording using a colored shape like a hand drawn circle to give your presentation a polished look.
Choose presentation background music that complements your video goals and doesn’t overpower the video narration, if any.
Use an intro and outro slide to make a lasting impression. It can be as simple as a logo animation .
Add captions to your video to make it accessible and easy to view even when on mute.
Frequently asked questions
Can i turn my powerpoint into a video presentation.
Yes, you can save your PowerPoint presentation as an MP4 file directly or use the screen recorder in Clipchamp to record your screen instead. When you’re happy with the recording, you can edit it in the timeline.
How to end a video presentation?
It depends on your video’s goal. Corporate presentations usually end with a reminder of the brand name or animated logo, and some call-to-actions to learn more on the website or email the contact person.
Easily create captivating video presentations in Clipchamp and share your video with ease on social media or OneDrive.
Learn more ways to create videos trouble-free with our beginner-friendly video templates or get inspired with these great explainer video examples .
Start editing with Clipchamp for free or download the Clipchamp Windows app.
More from the Clipchamp blog

New! Noise suppression in Clipchamp

Inside the major update for Clipchamp on iOS

How to convert video from MOV to MP4
Start creating free videos with clipchamp.
How to Create & Record Video Presentations | Ultimate Guide

Knowing how to create and record video presentations is a vital skill. It can help you grow your business, engage viewers and expand your follower base.
You may be a member of a company wanting to share your vision, or a student making a presentation for class. Whatever your situation, knowing the steps for a successful video presentation is essential.
That’s why we’ve broken down every stage of creating a video presentation. By following the steps below, you can easily record like a pro. You’ll be able to impress your audience with a sleek, eye-catching video presentation. We’ve even covered different video presentation software and how to use it.
To get started, all you need to do is read on.
What is a video presentation?
Typically, a video presentation involves a series of slides accompanied by audio narration. The narrator talks the viewer through the on-screen information and adds further details. There can also be diagrams, photographs, and animations during the presentation. These help the audience engage with the video and reveal more information.
The message of a video presentation depends on the purpose of the presentation. The presentation may be for entertainment, training employees, educating, pitching to investors, or many other reasons.
Why should you use video presentations?
All kinds of people find that video presentations are ideal for achieving their goals. From startup companies pitching for investments to tutors teaching their students, the uses of video presentations are almost limitless.
Not only this, but video presentations are a great way to make content more memorable. Instead of simply giving a speech, using a visual aid helps your audience engage with and absorb information. In fact, one study found that a visual presentation increased long-term information retention by up to 50%.
You should use video presentations to convey information in an entertaining and engaging way. Imagine you’re in a meeting room for training. Instead of sitting and reading a handout or listening to your boss talk, a video presentation can better capture your attention.
Video presentations include both audio and video together in one streamlined presentation. This helps prevent boredom and get viewers invested in your message.
How to create video presentations successfully: A Step-by-step
Creating a sleek, informative, eye-catching video presentation might sound like a challenge. The reality is anyone can do it. All you need are the right tools and steps to follow. We’ve got you covered with this step-by-step guide, which takes you from an idea to the final product.
Following this plan, you can make your next video presentation one to remember.
Step 1: Plan your presentation
Every great project begins with an idea. Before you can go any further, you’ll need to decide what your presentation will be about. You might be teaching new clients about your company or creating a presentation about your worldwide travels.
Whatever the topic, break it down into its key components. Which sections do you want to cover? What order should they go in? Remember not to lose sight of your overall message when planning. Stay on-topic and focus on the goals you want to achieve, such as brand awareness.
Step 2: Create a slideshow
Creating a slideshow involves adding content to individual slides in a program such as PowerPoint. This content could include bullet points, photographs, video clips, animations, links, etc.
The most important thing is to get your slides in the correct order with the right amount of information per slide. It’s a good idea to follow the 5/5/5 rule when it comes to making slideshows. The 5/5/5 rule means the following:
- 5 words per line
- 5 lines of text per slide
- 5 slides in a row that follow these rules
Remember, you don’t need to include all the information on the slides. You will record yourself speaking while presenting, so you can go into much more detail and explain the slides. Instead, focus on writing the most important information on each slide. This includes words and phrases you want the audience to remember.
Step 3: Write a script
Now that your slideshow is ready, it’s time to think about what you will say. As you narrate your presentation, you can give further information about each slide as you narrate your presentation. You can also add personal accounts and recollections to make your speech more engaging. What you don’t want is a long stream of rambling speech with too many ums and ahs. This can make your audience lose interest.
Creating a script is a good way to keep yourself on track. You can write or type your script into a Word document. It’s helpful to mark the places in the script where you will move onto the next slide. Be sure to repeat important phrases and stick to your main message.
Step 4: Choose a recording platform
A recording platform is a place where you can capture audio or video footage. You can use this platform to record yourself and your slideshow as you give your presentation. This will preserve the presentation, ready for you to show others or share online.
Your recording platform may be the same one you created your slides on. For example, both PowerPoint and Google Slides have recording capabilities.
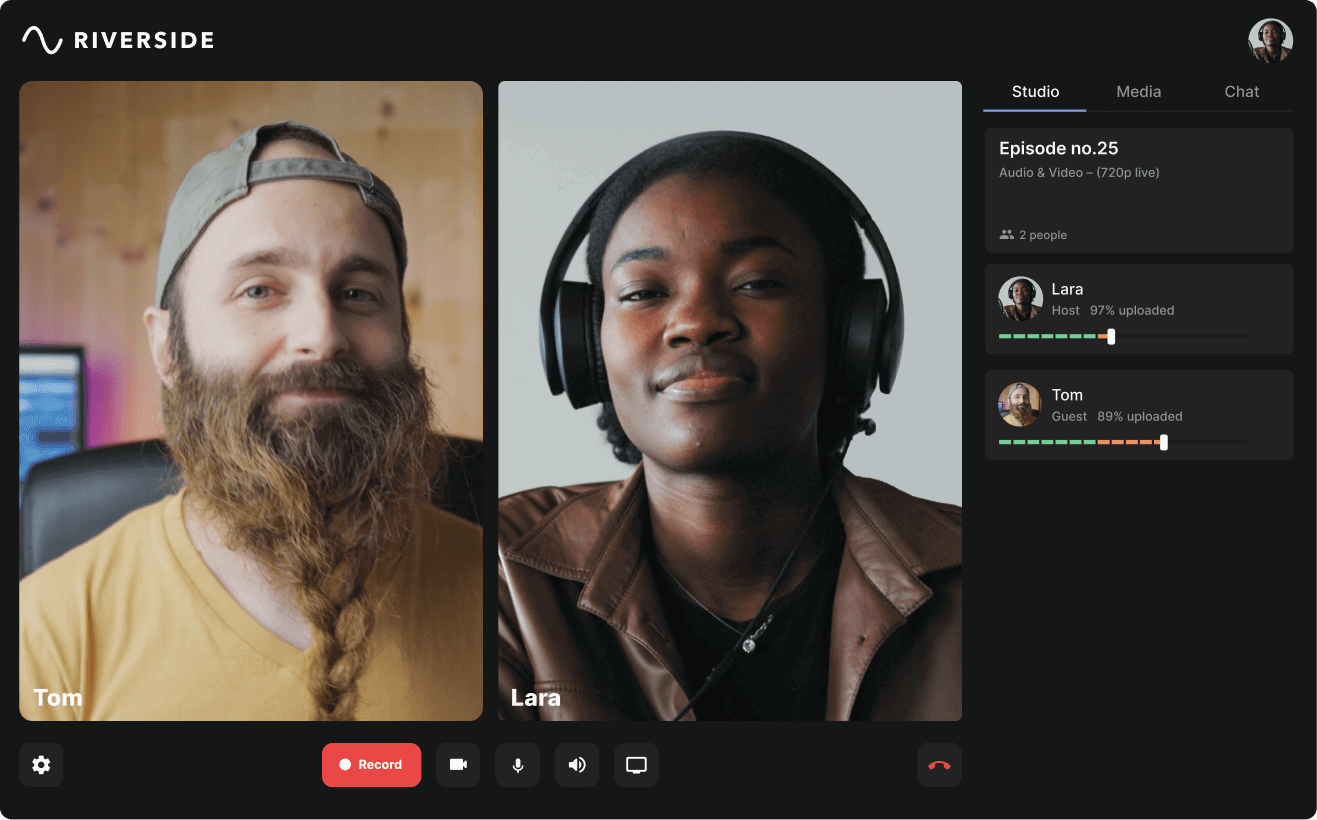
Another way to capture your content is to use a recording platform like Riverside. With the Presentation Recorder , you can record a video of yourself at the same time as recording your slideshow. You can also record a presentation with multiple people, as you can invite remote guests to join your recording. This is a handy tool for collaborative webinars or a co-led course.
Consider which of these options appeals most to you. If you do decide to use a recording platform, take a look at the choices available.
Step 5: Record your video presentation
How to record your presentation will depend on which platform you use. It may be as simple as clicking the Record button on PowerPoint. You might need to set up an account for other recording platforms first.
If you will record a video of yourself, ensure you are in an uncluttered space. Choose a place without a distracting background or lots of noise nearby. Dress in a way that reflects the tone of your video, like a suit and tie for a company training presentation.
Record your audio using a microphone. Consider investing in a high-quality mic to capture crisp and clear sound. Recording uncompressed WAV audio can help you achieve a higher-quality end result.
How to record video presentations: Video Presentation Software to Try
Video presentation software refers to platforms for creating and recording your presentations. This type of software is ideal for finding useful tools to create content easily and professionally.
Whichever software you choose, you can streamline your workflow and save precious time by knowing exactly how to use it. That’s why we’ve laid out step-by-step guides for creating video presentations with both PowerPoint and Riverside. You’ll find all the details below so you can get started.
Microsoft PowerPoint is one of the most popular programs for creating slideshow presentations. You can access PowerPoint as long as you have a Microsoft account. Within PowerPoint, there are tools for making a slideshow, including animation, design, and transition options. You can add text, images and videos to slides and format them in a variety of ways. There are also video and audio recording tools, perfect for capturing your video presentation.
How to record video presentations with PowerPoint
Step 1: Open PowerPoint and select ‘ New’ , then choose to create a ‘Blank Presentation ’ or select one of the templates for a premade design
Step 2: To start creating slides:
- Go to ‘Home’ > ’Slides’ and click on ‘ New Slides’ to choose the layout for each new slide you add.
- Add text to each slide by typing in the text boxes
- Add pictures and shapes by going to the Insert tab and choosing the picture source with the Insert Picture From tool
Step 3: Add speaker notes to your slide. These notes will only be visible to you during a presentation, and you can use them to record your presentation script.
- Click on any slide you want to add notes to.
- Select Notes in the bottom right-hand corner.
- Type out your notes in the window that pops up.
Step 4: When you finish creating your slideshow, select the ‘Record’ button in the upper right-hand corner. You will now see a recording button at the top of your screen and your presentation below it.
Step 5: Turn on your camera by clicking on the camera icon and make sure your microphone is on as well.
Step 6: Use PowerPoint’s default Teleprompter view to read your speaker notes while presenting your slideshow.
Step 7: Select Views in the bottom right-hand corner to change from a Presenter to a Slide View
Step 8: Press the red record button when you’re ready to begin your presentation
Step 9: To continue recording on your next slide, go to it. (Keep in mind Powerpoint stops recording audio during slide transitions, so finish all your transitions before speaking again.)
Select stop when you finish recording.
Step 10: Click the Play button to review your recording
Step 11: Press Export to download and share your video when you finish.
.webp "how to create a video presentation with audio")
Riverside is a high-quality remote recording platform with professional features for brands, businesses, and individuals. The platform Presentation Recorder , available with the Business Plan, streamlines your video presentation recordings. Manage and record your presentation from the same place while also being able to see other guests in the recording. You can even take some of the stress out of recording by assigning a guest to control your presentation remotely.
This online software uses local recording, so your video is recorded directly onto your computer and doesn’t rely on the internet to achieve a high quality. So, even if your internet connection dips, you’ll still be able to achieve impressive resolution on your video presentation. You’ll get an end result with higher quality than a screen share.
Riverside also offers top-quality 4K video recordings and up to 48kHz audio recordings You’ll receive separate audio, video and presentation tracks giving you more post-production control.
Key Features:
- Presentation recorder to easily upload a Powerpoint (PPT or PPTX), Keynote (KEY), or PDF file, ready for presenting in your recording studio
- Up to 4K video resolution with sharp, clear 48kHz WAV audio
- Remote guests capabilities where you can invite up to 7 other participants to join your presentation recording
- Separate, in-sync audio, video, and screen share tracks for all participants, ideal for postproduction
- Producer mod e so you can invite someone specifically as a producer to manage guests, adjust audio, screen share, and more during the recording
- AI Transcriptions with unmatched accuracy perfect for SEO content or creating subtitles with
- Text-based editing , making it quick and easy to edit your video by changing your Riverside-generated transcription
- Magic Clips creator so you can effortlessly repurpose one recording into multiple short form videos, all in one click
How to record video presentations in top-quality with Riverside
Step 1: Create and log into your account at Riverside.fm
Step 2: Click + Create new to make a new recording studio. Give your studio a name, select your recording type and transcription language. Then click Enter studio.
Step 3: You’ll now enter the lobby. Choose your equipment from the drop-down menu. Type in your name, select whether you’re using headphones, then click Join Studio.
Step 4: Invite remote guests to join your recording by copying the link in your Studio and sharing it with them
Step 5: In the studio, click on the Share button at the bottom of your screen, then select Presentation.
Upload your PowerPoint, Keynote, or PDF.
Step 6: When your file finishes uploading, click on it to present. All your guests and participants will see the slides in high-quality 16X9 format
Step 7: Navigate through your slideshow by hovering over slides with your mouse or clicking the left and right arrows on your keyboard.
Step 8: Give a guest control of your presentation at any point during your recording. Allow yourself to focus on the content while someone else controls the slides.
Simply click the plus icon at the top and select Give Control. Then choose which participant you want to put in charge of the slides.
Step 9: When you finish presenting, click on the + button on the top right of your slides, then select Stop Presenting.
Click on View recordings from your studio to find your separate video and presentation tracks ready to download in high quality. Just wait a few moments for the files to upload.
Step 10: Use Riverside’s Editor for text-based editing, clip creation, video trimming and more
Best practices for creating effective video presentations
Creating a stand-out video presentation is all about the methods you use. Following these best practices, you can create more professional, sleek, engaging content. If you’re unsure about making your first presentation or just want to pick up a few ideas on how to nail it, check out this list of tips.
- Practice. It can be nerve-wracking to give your first presentation. You can improve your confidence and speaking skills by practicing your presentation before the recording.
- Speak clearly without too many pauses and tangents. This will help your audience stay focussed on your presentation. It’s easier to stay on-topic by writing a script beforehand.
- Have a remote guest on-hand to help. Having someone working behind the scenes, monitoring audio levels or helping with guest management is very useful. With Riverside, you can easily invite someone to join in Producer mode, or assign a remote guest to control your slides for you.
- Don’t crowd your presentation slides. Follow the 5/5/5 rule to express information clearly in digestible portions.
- Give examples . This is a great way to explain your presentation's ideas and ensure the audience understands.
- Refer to your audience. Listeners like to know they are acknowledged, and it’s a great way to keep their attention levels up. You could ask the viewer to think about an aspect of their life or a rhetorical question.
- Use images and graphics. Visual content that isn’t text can be much more eye-catching. Some people are visual rather than auditory learners. This means they can learn more from Venn diagrams and graphs than simply listening to narration.
FAQS on Video Presentations
How do you make a video presentation entertaining?
There are a lot of things you can do to make an entertaining video presentation. On the visual side of things, try to vary your slideshow with different types of media. Break up text with images and videos. Add animations and transitions to give the sense that your presentation is moving along.
As the narrator, using a confident tone of voice can capture attention. Adding in jokes and questions from time to time is also a great way to surprise the viewer.
What should a video presentation have?
A good video presentation consists of a few key things. A slideshow, audio narration, video footage of the narrator and a message. You should tie the message to the aim of your video. It might be a message to spread brand awareness or inform people on a certain topic.
Oftentimes a video presentation needs a script too. This will keep things running smoothly, as the narrator will know exactly what to say. You can add contact information or further resources at the end of your presentation, so that viewers have a place to find out more.
What are the different types of video presentations?
There are many different types of video presentations. By getting creative, you can make a presentation on almost any topic. Some of the most popular types of presentation include:
- employee training
- investor pitching
- educational, and
- informational.
Presentations can also have different purposes. They can be made to persuade, spread awareness, or teach new skills to viewers. Knowing your purpose is essential for creating an effective video presentation.
Kendall Breitman
leads Riverside's community. She has over ten years of experience in television and video production for places like NBC and Bloomberg News. You’ll find Kendall on our webinar, where she shares her expert insights on content production, branding, and more.
Table of contents:
Try Riverside today
Record in studio quality without the studio. Transcribe, clip, and edit within seconds.

Keep reading
.webp)
Riverside resources
Screen recording software.
Capture screen recordings in full HD with constant frame rate MP4s for easy editing.

Video Capture Software
HD video capture software with powerful editing tools and automatic constant frame rate recordings.
Start creating with Riverside

Podcast guides
© 2023 RiversideFM, Inc.
3 Simple Ways to Record Audio on PowerPoint Presentations

Sara Wanasek

Enhance your PowerPoint presentations by incorporating music and adding your own narration or unique sound bites. This not only keeps your audience engaged but also complements your written content. Learning how to add and record audio in PowerPoint is a valuable skill, enabling you to create compelling presentations for professional, educational, and personal purposes.
Recording audio in PowerPoint offers significant advantages, especially when delivering remote or asynchronous presentations. You can:
- Record yourself giving the presentation and share the recording for viewers to access at their convenience, or
- Include audio clips to emphasize transitions, key points, or significant moments within your presentation.
Continue reading to discover how to record audio live in PowerPoint on Windows devices, add pre-recorded audio, and find useful tips for editing!
Step-by-step guide: How to Record Audio on PowerPoint
In PowerPoint, you have the capability to record two types of audio:
- Recording for exporting as a video: This method is ideal for narrating your presentation, making it perfect for sharing with others to watch at their own pace.
- Recording short audio clips: This method allows you to incorporate audio into your live presentation.
Let’s walk you through both methods of recording audio directly within PowerPoint:
Option 1: Record Narration for All Slides
Step 1: Open Your PowerPoint Presentation
Launch PowerPoint and open a new or existing PowerPoint file. If your are starting from scratch, make sure to complete the slides with design and interactive elements (make sure your presentation is engaging !) before adding your audio.
Step 2: Choose the Starting Position
- Go to the ‘SlideShow’ tab and click on the arrow next to ‘Record Slide Show.’
- Choose between ‘From Current Slide’ or ‘From Beginning’ based on your requirements.
- This will open the recorder window, where you can make necessary adjustments to the settings.

Step 3: Adjust Settings
You can select the microphone, view your notes, and toggle your camera on or off.

Step 4: Begin Recording
When you are ready, click the ‘Play’ button to begin recording. You will see a 3-second countdown, then the recording will start and you can begin speaking.

Use the side arrows for smooth navigation through your presentation while recording. Pause or stop the recording at any point. To review the recorded audio, click ‘ Replay .’ To delete any recordings, click the ‘x’ next to the speaker icon.
At the bottom left, you’ll find two timers: one for the entire presentation and one for the specific slide, helping you keep track of the recording length.

Step 5: Stop Recording
When done, click the ‘X’ in the top right-hand corner. Your audio recordings will be saved to each slide, indicated by the speaker icon at the bottom right corner of your slide.
Step 6: Share Recording
To share your recording, export the PowerPoint file as a video , selecting ‘Use Recorded Timings and Narrations.’ Then, easily share it via email or add it to a Learning Management System for convenient viewing.

Option 2: Record Audio for Specific Slides
Step 1: Navigate to the Desired Slide
Select the specific slide where you want to record audio. This could be for narration, background music, or sound effects, depending on your presentation’s needs.
Step 2: Insert Audio
To add audio, click the ‘Insert’ tab on your PowerPoint ribbon. Then in the Media section, select ‘Audio’ then ‘Record Audio’.

Step 3: Name Audio Sound
Name the sound uniquely for easy future retrieval.

- Click the red ‘Recording’ button to start.
- Use the green ‘Play’ button to review the audio.
- If it’s satisfactory, click ‘OK.’
- The speaker icon will be added to your slide, and you can reposition it as needed.
Step 5: Set Audio Playback Options
After adding audio to your slide, you can specify how and when you want it to play. Click on the Audio icon and select the ‘Playback’ tab in the PowerPoint ribbon.

In PowerPoint, utilize editing tools to refine your audio. Trim, adjust volume, and apply fade-in or fade-out effects for a professional touch. You can also set the start and stop points for the audio and save it for future use.
Step 6: Test Your Audio
Before your important presentation, test the audio to ensure it works smoothly. Play through your presentation to confirm that everything sounds and plays correctly.
Option 3: Adding Pre-Recorded Audio to PowerPoint
Already have the audio you want to use? No problem! Adding audio to your PowerPoint can be done in 4 simple steps:
Step 1: Navigate to the Slide
Select the slide where you want to addyour pre-recorded audio.
Click the ‘Insert’ tab and choose ‘Audio’ from the Media Section. Select ‘Audio on My PC’ and search for your pre-recorded audio to be uploaded.

Step 3: Configure Playback Options
Customize your playback settings to suit your needs, such as when the audio should start and how it should play.
Step 4: Test it out
Ensure that the audio plays well and syncs up with your slide transitions and animations for a seamless presentation.
Expert Tips for the Best Recording
Use these tips to get the best recording in PowerPoint:
- Choose the Right Microphone: Opt for a high-quality microphone for clear and professional audio. For frequent recordings, consider an external microphone.
- Minimize Ambient Noise: Record in a quiet space to reduce background noise. Close doors and windows, and use noise-canceling software if necessary.
- Prepare Your Narration: Outline your narration to ensure a structured delivery, preventing pauses or monotony. Avoid reading line by line.
- Practice Your Delivery: Practice your narration multiple times for improved flow and clarity. Utilize PowerPoint’s Speaker Coach for help with pace, tone, and filler words.
- Edit Minor Mistakes: Don’t worry about small errors during recording; you can edit them out later using PowerPoint’s editing tools.
- Enhance Accessibility: When recording the entire presentation, add closed captions or subtitles to make it accessible to a broader audience, including those with hearing impairments.
Bonus: Recording Interactive PowerPoint Presentations
Want to take your PowerPoint recordings to the next level? Include interactive elements in your PowerPoint recordings to engage your audience more effectively with ClassPoint.
ClassPoint is an interactive teaching tool that integrates directly into PowerPoint, Coffering live presentation engagement features such as interactive questions , gamification , and presentation tools !
When recording your presentation, use third-party recording software like Zoom, Teams, Loom, or Screencast-O-Matic, and incorporate ClassPoint features alongside your audio narration, like so:
1. Live Annotations
Use Pens , Highlighters , Shapes , and even Text Boxes to add notes and highlight the important information on your slides while recording.
2. Added Whiteboard Slides
Add variety to your presentation by annotating on a blank whiteboard slide of your choosing.
3. Laser Pen
ClassPoint’s laser can be used as a pen with disappearing ink and a spotlight when you press the ‘S’ key on your keyboard, allowing you to guide your audience’s attention more effectively.
4. Draggable Objects
Enhance audience understanding by moving objects on your slide as you explain , emphasize key concepts, and create visual associations.
5. Embedded Browser
If you need to search the web to emphasize a key point or show a video, simply open a browser within your presentation without interrupting your seamless presentation and recording.
6. Timer or Stopwatch
If you want your audience to reflect on a question or complete an activity independently, use the timer or stopwatch to create a brief pause before resuming your recording.
Final Thoughts
Whether you’re narrating a presentation for asynchronous viewing or incorporating audio into a live session, you’re now equipped with the knowledge of how to record audio on PowerPoint in the best way.
With added audio, you can engage your audience in a way that ensures your message resonates, no matter where or when they access your content.
Begin experimenting with these techniques, and see how recording audio on PowerPoint and leveraging ClassPoint can transform your PowerPoint presentations, both live and virtually.
Recommended Readings
3 Ways to Watch & Insert Videos in PowerPoint
How to Add Notes to PowerPoint Presentations: A Comprehensive Guide
About Sara Wanasek
Try classpoint for free.
All-in-one teaching and student engagement in PowerPoint.
Supercharge your PowerPoint. Start today.
800,000+ people like you use ClassPoint to boost student engagement in PowerPoint presentations.
From ideas to screen: How to make presentation videos that shine

What type of content do you primarily create?

Visuals can mean the difference between a killer presentation and a lost opportunity.
For salespeople, it’s difficult to close a deal without business presentations to back up your pitches. For marketers and business owners, video presentations help communicate ideas and share results from projects to ensure future success.
Customers also love high-quality visuals, like branded explainer videos and product tours. They’re the fuel that drives eight in 10 people to make online purchases.
But what makes a good presentation? And how can you engage viewers throughout your video? This guide covers what you need to know about creating video presentations, no matter the purpose.
What is a video presentation ?
A video presentation refers to a sequence of visuals combined with audio to convey information, arguments, ideas, or narratives. It can be about a product, service, internal business reports, or even a topic of interest.
Video presentations can range from simple slideshow-style videos with voiceovers to more complex productions involving animations, live-action footage, music, sound effects , and more.
A good video presentation provides information clearly and concisely. But the best video presentations engage your target audience with professional video quality: a good camera and mic, skilled editing, and a confident presenter.
There are a ton of different types of video presentation formats you can choose from, including:
- Animated explainer videos
- Employee onboarding videos
- Screen recordings
- Training videos
- Product demos
- Microsoft PowerPoint presentations with a talking head
- Sales presentations
- Awards presentations
Benefits of a video presentation
These are great reasons to put in the effort to produce this type of video content.
Enhanced engagement
Video recordings—whether on social media or hosted on your website—are great for engagement and getting your audience’s attention. Wyzowl found that 95% of marketers have said video marketing has helped them increase brand awareness, 90% say it has helped generate leads, and 87% said it has helped them increase sales.
Visual clarity
There's a reason many people suggest something like "If you can learn it, you'll find it on YouTube." The presentation video format is unique in its ability to teach and demonstrate, similar to the in-person experience you'd get with a tutor or salesperson.
The same Wyzowl report found that 96% of marketers say videos have helped increase user understanding of products and services. In short: video helps customers retain your information.
Global reach and accessibility
Video presentations are a great way to reach a global audience. More than half of people say they’re more likely to share a video with others than any other type of content.
A video presentation is also better for accessibility than other content types. With video editing software , you can:
- Easily add subtitles and annotations to your video footage for those with hearing loss.
- Add an audio description voiceover for those with sight loss.
- Change the color filters for those with color blindness.
Personal connection
Building a personal connection with your audience is critical for overall brand engagement. A video presentation, especially one with a person in the video, helps you do that. Research shows that students have positive feelings for videos presented by an instructor, for example.
How to create a video presentation
Step 1. plan and prepare.
Proper planning and preparation can help the rest of your presentation creation process run smoothly.
Think about what you’ll say, and use a storyboard to build out a visual plan of your presentation ideas. Storyboarding your presentation, instead of making it on the fly, will help you stay focused when you fire up your presentation software. (You don’t need to be an artist; just set out the scenes in a way that makes sense to you.)
At this point, start writing the video script for your presentation. You’ll know what to say and when to say it, and won’t fill your presentation up with filler words like “um” and pauses when trying to think about what to say next.
Step 2. Gather resources
After you’ve completed your paper storyboard and script, it’s time to go digital. With Descript, you can build your slideshows into the video editor just like any slideshow tool .
To create a presentation video in Descript:
- Hit New project .
- Import any media (images, infographics, short video clips, GIFs, or sounds) you want to include in your presentation.
- Drop your visuals into the script and edit them into a sequence, or work scene by scene by adding a / at the beginning of each slide.
- Add the background of your presentation, then your script in the left panel.
- Add captions to your presentation by hitting the T icon at the top and choosing Captions.
When you've set up all your slides, you can get fancier and add transitions, extra media, and special effects later.
But maybe you’d prefer to create the presentation using more familiar software, like Prezi, PowerPoint slides, or Google Slides. In that case, you can import the presentation into Descript later or use its screen recording functionality. (If you upgrade your Descript plan, you can create your own video presentation templates to use over and over again, if that’s your style.)
Step 3. Record your presentation video
With your slides all set up, it’s time to turn them into a video. This step is pretty straightforward if you’ve used Descript to make the presentation slides. All you’ll need to do is go to the beginning of the presentation and hit the Record button at the top of the screen:
If, like in the image example above, you’ve written your script into the scenes, change the default setting Record into script to Record new layer . This preserves your script so you can read from it whil recording your presentation video.
Decide if you want to record a voiceover only (leaving the record option as Audio only ), or add a floating head video with your webcam to show yourself as the speaker by clicking the Screen option. Either way, go through your script as the slides move along.
If you created your presentation in another software like Google Slides, there may be no built-in option to record your presentation over the slides. In that case, use Descript’s screen recorder to film your screen with audio. The video file will be ready and waiting for you in the video editor when you finish recording.
Step 4. Edit and enhance
At this point, you’ve got the basic presentation down. It’s time to bring out your inner filmmaker and turn the slideshow into something special.
With Descript’s free video editor, you can:
- Add title screens to introduce your presentation.
- Choose from a library of background music.
- Change the fonts of your captions and any other text layer.
- Add cool slide transitions.
- Improve audio quality with Studio Sound .
Descript’s video editing is different (and easy) since you can edit the video using the script instead of a traditional timeline editor. This makes the process super efficient since you can quickly identify what needs cutting. Simply delete the part of the script you don’t want, and the accompanying video will disappear.
Step 5. Review and fine-tune your video
What makes Descript extra special is the ability to edit your audio by taking out filler words you might have accidentally recorded. Remove “ums,” “uhs,” and awkward pauses in a single click with filler word removal .
If, like me, you also have a habit of forgetting to say something important, you can use Descript's Overdub feature to add those few missed words without re-recording the whole scene. The software will create an AI clone of your voice to fix audio mistakes.
With your video presentation fine-tuned, you’re ready to save and share it with the world. Click the Publish button in the top right corner and download the MP4 file, or export it directly to a platform like YouTube or Wistia.
6 key elements for crafting a great video presentation
Now you know the practical how-tos of making a presentation video, let’s look at some key elements that turn a good video presentation into a great one.
Clear and engaging content
Visual appeal, narration and voice quality, engagement techniques, structure and flow.
- Audience-centric approach
No one likes feeling confused. If your presentation isn’t clear, you’ll end up frustrating your audience. A nice trick for clarity is to imagine you’re explaining your presentation to a child; don’t use big words to sound smart. Presentations that are clear from the start are naturally more engaging.
Gone are the days of 360p Nokia footage. Even if you don’t have a professional camera setup, you can still record a video on a PC, phone, or webcam with high quality. But don’t forget about the images and text overlays. No one wants to try deciphering pixelated visuals—use the highest quality video resolution you can.
Even the best-quality video presentation can be ruined by bad audio. Poor-quality narration is hugely frustrating to viewers. Prioritize your audio quality, especially for information-rich videos like presentations, and use Studio Sound to remove distracting background noise from your presentation video.
When it comes to video presentations, you should think like a salesperson. You can't expect your audience to believe the information you give them if they don't trust you. Engage your audience by telling a personal story, describing relatable scenes, or emphasizing important points throughout your video.
Treat your presentation like a story with a beginning, middle, and end. Information should flow nicely from one point to the next. Do a test run through your slides before you start recording to ensure any questions don't crop up prematurely because the viewer thinks you haven't covered it (when you do a few slides later).
Learn: Narrative structure: How to compose the best story for your footage
Audience-centric approach
It's pretty much always to the audience's benefit when you make a presentation video, so you shouldn't focus too much on yourself. Address your audience's needs and go above and beyond to answer any questions they may have. Otherwise, why would they listen to you?
5 tips to help you craft remarkable video presentations
Now we know what makes a great presentation video, here are five bonus presentation tips to create yours.
1. Practice and rehearse
You won’t always get it right the first time, and that’s okay. But the more you practice before hitting record, the better your presentation video will be—and the less legwork you’ll need to do throughout the video editing process.
2. Invest in good equipment
Top-notch equipment makes your life easier throughout the video creation process. Replace your webcam with your iPhone to improve picture quality, and invest in editing tools that allow you to record and edit in the same dashboard.
3. Optimize lighting
Another area where you can improve the quality of your video is the lighting technique . If you have the budget, you can use a simple ring light, but if you don’t have the cash to invest in video equipment, use natural light (such as a window) behind your camera.
4. Engage with eye contact
If someone was talking to you and they weren’t looking at you, you’d probably be a little confused or uncomfortable, right? It’s the same with video. Look into the camera when making video presentations to simulate real eye contact with your audience. If you forget, use Descript’s Eye Contact AI effect to fix it.
5. Keep it concise
If you waffle on with unnecessary information or get sidetracked on a story, you’ll lose your audience’s attention, and they’ll click away or switch off. Stick to your video script and keep your presentation concise.
Elevate your video presentations with Descript
Creating an informative and engaging video presentation isn’t the easiest task in the world. You’ve got to know your audience and what they want, present the information confidently, and do it with visually appealing content.
With Descript, you can take your presentation video to the next level with an editing experience that allows you to:
- Record your screen on a Mac or Windows device
- Create and record slides (with voiceover) in one dashboard
- Remove filler words with a single click
- Use Studio Sound to remove background noise from your presentation
- Turn your presentation into a YouTube video, or download it as an MP4 file
Take a free tour of Descript and see why thousands of creators love its video editing platform.
How to make presentation videos FAQ
How do i make a presentation video for free.
- Choose a slideshow software like Descript
- Create your slides
- Add transitions
- Record your voiceover
- Edit your presentation
- Share your video
How do I video myself when presenting a PowerPoint?
Use PowerPoint’s built-in recording feature and choose the “Cameo” option to record yourself when presenting. Or, use Descript’s screen recording feature and have the presentation ready for editing when you finish recording.
How do I make an audio-video presentation?
If you don’t want to record yourself on video, use a screen recorder to film your presentation slides. Video presentation makers like Descript allow you to record a voiceover.
Related articles

Featured articles:
Articles you might find interesting
3 unique ways to grow an interview podcast
If you have an interview podcast and you’re looking to grow your audience, congratulations: you already have built-in growth potential. Here's how to take advantage of that potential.

Product Updates
What is Digital Marketing and How Does It Create Growth?
What is digital marketing, and how can you use it to create brand awareness? Here is a quick list of some tips and tricks.

For Business
How to compress a video for email: 4 easy ways + tips
It’s not easy to send a huge video file over email. Learn how to compress a video without losing quality so you can email it in a smaller attachment.

How They Made It
My Perfect Console’s Simon Parkin on how to make your interview podcast stand out
Simon Parkin didn't set out to make an indie podcast, but that's what he did. He shares how a sharp format helps his interview show stand out and how to stay creative with a day job.
%20(1).JPG)
How Imputations Work: The Research Behind Overdub
Anyone in audio or video production has experienced the frustration of reviewing tape and finding just the right sound bite for a story… if only the speaker hadn’t flubbed some words or forgotten to mention something crucial at the right time. Sometimes the only choice is to go through the effort of re-recording or leaving out the almost-perfect sound bite altogether.

50+ podcast topic ideas to inspire your own (2024)
Ideally, you already have a concept of what you want your new podcast to be about. But if you don’t, we’ve put together 50+ podcast topic ideas to inspire your own.

Join millions of creators who already have a head start.
Get free recording and editing tips, and resources delivered to your inbox.
Related articles:
Share this article
How to Create Pro-level PowerPoint Videos with Audio
Senior Marketing Manager at Loom

The power of a presentation lies in its ability to educate and inspire.
But why limit access to inspiring ideas because of the time slot in which they were presented? Microsoft PowerPoint, Google Slides, and Keynote slides have become the go-to formats for delivering supporting content to help audiences from classrooms to boardrooms engage with ideas. But once the content is complete, what happens to it?
Getting used to the sound of your own voice can take some time, but the benefits of using Loom to record PowerPoint presentations are worth it.
Depending on the content and intended audience, a few will be published, stored, or made available on a marketplace. However, many will be lost, all your hard work never to be seen again. PowerPoint slides that aren't accompanied by a presentation are incomplete and don't do a sufficient job of expressing the author's ideas.
If you want to get ahead of the curve and preserve the integrity of your hard work, learn how to record a presentation by recording your screen .
Loom is one of the most popular choices for recording a video presentation—and for a good reason. The user interface is straightforward and easy to use. Mastering it requires little effort.
The benefits of presenting a PowerPoint in video
There are several reasons someone would want to learn how to record a PowerPoint presentation. Whether they’re explaining the quarterly statistics in a sales meeting , creating a webinar as a marketing tool , or recording training sessions for onboarding new hires, communicating ideas clearly and succinctly via video becomes more crucial every day.
With Loom, you can engage directly with your audience, allowing you to interact with a large group of people in a small, intimate environment. Let's look at some advantages of knowing how to record slide show presentations and the procedure for doing so.
Scheduled attendance is not guaranteed
Unless your presentation is a mandatory work meeting or you're teaching a paid course, many individuals will drop out before or during the presentation. However, by providing a presentation recording for them, you can still interact with those people, and they’ll feel supported by your accessibility.
Provides on-demand access to your presentation
Using Loom's video recording capabilities, you provide access to your material long after you've presented it. Giving your audience access to resources is one of the best ways to build trust and support.
Enhances your search engine optimization (SEO)
If you don't want to make your recorded presentations available on-demand but want to reap the benefits of SEO-driven traffic, you may post all or part of it on YouTube as a free resource in the future to attract new prospects.
Practice makes perfect
Another reason to learn how to record a presentation is that you can review your work before showing it to a live audience. By recording yourself before a meeting or lecture, you can review the footage to ensure you cover every aspect of the topic, make improvements, and eliminate those pre-performance jitters.
Tips for video recording yourself presenting a PowerPoint
While technology and practice are your two best allies in confidently presenting PowerPoint video presentations, a few extra tips can make yours even more effective and professional. Consider following these best practices:
Choose the right equipment
Video communications technology has flourished in the last few years. There are more options than ever to record presentations and deliver them digitally to a worldwide audience. A tool like Loom makes it easy to record webcam videos, screen captures, and recorded narration quickly and easily. This lets you present your PowerPoint or any other content to a digital audience without extensive and time-consuming video editing.
Include direct-to-camera (DTC) content
Personalization is the heart of every good video—nothing builds a personalized experience like a friendly face. Use a simultaneous webcam and screen capture to record yourself explaining the slides and information on the screen. Adding picture-in-picture DTC elements creates rapport and trust with your audience and ensures they stay engaged with your presentation.
Slide text: Less is more
Text is great for outlining the major themes of a presentation and adding context to discussions, but with a PowerPoint presentation, treat text as the seasoning in a recipe. Use what you need to enhance the experience, but don’t overwhelm.
Build your slides as an outline for each discussion topic and a home for visual elements like charts, infographics, and embedded video clips. But you, as the presenter, should do most of the talking. Building your presentation this way keeps viewers focused and engaged instead of hurrying to keep up with the reading.
Structure your presentation
Well-structured content is vital to the flow and digestibility of your presentation. When building your slides and video script, organize your information similarly to a blog post or an ebook. Start with an introduction to share your personal info and a general topical overview. Create segments that logically lay out each point or step in the process. Wrap things up with a conclusion and (if needed) a call to action that invites the viewer to take the next step—booking a call, downloading a resource, or signing up for a service.
Keep videos concise and skimmable
Digital fatigue is real. With so many videos and messages competing for our attention, creating a streamlined presentation results in longer view duration . The average view duration of a YouTube video may be as short as 40 seconds, with the median watch time averaging just over a minute and a half .
Another trick to increase viewability is to make it easy for viewers to skim. A well-structured presentation offers natural segments to help viewers zero in on the information they need. YouTube offers a Chapters feature that lets you insert a linkable outline so viewers can easily skip to specific timestamps.
Basic recording in PowerPoint
Microsoft offers basic tools to start recording your PowerPoint presentation. Here’s a quick step-by-step guide to recording a simple presentation:
Step 1: From PowerPoint, open the slide with which you want to start your presentation.
Step 2: Select Record from the upper right hand corner of the PowerPoint window.
Step 3: Make sure your recording and voice settings are set properly, then click the round Record button. Begin your presentation.
Step 4: Click through your slide presentation and record your audio. Be sure to pause during slide transitions, as PowerPoint will not record audio during slide changes.
Step 5: Save your finished PowerPoint video to your local device and share it through email or upload it to sharing platforms like Vimeo, YouTube, etc.
An important note: PowerPoint’s native recording features offer some editing and highlight features. You’ll need a screen recorder app like Loom to film direct-to-camera or make substantial edits.
How to use Loom’s presentation recording software
It's simple to record yourself and your screen presentation side-by-side using only your laptop, a built-in camera, a mic, and Loom. Using Loom to record presentations on a computer is a fantastic way to save time and guarantee that your presentation goes precisely as planned. Loom's basic version is free to use and provides users with different options to meet their unique needs best. You may record the material on your screen and even take a video of yourself presenting alongside your screen capture.
Loom is available as a PC screen recorder , Mac screen recorder , iOS screen recorder , and Android screen recorder . The two primary methods are through the Desktop Client or the Chrome Screen Recorder . The desktop versions offer a higher recording resolution (4k compared to 1080p in the Chrome extension) and additional features like camera frames and backgrounds.
In either case, learning to record a presentation is simple with Loom’s easy-to-use presentation recorder. Here’s some information to help you get started.
You can create a Loom account using a variety of methods. Users may log in with their Google account information, or connect their Slack account information, email address, password, and name. You must first complete the registration process to have access to the program.
What is the Loom desktop client, and how can I use it?
Search for Loom in the Windows search box or click the red pinwheel Loom logo to launch the Loom Desktop Client. After you've opened it, choose the type of video recording you wish to make. Cam Only, Screen Only, and Screen + Cam are the three possibilities for the basic Loom version. As their names suggest, Cam Only and Screen Only allow you to record the material on your screen or yourself through a camera. Screen + Cam will enable you to make a presentation recording with both yourself and the information in real time, allowing others to watch your reactions to the material and connect with you as the presenter.
If you wish to record your screen, the presentation recorder has three options for defining the parameters of your video: Full Screen, Window, and Custom Size.
Full Screen captures everything on your monitor or display, allowing others to watch and follow along.
You may use the Window option to record a single computer application if you want to construct a more restricted lesson without interruptions.
Custom Size is exclusively available to Pro account holders, allowing users to build custom windows to capture particular areas of their screen.
To record your Loom videos, use the built-in webcam and microphone on your smartphone or computer or additional devices as needed. Loom recommends using high-quality microphones for better audio.
Using the Loom Google Chrome Extension to capture videos
First, download and install the Loom Google Chrome Extension from the Chrome Web Store. Then launch the extension's user interface by clicking on the red pinwheel Loom logo in the browser's top right corner. You can choose Cam Only, Screen Only, and Screen + Cam, the same as the desktop client. Unfortunately, users of the Google Chrome Extension can only record their entire screen or the contents of a single tab.
The Video Control menu differs from the desktop extension, appearing in the bottom left corner of the browser window. Users may only utilize three buttons: Start/End Recording, Pause Recording, and Delete Recording.
Using the Loom desktop client to record videos
Each option lets you use Loom's camera bubble , which allows you to see and record yourself as well as a video. There is no set limit on the duration of the video, but Loom will provide you alerts to ensure you don't keep recording by accident. Once you've decided on your selections, go to the four-button Video Control menu on the left side of your screen. To start your video, press the Recording button at the top of the menu. This button has two purposes: When the button is red, it indicates that you’re currently recording, and it stops the recording when clicked a second time.
The Pause button is located beneath the Recording button and is used to pause your video. However, depending on your computer, you may alternatively use Alt + Shift + P or Option + Shift + P . The Delete option is represented by a garbage can icon, which pauses the recording and completely deletes the video once you confirm your decision via a dialog box.
How to use the speaker notes feature
Loom makes presentations easier with speaker notes , an on-screen cue card feature visible only to you. Speaker notes are bullet points or full scripts written by you and activated during recording. These prompts allow you to deliver your message with confidence, without the need to remember your whole script or utilize physical note cards.
From the desktop app, open Loom and click Speaker Notes. Use the pop-up window to type in your notes, then resize the notes window to suit your needs before recording. Speaker notes are always presented on top, so there’s no need to switch windows during your presentation.
How AI-generated chapters work
Want your viewers to be able to skip to the most useful portion of a presentation? The AI-generated chapter feature allows viewers to select important topics within your presentation and navigate to them easily. These time-stamped chapters also allow users to link and respond to content.
How to use the drawing tool
Finally, the drawing tool , symbolized by a pen icon and available with the Pro subscription, can assist you in focusing on certain facts and numbers. Using this button, which includes picking a preset color, lets you make graphics that will draw your viewer's attention to key information.
Preserve your ideas with Loom’s Presentation Recorder
If you’re just starting out, learning to record a presentation with Loom is an excellent tool for creating quality content. As the world continues to move towards remote work environments, the ability to give an online presentation (and record it for posterity) becomes more essential every day.
Loom is free, so don’t wait to see how you can enhance your video presentation with video capture software.
Jan 8, 2024
Featured In:
Share this article:.
Jeong Lee works in Marketing at Loom.
Video Presentation Maker
Empower your people and drive results with professional-quality video presentations

319 reviews

Transform your ideas into powerful video presentations
With VEED’s online professional video editor, you can create powerful video presentations that can empower your team and drive results—whether that’s for your company’s quarterly review, a marketing pitch, or a product launch. Use our online screen and webcam recorder and upload your Google Slides. Edit your recording with our full range of video editing tools. You can add annotations, images, text, and animations to make your presentation even more engaging.
Recording from your home office? You can remove clutter and noise in your background with our one-click video background remover and background noise remover . You can also add background music and sound effects; just select from our library of royalty-free stock audio and video clips. When you’re done with your video and screen recording, you can also add subtitles automatically to make your video presentation accessible to all audiences. Our video background and noise remover are available to premium subscribers. Check our pricing page for more info.
How to create a video presentation:

Upload, record, or start with a template
Upload your video to VEED or record your screen and webcam with our online webcam recorder. You can also start with our video presentation templates.

Add annotations, text, animations, and more!
Use our full range of tools to add annotations, animated text, music, and more! You can also add your company logo and other branding assets (available in premium).

Email, share, or save as a template
You can email the VEED link of your video presentation so your team doesn’t have to download the file. Or export it at the quality and file size you prefer. You can also save your video as a template for easier business communication in the future.
Watch this walkthrough of our video presentation maker:

Maximize your slides’ impact with our presentation maker
Upload your Google Slides or PowerPoint presentation inside our webcam and screen recorder, and go through your slides while recording yourself. Select from different themes, backgrounds, and layouts. When you’re done, you can edit your video presentation to make it even more engaging for your audience. Split, cut, and rearrange your clips on the timeline. Add transition effects between clips to maximize their impact.

Annotate, add text, images, music, and more!
VEED lets you quickly add annotations to your presentation slides and animate them. Add drawings and text. You can animate these elements and even add music and sound effects from our stock library. Draw arrows, underline key points, and create speech bubbles to emphasize your message. Make sure that you get your message across using our full range of tools!

Save your videos as templates for business communication
Our professional video editing software lets you save your videos as templates, letting you quickly edit and repurpose your video for future business video communications. You can automatically add subtitles to your video presentations and translate them to make them accessible to people all over the world. This is great if you need to talk to your international team.

How do I make a video presentation?
Upload your video to VEED or use our webcam recorder. You can also upload your slides and present them while recording yourself. Edit your video, add all the elements you want, and share!
How can I make a free video presentation?
VEED is free to use for everyone. Some tools require a premium subscription, but even with a free account, you can use our screen and webcam recorder, upload your slides, and edit your video with our pro tools!
Which app is best for video presentations?
There are many video presentation software out there, but VEED stands out because of its smooth user interface and design. Our drag and drop functionality makes video creation quick and efficient. Plus, it’s packed with a full range of tools that you won’t find in other free video editors.
How do you make an interesting video presentation?
To ensure that you will get your audience’s interest, your presentation needs to be compelling. Don’t just share information, tell a story! You can also add music, visual elements like photos and text, use humor, and add graphics.
How do I make a video like a PowerPoint presentation?
VEED lets you edit your video to make it look like a presentation. You can split your video into clips and add transition effects in between. Animate elements like text, images, and subtitles. And much more!
How do I make a video on my laptop?
VEED works smoothly on laptops, desktops, and mobile phones. It is compatible with Windows, Mac, and Linux. And it works right from your browser!
Discover more
- Demo Creator
- Make Animated Presentation
- Tutorial Video Maker
- Webinar Video
Loved by creators.
Loved by the Fortune 500
VEED has been game-changing. It's allowed us to create gorgeous content for social promotion and ad units with ease.

Max Alter Director of Audience Development, NBCUniversal

I love using VEED. The subtitles are the most accurate I've seen on the market. It's helped take my content to the next level.

Laura Haleydt Brand Marketing Manager, Carlsberg Importers

I used Loom to record, Rev for captions, Google for storing and Youtube to get a share link. I can now do this all in one spot with VEED.

Cedric Gustavo Ravache Enterprise Account Executive, Cloud Software Group

VEED is my one-stop video editing shop! It's cut my editing time by around 60% , freeing me to focus on my online career coaching business.

Nadeem L Entrepreneur and Owner, TheCareerCEO.com

When it comes to amazing videos, all you need is VEED
Create a video presentation
No credit card required
More than a video presentation maker
If you have been looking for a video editor that can do it all, look no further! VEED is a professional, all-in-one video editing software that can take care of all your video editing needs—quickly and efficiently. You can resize your video for different video sharing and social media platforms, add text, images, music, and more. Whether you need to edit a video for business or personal use, VEED is the best tool you can use.

- Start the presentation and see your notes in Presenter view Article
- Add speaker notes to your slides Article
- Rehearse and time the delivery of a presentation Article
- Record a slide show with narration and slide timings Article
- Print your PowerPoint slides, handouts, or notes Article
- Create a self-running presentation Article

Record a slide show with narration and slide timings
You can record your PowerPoint presentation—or a single slide—and capture voice, ink gestures, and your video presence. When completed, it’s like any other presentation. You can play it for your audience in a Slide Show or you can save the presentation as a video file. So, instead of just “handing the deck” to someone, people can see your presentation with the passion and personality intact.
A new feature for Microsoft 365 was rolled out in early 2022. Exactly when your business has this feature is also based on when your admin distributes new features in Microsoft 365.
This article contains procedures for both the new experience and the classic experience:
New experience
Classic experience

All recording tools are in the Record tab in the ribbon, but you can start by selecting the Record button.

You can also record by selecting one of the options in the Record section of the Record tab.

If you have notes in your presentation, they’re turned into text at the top of the screen so you can use them like a teleprompter as you record.
Tip: Use the auto-scroll feature in teleprompter and set it to scroll at your preferred speed.

There are several options you can use when you record a presentation. You can turn your camera and microphone on or off by selecting the icons at the top. There are several options you can use when you record a presentation. You can turn your camera and microphone on or off by selecting the icons at the top. To change your camera or microphone, choose the Select more options <···> icon. You can even add a customizable camera that can be resized, repositioned, and formatted to go with your slide content. Select Edit , then select Cameo . Adjust the formatting for the camera, then select Record again to return to the recording environment.
In the Select the camera mode menu, you can select Show Background or Blur Background .

You can also change the layout in the Views menu to switch between Teleprompter , Presenter View , or Slide View .

When you’re ready, select Start recording and a countdown will begin.
Use the onscreen laser, colored pens, or highlighters in the tray below markup slides and it’ll record as well.
To record narration for a specific slide, use the previous or next arrows.
Note: Narration won’t record during slide transitions so let those play first before you start speaking.
Pause the recording as needed or select Stop if you’re done.
To review the video, select the Play button.
To quickly delete and re-record your video on current slide or on all slides, select Delete . While Clear will delete the recorded narration, Reset to Cameo additionally replaces the recorded narration with the camera feed for an easy retake.

When you’re done, select Export > Export Video .
After you successfully export the video, you can view the video by selecting View and share video .

At any time, you can return to your document by selecting the Edit button.
Want more?
About Record in PowerPoint
Create a self-running presentation
Export or turn your presentation into a video
Classic experience
Turn on the Recording tab of the ribbon: On the File tab of the ribbon, click Options . In the Options dialog box, click the Customize Ribbon tab on the left. Then, in the right-hand box that lists the available ribbon tabs, select the Recording check box. Click OK .

To get ready to record, select Record on either the Recording tab or the Slide Show tab of the ribbon.
Clicking the upper half of the button starts you on the current slide.
Clicking the lower half of the button gives you the option to start from the beginning or from the current slide.

(The Clear command deletes narrations or timings, so be careful when you use it. Clear is grayed out unless you have previously recorded some slides.)
The slide show opens in the Recording window (which looks similar to Presenter view), with buttons at the top left for starting, pausing, and stopping the recording. Click the round, red button (or press R on your keyboard) when you are ready to start the recording. A three-second countdown ensues, then the recording begins.

The current slide is shown in the main pane of the Recording window.
You can stop the recording any time by pressing Alt + S on your keyboard.
Navigation arrows on either side of the current slide allow you to move to the previous and next slides.
PowerPoint for Microsoft 365 automatically records the time you spend on each slide, including any Animate text or objects steps that occur, and the use of any triggers on each slide.
You can record audio or video narration as you run through your presentation. The buttons at the lower-right corner of the window allow you to toggle on or off the microphone, camera, and camera preview:

If you use the pen, highlighter, or eraser, PowerPoint records those actions for playback also.

If you re-record your narration (including audio and ink), PowerPoint erases your previously recorded narration (including audio and ink) before you start recording again on the same slide.
You can also re-record by going to Slide Show > Record .
You can pick a pointer tool (pen, eraser, or highlighter) from the array of tools just below the current slide. There are also color selection boxes for changing the color of the ink. ( Eraser is grayed out unless you have previously added ink to some slides.)
To end your recording, select the square Stop button (or press S on your keyboard).
When you finish recording your narration, a small picture appears in the lower-right corner of the recorded slides. The picture is an audio icon, or, if the web camera was on during the recording, a still image from the webcam.

The recorded slide show timing is automatically saved. (In Slide Sorter view, the timings are listed beneath each slide.)
In this process, what you record is embedded in each slide, and the recording can be played back in Slide Show. A video file is not created by this recording process. However, if you need one, you can save your presentation as a video with a few extra steps.
Preview the recorded slide show
On the Slide Show tab, click From Beginning or From Current Slide .
During playback, your animations, inking actions, audio and video will play in sync.

Preview the recorded sound
In the Recording window, the triangular Play button near the top left corner lets you preview the recording of the slide that currently has the focus in that window.

In Normal view, click the sound icon or picture in the lower-right corner of the slide, and then click Play . (When you preview individual audio in this way, you won't see recorded animation or inking.)

You can pause playback while previewing the audio.
Set the slide timings manually
PowerPoint for Microsoft 365 automatically records your slide timings when you add narrations, or you can manually set the slide timings to accompany your narrations.
In Normal view, click the slide that you want to set the timing for.
On the Transitions tab, in the Timing group, under Advance Slide , select the After check box, and then enter the number of seconds that you want the slide to appear on the screen. Repeat the process for each slide that you want to set the timing for.
If you want the next slide to appear either when you click the mouse or automatically after the number of seconds that you enter—whichever comes first—select both the On Mouse Click and the After check boxes.
You can use manual slide timings to the trim the end of a recorded slide segment. For example, if the end of a slide segment concludes with two seconds of unnecessary audio, simply set the timing for advancing to the next slide so that it happens before the unnecessary audio. That way you don't have to re-record the audio for that slide.
Delete timings or narration
The Clear command is for deleting timings or narration from your recording that you don't want or that you want to replace.
In the Recording window, the Clear command in the top margin of the window allows you to:
Clear recordings on the current slide
Clear recordings on all slides
In Normal view, there are four different Clear commands that allow you to:
Delete the timings on the currently selected slide
Delete the timings on all slides at once
Delete the narration on the currently selected slide
Delete the narration on all slides at once
If you do not want to delete all the timings or narration in your presentation, open a specific slide that has a timing or narration that you do want to delete.
On the Recording tab of the PowerPoint for Microsoft 365 ribbon, on the Record Slide Show button, click the down arrow, point to Clear , and then choose the appropriate Clear command for your situation.

Turn off timings or turn off narrations, and ink
After you've recorded your PowerPoint for Microsoft 365 presentation, any timings, gestures, and audio you performed are saved on the individual slides. But you can turn them all off if you want to view the slide show without them:
To turn off recorded slide timings: On the Slide Show tab, clear the Use Timings box.
To turn off recorded narrations and ink: On the Slide Show tab, clear the Play Narrations box.
Publish the recording to share it with others
Once you've edited the recording to your satisfaction, you can make it available to others by publishing to Microsoft Stream.
With the presentation open, on the Recording tab, select Publish to Stream .
Type a title and a description for the video.
Set other options, including whether you want others in your organization to have permission to see the video.
Select the Publish button.
The upload process can take several minutes, depending on the length of the video. A status bar at the bottom of the PowerPoint window tracks the progress, and PowerPoint shows a message when the upload is finished:

Click the message to go directly to the video playback page on Microsoft Stream.
Create closed captions
To make your video more accessible by including closed captions, choose from these options, which are described in separate Help articles:
Manually write a closed caption file yourself
Get a closed-caption file automatically generated by Microsoft Stream
Once you have a closed-caption file, you can add it to your video file by using PowerPoint .
Record a slide show
With your presentation open, on the Slide Show tab, click Record Slide Show .
(The Clear command deletes narrations or timings, so be careful when you use it. Clear is grayed out unless you have previously recorded some slides.)
In the Record Slide Show box, check or clear the boxes for your recording, and click Start Recording .

More about these options:
Slide and animation timings : PowerPoint automatically records the time you spend on each slide, including any animation steps that occur, and the use of any triggers on each slide.
Narrations, ink, and laser pointer: Record your voice as you run through your presentation. If you use the pen, highlighter, eraser, or laser pointer, PowerPoint records those for playback as well.
Important: Pen, highlighter, and eraser recording are available only if you have the February 16, 2015 update for PowerPoint 2013 or a later version of PowerPoint installed. In earlier versions of PowerPoint, pen and highlighter strokes are saved as ink annotation shapes.
At the top left corner of the window is the Recording toolbar, which you can use to:

If you re-record your narration (including audio, ink, and laser pointer), PowerPoint erases your previously recorded narration (including audio, ink, and laser pointer) when you start recording again on the same slide.
You can also re-record by going to Slide Show > Record Slide Show .
To use ink, eraser, or the laser pointer in your recording, right-click the slide, click Pointer options , and pick your tool:
Laser Pointer
Highlighter
Eraser (This option is grayed out unless you have previously added ink to some slides.)
To change the color of the ink, click Ink Color .
To end your recording, right-click the final slide, and click End Show .
Tip: When you finish recording your narration, a sound icon appears in the lower-right corner of each slide that has narration.
The recorded slide show timings are automatically saved. Timings are shown in Slide Sorter view just beneath each slide.
In this process, what you record is embedded in each slide, and the recording can be played back in Slide Show. A video file is not created by this recording process. However, if you want a video file, you can save your presentation as a video with a few extra steps.
On the Slide Show tab, click From Beginning or From Current Slide.
During playback, your animations, inking actions, laser pointer, audio and video play in sync.
Preview the recorded audio
In Normal view, click the sound icon in the lower-right corner of the slide, and then click Play.
PowerPoint automatically records your slide timings when you add narrations, or you can manually set the slide timings to accompany your narrations.
On the Transitions tab, in the Timing group, under Advance Slide , select the After check box, and then enter the number of seconds indicating how long the slide should appear on the screen. Repeat the process for each slide that you want to set the timing for.
Tip: If you want the next slide to appear either when you click the mouse or automatically after the number of seconds that you enter—whichever comes first—select both the On Mouse Click and the After check boxes.
The Clear command is for deleting timings or narration from your recording that you don't want or that you want to replace. There are four different Clear commands that allow you to:
On the Slide Show tab of the PowerPoint ribbon, on the Record Slide Show button, click the down arrow, point to Clear, and then choose the appropriate Clear command for your situation.
Turn off timings or turn off narrations, ink, and laser pointer
After you've recorded your PowerPoint presentation, any timings, gestures, and audio you performed are saved on the individual slides. But you can turn them all off if you want to view the slide show without them:
To turn off recorded narrations, ink, and the laser pointer: On the Slide Show tab, clear the Play Narrations box.
Turn your mouse into a laser pointer
Animate text or objects
Turn your presentation into a video
Create a self-running presentation
Record your presentation

Toggle video and audio options in the options dropdowns in the recording toolbar.

Note: Your video will be re-recorded just as you had styled.
After you exit Recording Studio with the Esc key (or by clicking End show ) you will see narration (audio/video) applied to your slide along with the proper slide timings and ink animations.
Tip: Audio, video, and inking elements can all be resized and moved in edit view after recording.

Reset to Cameo
To delete your recording and retain your camera style, do the following:
On the Record tab, select Reset to Cameo .

Clear timings or narration
On the Record tab, select Clear Recording

Keyboard shortcuts during the recording process
| Task | Keyboard Shortcut |
| Advance to the next slide or animation | N Click Spacebar Right Arrow Down Arrow Return Page Down |
| Return to the previous slide or animation | P Delete Left Arrow Up Arrow Page Up |
| Toggle screen blackout | B . (period) |
| Toggle screen whiteout | W , (comma) |
| End slide show | Esc Command+. (period) |
| Erase drawing on screen | E |
| Go to next slide if hidden | H |
| Change pointer to pen | Command+P |
| Change pointer to arrow | Command+A |
| Hide arrow on mouse move | CONTROL+H |
| Shortcut menu | CONTROL+click |
Related information
Present with Cameo
Save a presentation as a movie file or MP4
Record audio in PowerPoint for Mac
Add or delete audio in your presentation
Prepare to record
To begin, open the presentation you want and click the Slide Show tab.
Tip: If your presentation has a lot of slides, you might find it more convenient to work in Slide Sorter view. Click View > Slide Sorter to try it out.
Here are some things to check before you begin recording:
If you want to record only part of your slide deck, do one of the following before you begin:
Select the slides you don't want to include, and click Hide Slide .
Click Custom Show > Custom Slide Show > + (add).

Use the Rehearse button to change the timing between slides without affecting the narration or gestures you've already recorded.

Make sure your microphone is set up correctly. On the Mac, go to System Preferences > Sound .
Record your slide show
If you want to add narration or commentary to the slide show, make sure your microphone is set up and working.
To start recording:
Click the Slide Show tab, select the slide where you want the recording to begin, and then click Record Slide Show .

During recording, use Ctrl+click to access the recording commands that let you navigate through the slides, change cursors, or trigger screen blackouts or whiteouts.

Click End Show to stop recording.
A Save dialog box appears. Click Yes to save your recording, or No if you want to record it again.
Saving overwrites anything you've previously recorded. If you want to record another slide show with the same set of slides, save your presentation file with a different name.
Click Play from Start to preview your recording.
You may want to print this list of keyboard shortcuts to refer to while you're recording:
| Task | Keyboard Shortcut |
| Advance to the next slide or animation | N Click Spacebar Right Arrow Down Arrow Return Page Down |
| Return to the previous slide or animation: | P Delete Left Arrow Up Arrow Page Up |
| Go a specific slide | Slide number + Enter |
| Toggle screen blackout | B . (period) |
| Toggle screen whiteout | W , (comma) |
| Stop/Restart automatic show: | S |
| End slide show | Esc Command+. (period) |
| Erase drawing on screen | E |
| Go to next slide if hidden | H |
| Change pointer to pen | Command+P |
| Change pointer to arrow | Command+A |
| Hide arrow on mouse move | CONTROL+H |
| Shortcut menu | CONTROL+click |
| Advance on mouse click (rehearsing only) | M |
Set playback options
When you've finished recording and are ready to distribute the presentation, click Set up Slide Show and choose the options that are right for your audience.

Show type Show full screen or windowed.
Show options Turn off narration or animations.
Slides Choose a subset of slides, or a Custom show if you've set one up.
Advance slides Set up this version of the slide show so someone can page through it manually.
Add, change, or remove transitions between slides
Start the presentation and see your notes in Presenter view
We're sorry. PowerPoint for the web doesn't support recording a slide show.

Need more help?
Want more options.
Explore subscription benefits, browse training courses, learn how to secure your device, and more.

Microsoft 365 subscription benefits

Microsoft 365 training

Microsoft security

Accessibility center
Communities help you ask and answer questions, give feedback, and hear from experts with rich knowledge.

Ask the Microsoft Community

Microsoft Tech Community

Windows Insiders
Microsoft 365 Insiders
Was this information helpful?
Thank you for your feedback.
Slideshow Maker
Create a slideshow with music.
You don't need to install anything or read a long manual to understand how the tool works which greatly reduces the amount of spent time.
Works with Any Format
The Slideshow Video Maker is compatible with all the popular formats like JPEG, TIFF, PNG, MP4, AVI, DVD, GIF, MP3, and with more rare ones.
Completely Secure
We use premium encryption to ensure that no one except you can access your uploaded files.
Additional Features
You can crop the video and select duration for images. When you're done editing your new clip, you can select any output format you like.
Online Slideshow Maker
There is no need to download Clideo to your PC, Mac, or another device because it's completely online.
The tool is really intuitive and has simple interface, so you can edit your files without any help.
Make slideshow video online
Have a lot of memorable moments captured in photos and videos? Combine them together in your own slideshow to play it for friends and family on an important event. Don't forget to complete it with a great song!
You don't need any special editing skills because Clideo is super simple-to-use. Just select the desirable files!
How to use the picture slideshow maker
Explore further, get clideo video editor app for iphone.
Download the Clideo Video Editor App to your iPhone to create your own video and edit it in any way: combine video, images, text, and music in the multi-track timeline.
Open the Camera app or other QR code scanning app.
Point your camera steadily at the QR code to scan it.
Get redirected to the App Store, where you can download the Clideo Video Editor App.
Upgrade your account
Get unlimited storage time and create projects without watermarks.
How to Make a High-Quality Video Presentation

Featured In
Table of contents, how do you make a presentation video, how can i make a video presentation for free, how do i make a presentation with audio and video, can i video myself presenting a powerpoint, how do i make a presentation video in powerpoint, where can i find a how-to video on making a presentation, how do i record a presentation on my computer, what are the steps for making a presentation video, how do you record a video presentation, top 8 software or apps for making video presentations.
Presenting information through a video presentation is an engaging way to hold your audience’s attention. It combines audio, visuals, and text to convey...
Presenting information through a video presentation is an engaging way to hold your audience’s attention. It combines audio, visuals, and text to convey your message effectively. Let's delve into how to make a video presentation, customizing it with unique templates, incorporating transitions, adding voiceover , and more.
Creating a video presentation entails various steps. From creating a PowerPoint presentation to adding transitions and voiceovers, you must ensure every element blends together seamlessly to create a compelling visual content.
- Prepare Your Content : Start with a storyboard outlining the entire presentation's flow.
- Create Your Slideshow : Use PowerPoint or Google Slides to make your slides. Customize the fonts and infographics for a unique look.
- Add Transitions : Transitions add dynamism to your presentation. Be mindful not to overuse them, as it can distract your viewers.
- Record Audio : Record a voiceover narration for your presentation. Make sure the audio quality is clear and audible.
- Incorporate Video Clips : Add relevant video clips to your presentation. You can also video yourself presenting a PowerPoint to add a personal touch.
- Edit Your Video : Use video editing software to fine-tune your video, add background music, and synchronize your audio with your slides.
Several free online tools allow you to make a video presentation. Canva, Google Slides, and Microsoft Sway offer templates that you can customize for your presentation. They provide an array of options like adding your own video, subtitles, GIFs, and more.
Adding audio and video to your presentation can make it more interactive and engaging. To add audio, simply record a voiceover and import the audio file to your presentation. As for the video, you can import video footage or even YouTube videos directly into your slides.
Absolutely. You can use a webcam to record yourself giving a live presentation. Use screen recording software to capture both the PowerPoint slides and your webcam feed. Once recorded, use a video editor to blend your footage into the presentation.
PowerPoint allows you to convert your slideshow into a video. Simply go to the 'File' menu, select 'Export', and choose 'Create a Video'. You can also add voiceover and record timings for each slide.
Several online platforms provide tutorials on making video presentations. YouTube is a vast resource for video guides and tutorials on this topic.
Recording a presentation on your computer is easy with screen recording software. Software like OBS Studio, Screencast-O-Matic, and Camtasia can record your entire screen, specific windows, or regions.
One of the most comprehensive platforms for how-to videos is YouTube. Simply type in "How to make a video presentation" in the search bar, and you'll find numerous tutorials covering various aspects of making a presentation video.
LinkedIn Learning and Coursera also offer professional video courses on the topic, although these might require a subscription. Some software vendors also provide tutorials on their official websites or user communities.
- Plan Your Content : Outline your presentation's content, main points, and structure before you begin creating slides or recording video.
- Design Your Slides : Use software like PowerPoint or Google Slides to create a visually appealing slideshow. Incorporate key details, infographics, and graphics to make it engaging.
- Add Transitions and Animation Effects : Transitions between slides and animation effects can make your presentation more dynamic. Use them sparingly to maintain a professional feel.
- Record a Voiceover : Narrate your presentation to provide more information and guide your viewers through the slides.
- Incorporate Video : You can add video clips or screen recordings to your presentation to illustrate points or show practical examples.
- Edit and Finalize Your Video : Use video editing software to combine your slides, voiceover, and video clips into a single, cohesive video presentation. You can also add background music at this stage to enhance the mood of your presentation.
- Review and Adjust : Watch your video presentation multiple times to spot and correct any mistakes or awkward transitions. Adjust the timing of slides and voiceover as necessary.
- Export and Share : Once you're satisfied with your video presentation, export it as a video file and share it with your audience.
To record a video presentation, you can use screen recording software like OBS Studio, Camtasia, or Screencast-O-Matic. Here are the steps:
- Set up Your Software : Download and install your preferred screen recording software. Familiarize yourself with the controls and settings.
- Prepare Your Slides : Have your slides ready and open in presentation mode on your screen.
- Start Recording : Start your screen recording software and select the area of your screen where the presentation is displayed. If you want to record yourself presenting, ensure your webcam is enabled and properly positioned.
- Present Your Slides : Go through your slides as if you were presenting to an audience. Speak clearly for your voiceover, and ensure your presentation is paced appropriately.
- Stop Recording : Once you've finished presenting, stop the screen recording.
- Edit Your Recording : Import your recording into a video editor to trim any unnecessary parts at the beginning or end, adjust the audio, and add any additional effects or annotations.
Remember to save your work regularly, especially during the editing process, to avoid losing any progress. If you're new to video editing, there are numerous tutorials online that can help you get started.
- PowerPoint : A robust tool for creating presentations, offering a wide range of templates, animations, and transition effects.
- Canva : An online design tool that also serves as a video presentation maker with templates for social media, marketing videos, and more.
- Google Slides : A free tool to create slideshows, compatible with PowerPoint files.
- Prezi : A cloud-based presentation tool offering dynamic, zoomable canvas making it perfect for explainer videos.
- Adobe Spark : Offers high-quality video creation with a focus on professional design.
- Vyond : Great for creating animated video presentations with built-in templates.
- Biteable : Easy-to-use video editor for creating marketing videos, animated videos, infographics, and more.
- Animaker : A free online animated video maker, offering a range of characters, animations, properties, BGs, and more.
When making video presentations, always keep in mind your audience’s attention and retention. Crafting a powerful intro and outro, utilizing fullscreen playback, and ensuring your video file is in a widely compatible format like .mov or .mp4 will make your presentations stand out.
Creating a professional video presentation is more than just compiling PowerPoint slides. It's about telling a story, captivating your audience, and conveying your message in an engaging and memorable way
Best Android PDF Reader: Reviewed and Ranked!
Read Aloud: Transforming the Way We Experience Text

Cliff Weitzman
Cliff Weitzman is a dyslexia advocate and the CEO and founder of Speechify, the #1 text-to-speech app in the world, totaling over 100,000 5-star reviews and ranking first place in the App Store for the News & Magazines category. In 2017, Weitzman was named to the Forbes 30 under 30 list for his work making the internet more accessible to people with learning disabilities. Cliff Weitzman has been featured in EdSurge, Inc., PC Mag, Entrepreneur, Mashable, among other leading outlets.
How to Record a Presentation with Webcam, Narration, and More

Justin Simon

Table of contents
- Benefits of Recording a Presentation
How to record your presentation (with Snagit)
How to record a presentation from powerpoint with audio and webcam, how to turn your powerpoint presentation slides into a video.
- How to edit a presentation video (in Camtasia)
Recording a PowerPoint Presentation, the FAQs
Subscribe to techsmith’s newsletter.
Everyone has, at some point, put a load of time and effort into creating the perfect PowerPoint presentation, only to use it once or twice. But isn’t it a shame for all that hard work to be discarded so quickly? Is every slide deck destined for deletion after just a couple of uses?
Isn’t there a better way to make the most out of your presentations? Well, yes. Yes, there is.
Rather than simply creating and presenting your work once or twice, recording your presentations can give them a new lease of life. Whether it’s a data report or a self-recorded PowerPoint, you can record a presentation in real-time, or in advance to make it available on-demand.
In this guide, we’ll explore two distinct ways of recording your presentation. First, we’ll discuss how to record a presentation from PowerPoint with audio and webcam, and then we’ll look at how to turn your .ppt slides into a video.
Benefits of Recording a Presentation
As well as there being many different ways to record a presentation, there are also many benefits of recording them. So, before we show you the ‘how,’ let’s talk about the ‘why.’
- Encouraging asynchronous communication : One key benefit is fostering asynchronous communication . By recording presentations, you’re letting your audience engage with the content in their own time, breaking the constraints of time zones and scheduling conflicts. This also ensures your viewers can absorb information at their own pace, and revisit it as needed.
- Boosting SEO : You can use your presentation to create a YouTube video and share it on your website to increase your online visibility and attract prospective customers. This can be a great way to expand your audience, increase web traffic, and establish yourself as an expert in your field.
- Perfecting your presentation : Whether it’s in-person or over Zoom, you don’t get second chances with live presentations. However, a pre-recorded keynote lets you perfect the content and the narration before anyone sees it. This is a great way to combat stage fright while honing your presentation skills and building confidence.
With this in mind, turning your slides into a video is a no-brainer. It’s an easy way to grow your audience and make the information you’re sharing more accessible and easier to digest.
Video messages > meetings
Record your screen and camera with Snagit for quick updates and feedback.

Depending on your audience and the type of presentation you need to deliver, TechSmith’s Snagit could just be the perfect tool for recording your PowerPoint. With its user-friendly interface and advanced features, Snagit is ideal for capturing top-notch presentation videos, in just a few clicks.
Now, there’s no denying that presentations are better when you can see the presenter… Fortunately, Snagit lets you capture your screen and webcam at the same time to create a Picture-in-Picture video.
In this section, we’ll guide you through the steps to record your presentation and webcam with Snagit.
Step 1: Open video capture
First, open Snagit and navigate to the Capture window. Select the Video tab, and start by clicking the big red Capture button.
Step 2: Select a recording area
Next, you’ll be prompted to choose which parts of your screen you want to record. Use Snagit’s orange crosshairs to select a specific region, window, or your entire screen.
Step 3: Configure recording settings
With the Video Recording toolbar, you can set options like Cursor Capture and Effects, System Audio, and Webcam.
If your webcam isn’t showing, click on the webcam icon. If you have an external webcam, select the one you want to use by clicking the dropdown arrow next to the webcam icon.
Step 4: Adjust your webcam
Next, adjust your webcam options to ensure your Picture-in-Picture recording looks how you want it. Here you can change the Picture-in-Picture placement as well as the shape and size of your webcam recording. You can even toggle between Picture-in-Picture and fullscreen webcam modes as you like.
The best part? You can make these adjustments even while recording.
Step 5: Manage recording
When you’re ready to roll, hit the Record button and click the Stop button when you’re finished. It’s that simple!
And remember, if there’s an interruption (like an unexpected visit from the mailman), just hit Pause. It’s okay to take a break — your video won’t be ruined by a little interruption.
Step 6: Edit your video
Once you’ve finished recording, Snagit will automatically open your video in the Snagit Editor, which is super easy to use. From here, you can make light edits to the footage as needed.
For example, if you need to cut or trim your footage , you can! Here’s how:
- Set Start Point : Drag the Start handle (green) on the timeline to your desired starting point.
- Set End Point : Similarly, drag the End handle (red) to where you want to end the cut.
- Review the Segment : Before making any cuts, you can review the segment by dragging the Playhead (white) left and right across the timeline. This ensures you’re only cutting the footage you intend to.
- Make the Cut : Once you’re satisfied with the selection, click the Cut button, which will pop up once you’ve made a selection.
And that’s all there is to it! If you want to go the extra mile, you can also use Snagit to save individual frames of your video as images , which can be used to create a thumbnail for your video .
Record your screen with Snagit
Snagit makes it easy to share quick updates and how-to’s by capturing exactly what’s happening on your screen.

Now, Snagit is great for recording less formal videos in a flash, but if your presentation is intended for a particularly large or important audience, you might be looking to create something more polished. This is where TechSmith’s Camtasia comes in.
Camtasia is one of the smartest and most intuitive pieces of editing software out there, but it also makes for a pretty nifty screen recorder too. Camtasia is great for recording presentations when you need more control and editing powers over the final product.
But best of all, Camtasia streamlines the process by letting you record your presentation and voice over directly within PowerPoint.
Step 1: Set up your presentation video recording
If you’re a Windows user, you’ll have the option to include a PowerPoint Add-in Toolbar when you install Camtasia. While this feature isn’t currently available on MacOS, the Camtasia Add-in Toolbar allows you to start, stop, and control your recordings from within PowerPoint — so you don’t need to switch between applications.

Just open the presentation you want to record and locate the Add-in toolbar under the Add-ins tab.
Don’t see the add-in toolbar? Go to File > Options > Add-ins, to enable it. Click on the Manage drop-down, select Disabled Items, then click Go. If the Camtasia Add-in is listed, select it, and click Enable.
If you’re an Apple user, don’t panic! You can still record your screen (with audio) on a Mac using Camtasia, and it’s just as easy. Alternatively, you can skip ahead to the next section and import your slides directly into Camtasia.
Step 2: Customize your recording options
Now let’s walk through each of the options on the toolbar before we begin recording.

Record audio
The microphone button controls whether or not audio is recorded as part of your presentation. When you enable it, you’ll be able to record your narration using a microphone.
If you are planning to record audio, this is where you’ll select your microphone. If you want to record great audio , we suggest using an external microphone, rather than the one that’s built into your laptop.
Some of the best microphones for recording video are likely to be less expensive than you think. But, if you’re on a shoestring budget, even the mic that’s built into your headphones could produce better audio than your laptop.
Once you’re set up, be sure to test the mic and adjust the volume slider as needed. You’ll also need to decide whether or not to record your system audio, which is any sound that comes out of your speakers, such as email notifications.
Record webcam
If you have a webcam, you can also record your camera during the presentation to create a Picture-in-Picture clip — just as you can with Snagit!

To customize even more of the recording settings, click the Recording Options button. Here you’ll find settings that let you record with a watermark and adjust your video frame rate . There are a few more options too, but the default settings should work just fine.
When you’re ready, click OK to close this window and save any changes made.
Step 3: Record your presentation
The final step is as simple as clicking the Record button in the toolbar. This will launch your slides into the Presentation Mode and start recording.
When you exit Presentation Mode or reach the end of your slideshow, you can either continue recording your screen, or stop recording and save your file. Pretty easy right?
Before you get started, let us show you another way to turn your presentation into a video, without recording your desktop .
Another way to create a video from your presentation is to import your PowerPoint slides into Camtasia. This way you can adjust how long each slide appears on screen, as well as add Behaviors and Annotations to personalize your presentation and highlight important information.
By importing your slides into Camtasia, and recording your voice over separately, you get a lot more flexibility with the editing process, which means you have more control over the finished article.
If you do decide to record your audio separately, you might want to take a look at TechSmith’s Audiate . This advanced audio recorder will transcribe your voice over in real-time and let you edit the audio file as if it were a text-based document. We don’t want to brag, but it’s probably the best way to add a voice over to a PowerPoint .
Regardless of how you decide to narrate your PowerPoint, here’s how to turn your presentation into a video:
1. Import your PowerPoint slides
First, start by importing your PowerPoint slides directly into Camtasia. Once your media is imported, you can edit it by dragging your slides into the Editing Toolbar.

You can now add the images to the Timeline, and edit them like any other media in a Project.

If you drag your slides to the Timeline, the slides will be placed in the order of the presentation, each with a default 5-second duration.

With your presentation on the timeline, use Ripple Move to create space in between slides to adjust the timing of each one. To do this, hold shift, then click and drag.

Once you’ve imported your slides and adjusted the duration of each one to correlate with your voice over, it’s time to start editing.
How to edit a presentation video (in Camtasia)
Add behaviors.
Firstly, add some visual interest with Camtasia Behaviors . A Behavior is an animation that brings movement to your slides, making them stand out on screen. This is a great way to bring parts of your presentation to life and take it from ordinary to extraordinary — because nobody likes a boring presentation .
To add a Behavior, click and drag the Behavior you wish to use onto the slide you want to animate. Once added, you can adjust the Behavior using the Properties tab.
Add annotations
Another good way to grab and direct your audience’s attention is to add some Annotations, which are great for highlighting important information.
To insert an Annotation, click the Annotation tab on the left side of the screen and drag it into the designated slide. You can then re-position and edit the Annotation in the Properties tab as needed.
Absolutely! Both Snagit and Camtasia are excellent choices for recording a professional and polished presentation. Snagit is perfect for no-fuss recording and editing. If you require more sophisticated editing capabilities, Camtasia is the ideal choice, offering the added convenience of recording your slideshow and voice over directly within PowerPoint.
Click the Record button in the toolbar to launch your slides into the Presentation Mode and start recording. When you exit Presentation Mode or reach the end of your slideshow, you can either continue recording your screen or stop and save your file.
If you’re planning to record audio, select your microphone in the recording options. The microphone button controls whether or not audio is recorded as part of your presentation. If you have a webcam attached to your computer, you can also record your camera to create a Picture-in-Picture clip, perfect for showing the presenter during the presentation.
With Snagit, you can conveniently record your voice over as you go through your presentation, capturing both the audio and visuals in one go. If you’re looking for more advanced recording and editing options, you might also consider using Camtasia, which allows you to record your voice over while presenting. For even more control, use Audiate to record your audio separately and then import it into Camtasia for fine-tuning.
Additional Resources
Camtasia vs. clipchamp: which screen recorder is best, how to screen record on iphone: the ultimate guide, how to make money on youtube: 7 effective strategies.
Ready to get started?
- Inspiration
17 fun presentation ideas (with video!) to wow your audience
 to wow your audience")
- 30 Mar 2023
So you want to be the next Steve Jobs. Or Martin Luther King. Or any other dazzling orator you look up to. But you need a little something to add to your presentation ideas – you don’t want to bore people to death with Powerpoint.
Whether you’re creating a sales presentation, an event presentation, or just showing your travel video to Uncle Ron, we’ve compiled some of the best ways to get your audience seriously hyped up about your message.
Biteable offers online video presentation software, so we know a thing or two about making engaging presentation videos. In this guide, we share some of our favorite video presentation inspiration and show you some of the different types of presentations you might consider.
When you’re ready to make your own video presentation, head over to Biteable for hundreds of brandable templates, video scenes, and workplace-ready animations. With Biteable, making a video presentation is as easy as making a PowerPoint – only a whole lot more fun.
Create videos that drive action
Activate your audience with impactful, on-brand videos. Create them simply and collaboratively with Biteable.
Types of video presentations
If you’re looking to win over your audience with a presentation, videos are the best way to do it. According to Insivia, viewers retain 95% of a message when they see it in a video, but only 10% if they have to read on-screen text.
When you’re making your presentation, you could either make your video the whole presentation, or just a part of the whole. Did you know, for example, that you can embed a video in a Powerpoint document? Either is possible with our video templates and it can be interesting to mix things up once in a while.
There are four main types of presentations:
- Informative
- Demonstrative
- Inspirational
Picking the right one will ensure you’re onto a winner with your video presentation. For example, if you’re onboarding some new employees, you might choose a video template that’s an informative presentation like this one:
Or, if you want to show off how something works, a demonstration presentation might be what you want to create:
A persuasive presentation would involve creating a video more like this charity infographic example:
And if you want something a little more inspirational, try something like this positive quote video template.
But that’s not all, folks! If you’d like to check out more awesome Biteable video templates, visit our templates page here .
Creative (and fun!) video presentation ideas
You’ve now picked the type of presentation you need. But how do you get creative with your video?
First of all, it’s important your video is top-notch. Without high-quality graphics and production value, your message may fall by the wayside. Choose online video presentation software that’s easy to use and makes great-looking videos. That’s where Biteable comes in.
Whatever the topic of your presentation, your video format and design need to match the overall tone and message.
Delivering a corporate presentation on climate change? A fast-paced, wildly colorful template with upbeat music is going to feel a little off-message.
To identify how to design your presentation, think about the feelings you want to evoke in your audience. Want them to be crying with laughter? Moved to tears? Motivated into taking action? Pinpointing the emotions behind your presentation will help you choose the right template and make the best video possible.
17 great video presentation ideas
Now you’ve nailed down the type of video presentation you want to make, it’s time to master the finer details. Here’s just some of the ways you can make your message sing.
1. Start with a bold statement
A bold statement can capture your audience’s attention right from the get-go. Your statement should offer something slightly unusual and maybe even a little controversial. Something to make people sit up and take notice.
2. Tell a story
One of the best ways to get your audience’s attention is to tell a story – it’ll hit them right in the feels.
A personal, human story works because it the audience can relate to it on a personal level. Think about some stand-out examples of human stories that relate to your business or idea, and tell that story so people will connect with the central character. The bigger the emotion the better: love, longing, overcoming obstacles, things we’ve all had to deal with at some point in our lives.
Think about the ‘story arc’ – how will you frame your message so the audience immediately empathizes?
If you’re selling trainers, perhaps you’ll talk about someone who’s training for a marathon. If you’re lobbying for women’s rights, perhaps you’ll tell a story of when a passing comment affected you deeply. Maybe you should think back to the decision that started your business, and start your presentation with that.
Here’s a great example of storytelling from one of the world’s top brands:
3. Use music
Music has great power to support and enhance the emotion in a video presentation, and has been proven to sustain an audience’s attention and aid in information retention. Music is used in movies to suggest an emotional state to the viewer, so why not in a video presentation?
Modern, up-tempo music will snap people to attention at the right moment, while slow, minor-key sounds relax the brain, which is useful for reviewing content so it can slip more easily into long-term memory.
It can be a struggle to find good quality royalty free music , but here at Biteable we have a selection of great royalty free tracks (or you can upload your own if you’re that way inclined).
Music is one of the most critical (and often overlooked) aspects of any presentation. Here’s a good example of a Biteable template where the music does a great job of supporting the message.
4. Visual metaphor
Research has shown that combining pictures and text is one of the best ways to help people engage with and retain information. There’s something about how our brain works that makes text by itself far less memorable, so if you can combine something visual with your message, you’ll keep people’s attention longer and they’ll remember more of your presentation.
Talking to a group of people about taking action on something that scares them? A picture of someone diving or bungee jumping could work. Telling your boss how important that company retreat is next year? Show them an image of happy, relaxed people with their toes in the sand.
It doesn’t have to be obvious and clichéd, either. Closed doors, wide open roads, and lighting a candle all have subconscious messages that you don’t really need to explain. (Whatever you do, just don’t use the ultimate cliche: the overused ‘water ripple’ .)
5. Use questions
Questions can be a great way to open a presentation, because they encourage the audience to think for themselves. It opens them up to a realm of critical thinking, which is perfect when you’re gonna sock it to them with your impactful message.
‘Did you know 15 billion trees are cut down each year?’
‘Have you ever considered what life would be like if you didn’t have to save money?’
The art of asking questions in a presentation means you can incorporate them into your video as a great lead-in. Combined with some appropriate music, it can really get your audience thinking about the issue, and then you’ll go on to explain exactly what your solution is.
Having a laugh can really do a lot to win over an audience. There’s no need to be too serious, and even if you’re dealing with a heavy topic, lightening the mood can work wonders.
Whether you’re looking to create a funny sales video, an event presentation, or a presentation for an interview — one thing’s for sure, you can’t go wrong by including humor.
7. Repetition
Simple. Effective. Powerful.
Repetition can be used in several ways: by offering several one-word sentences in a row (the repetition is in the rhythm), or by repeating a word or a key phrase several time throughout your presentation.
In his famous Stanford speech in 2005, for example, Steve Jobs concluded by saying “Stay hungry. Stay foolish.”
Repetition is powerful. It drives home your key message and strengthens your position.
8. Motion Graphics
Motion graphics are basically animation with text as a major component, and is a staple of what we do at Biteable.
When you use moving graphics in a presentation, it instantly captures attention. If your audience is just taking their seats, or are halfway through hearing your story, there’s no doubt they’ll sit up and take notice if you introduce some cool motion graphics, like this Meeting Tips example.
Although they can sometimes feel clichéd, quotes are a great way to impart a message in a presentation. Want your audience to understand something complex? A quote from Einstein should do it. Or would you like to say something meaningful and poetic? A couple of lines of Shakespeare should convey some wisdom.
10. Audio narration
Narration can give a different mood to your presentation, especially if the voice is powerful and the words are heartfelt. Use it to change the tone or pace of your presentation and it will certainly keep your audience hooked if there’s a danger of them losing interest.
11. Go bright with color
Color can have a huge effect on how your video comes across. Don’t be afraid to experiment. The contrasts of black and white can be extremely effective, but you can also grab people’s attention with some carefully-chosen primary and secondary colors, like in our Motion Graphics template.
12. Use illustrations
Illustrations are a great way to communicate information, especially if you’ve got lots to say. Whether you want to create a crowd of people or a cool depiction of some new fancy gadget, illustrations can draw the eye and make your presentation more interesting.
13. Infographics
When you utilize infographics, you can pack in a huge amount of data and information without confusing your audience. Think pie charts, digital numbers, and ascending animated graphs. These can show your audience boring data in an exciting way.
14. Create interesting transitions
The one advantage of video over a standard presentation is that you can do all types of funky things with transitions, like a whip pan transition, when the camera quickly pans between scenes. It’s a bit like a wipe, but much faster. Check out our full article on transitions here .
15. Make it look cinematic
Adding a cinematic touch can help your audience feel receptive to your message because subconsciously, they will associate these elements with being at the cinema, eating popcorn, and generally having a good time.
16. Go retro
A cool, retro look for your presentation will make it hard to ignore. By going retro, you add a little bit of cheeky style to your message. You don’t need to go quite as retro as the template below, but taking a step back in time is a sure way to add a little bit of zing to things.
17. End on a meaningful note
Your presentation will only give your audience a lasting impression if you end it right.
It’s important to let the audience know what you want them to do next: to visit a website for more information, to ponder an idea or new direction, or to take action toward a particular goal.
An attention-grabbing visual will work really well here, along with a meaningful end to the music – a change of pace, volume, or pitch.
What’s the takeaway message? A strong CTA (call to action) will ensure your presentation is memorable and much more likely to be talked about.
Video brings your presentation alive
Of course, we’re a little biased here at Biteable, but we’ve also sat through enough mind-numbingly dull presentations to know that video offers a delightful treat for your audience. It brings your message to life in a way no other medium can.
Ready to start crafting your presentation? Check out our range of templates here .
Make stunning videos with ease.
Take the struggle out of team communication.
Try Biteable now.
- No credit card required
- No complicated design decisions
- No experience necessary
IMAGES
VIDEO
COMMENTS
In "Video", choose the desired output quality and format. Make sure the toggles next to "Record mouse movements" and "Animate mouse clicks" are enabled if needed. In the "Audio" tab, adjust the sound levels and select the desired input devices. 3. Record your presentation. Click the "Capture video" option in the side menu and select the mode ...
What Makes a Good Video Presentation? A good video presentation will capture your audience's attention until the very end. When it comes to creating a video presentation, there is no definite checklist as to what constitutes a good video presentation. But there are some things you can do to make sure that yours is good enough to keep the viewer engaged.
Learn how to record a PowerPoint Presentation with audio and video simply by using the build-in PowerPoint functionalities and tools. You will learn how to...
Join 400,000+ professionals in our courses here 👉 https://link.xelplus.com/yt-d-all-coursesLearn how to create a video using PowerPoint. I'll first show you...
Here's how to do a presentation with voice over using Visme. Record your own audio by clicking on the "Record" option to the top right of the "Add Audio" tab. Once chosen, you will see a red record button appear below your slide. To start recording your own narration within Visme, simply click on the red button and speak into your microphone.
How to Make a Video Presentation. Open a new project with a blank canvas. Choose the size you want your video presentation to be; apply preset aspect ratios 9:16, 4:5, 1:1, and vice versa. Open the "Record" tab in the left-hand side and choose your recording settings to start recording. Or, browse the stock footage library to create a ...
Learn how to publish your own video using Microsoft PowerPoint with narration, annotations, animations, and timings. As full disclosure, I work at Microsoft ...
Presentations. Infographics. To live to tell the tale, make it online with Genially. It's free. Create animated video presentations, autoplay slideshows and beautiful galleries with audio or voiceover. Share online or download as MP4.
On the File menu, select Save to ensure all your recent work has been saved in PowerPoint presentation format (.pptx). Select File > Export > Create a Video. (Or, on the Recording tab of the ribbon, select Export to Video.) In the first drop-down box under the Create a Video heading, select the video quality you want, which pertains to the ...
How to create an engaging video presentation. Step 1. Create video slides or record your screen and webcam. To import your own presentation videos, photos, and audio, click on the import media button in the your media tab on the toolbar to browse your computer files, or connect your OneDrive.
How to record video presentations with PowerPoint. Step 1: Open PowerPoint and select ' New', then choose to create a 'Blank Presentation ' or select one of the templates for a premade design. Step 2: To start creating slides: Go to 'Home' > 'Slides' and click on ' New Slides' to choose the layout for each new slide you add.
To add audio, click the 'Insert' tab on your PowerPoint ribbon. Then in the Media section, select 'Audio' then 'Record Audio'. Step 3: Name Audio Sound. Name the sound uniquely for easy future retrieval. Step 4: Begin Recording. Click the red 'Recording' button to start. Use the green 'Play' button to review the audio.
To create a presentation video in Descript: Hit New project. Import any media (images, infographics, short video clips, GIFs, or sounds) you want to include in your presentation. Drop your visuals into the script and edit them into a sequence, or work scene by scene by adding a / at the beginning of each slide.
There are three ways to make a narration video presentation. Record narration separately and sync it to your presentation. Upload first-person video footage. Merge it with your presentation. Use a video presentation maker with in-app voice-over and recording features. (This is the easiest way to make a narration video presentation.)
Step 1: From PowerPoint, open the slide with which you want to start your presentation. Step 2: Select Record from the upper right hand corner of the PowerPoint window. Step 3: Make sure your recording and voice settings are set properly, then click the round Record button. Begin your presentation.
VEED is a professional, all-in-one video editing software that can take care of all your video editing needs—quickly and efficiently. You can resize your video for different video sharing and social media platforms, add text, images, music, and more. Whether you need to edit a video for business or personal use, VEED is the best tool you can ...
Training: Add and record audio, such as music, narration, or sound bites, to your PowerPoint presentation and select the playback options. Watch this video to learn how. ... Animation, audio, & video Add and record audio. Add animation Video; Add transitions between slides Video; Add, format, and record video Video; Add and record audio
A video file is not created by this recording process. However, if you want a video file, you can save your presentation as a video with a few extra steps. Preview the recorded slide show. On the Slide Show tab, click From Beginning or From Current Slide. During playback, your animations, inking actions, laser pointer, audio and video play in sync.
1. Add files. Select the necessary photos and videos from your computer, Android, iPhone, or cloud storage account. Each file can be up to 500 MB for free. Step. 2. Make a slideshow. Now you can add more files if you want and change their order until you like it. Then add an audio track, trim it and click "Export".
Add Transitions: Transitions add dynamism to your presentation. Be mindful not to overuse them, as it can distract your viewers. Record Audio: Record a voiceover narration for your presentation. Make sure the audio quality is clear and audible. Incorporate Video Clips: Add relevant video clips to your presentation.
Step 3: Configure recording settings. With the Video Recording toolbar, you can set options like Cursor Capture and Effects, System Audio, and Webcam. If your webcam isn't showing, click on the webcam icon. If you have an external webcam, select the one you want to use by clicking the dropdown arrow next to the webcam icon.
Here's a great example of storytelling from one of the world's top brands: Nike - Dream Crazier | #JustDoIt. 3. Use music. Music has great power to support and enhance the emotion in a video presentation, and has been proven to sustain an audience's attention and aid in information retention.