- Shell Scripting
- Docker in Linux
- Kubernetes in Linux
- Linux interview question

What is Linux Operating System
The Linux Operating System is a type of operating system that is similar to Unix, and it is built upon the Linux Kernel. The Linux Kernel is like the brain of the operating system because it manages how the computer interacts with its hardware and resources. It makes sure everything works smoothly and efficiently. But the Linux Kernel alone is not enough to make a complete operating system. To create a full and functional system, the Linux Kernel is combined with a collection of software packages and utilities, which are together called Linux distributions. These distributions make the Linux Operating System ready for users to run their applications and perform tasks on their computers securely and effectively. Linux distributions come in different flavors, each tailored to suit the specific needs and preferences of users.
Table of Content
Linux History
What is linux, what is linux operating system, what is a “distribution”, why use linux, architecture of linux, which distribution is right for you, installing linux, installing software on linux, advantages of linux, disadvantages of linux, linux commands.
Linus Torvalds designed the free and open-source Linux operating system kernel in 1991. Torvalds set out to develop a free and flexible system for personal computers, drawing ideas from the UNIX operating system and the MINIX operating system. Teamwork in development was encouraged with the initial release of the Linux kernel, which attracted developers and enthusiasts globally quickly. Various open-source software packages integrated with the Linux kernel created fully operational operating systems, occasionally referred to as Linux distributions. Over the years, Linux has become known as a key component of modern computing, powering everything from servers and personal computers to supercomputers and smartphones. Due to its flexibility, durability, and strong community support, developers, businesses, and educational institutions frequently opt for it.
Linux is a free and open-source family of operating systems that is resilient and flexible. In 1991, an individual by the name as Linus Torvalds constructed it. The system’s source code is accessible to everyone for anyone to look at and change, making it cool that anyone can see how the system works. People from all across the world are urged to work together and keep developing Linux due to its openness. Since the beginning, Linux has grown into a dependable and safe OS that is used in an array of gadgets, including PCs, cell phones, and huge supercomputers. It is well-known for being cost-effective, which implies that employing it doesn’t cost a lot, and efficient, which indicates it can complete a lot of jobs quickly. A lot of people love Linux, and
Developed by Linus Torvalds in 1991, the Linux operating system is a powerful and flexible open-source software platform. It acts as the basis for a variety of devices, such embedded systems, cell phones, servers, and personal computers. Linux, that’s well-known for its reliability, safety, and flexibility, allows users to customize and improve their environment to suit specific needs. With an extensive and active community supporting it, Linux is an appealing choice for people as well as companies due to its wealth of resources and constant developments.
Linux distribution is an operating system that is made up of a collection of software based on Linux kernel or you can say distribution contains the Linux kernel and supporting libraries and software. And you can get Linux-based operating system by downloading one of the Linux distributions and these distributions are available for different types of devices like embedded devices, personal computers, etc. Around 600 + Linux Distributions are available and some of the popular Linux distributions are:
Because it is free, open-source, and extremely flexible, Linux is widely utilized. For servers and developers, it is the ideal option because it offers strong security, stability, and performance. Generally interoperable hardware, a broad software library, and a vibrant community that offers support and regular updates are the many benefits of Linux. Due to its adaptability, users can customize the operating system according to their own needs, whether they become for personal or large enterprise use.
Linux architecture has the following components:

Linux Architecture
- Monolithic Kernel
- Hybrid kernels
- Exo kernels
- Micro kernels
- System Library: Linux uses system libraries, also known as shared libraries, to implement various functionalities of the operating system. These libraries contain pre-written code that applications can use to perform specific tasks. By using these libraries, developers can save time and effort, as they don’t need to write the same code repeatedly. System libraries act as an interface between applications and the kernel, providing a standardized and efficient way for applications to interact with the underlying system.
- Shell: The shell is the user interface of the Linux Operating System. It allows users to interact with the system by entering commands, which the shell interprets and executes. The shell serves as a bridge between the user and the kernel, forwarding the user’s requests to the kernel for processing. It provides a convenient way for users to perform various tasks, such as running programs, managing files, and configuring the system.
- Hardware Layer: The hardware layer encompasses all the physical components of the computer, such as RAM (Random Access Memory), HDD (Hard Disk Drive), CPU (Central Processing Unit), and input/output devices. This layer is responsible for interacting with the Linux Operating System and providing the necessary resources for the system and applications to function properly. The Linux kernel and system libraries enable communication and control over these hardware components, ensuring that they work harmoniously together.
- System Utility: System utilities are essential tools and programs provided by the Linux Operating System to manage and configure various aspects of the system. These utilities perform tasks such as installing software, configuring network settings, monitoring system performance, managing users and permissions, and much more. System utilities simplify system administration tasks, making it easier for users to maintain their Linux systems efficiently.
Choosing the right Linux distribution depends on your needs and experience level:
- For Beginners: Because of its simple user interface and strong community support, Ubuntu is a wonderful choice for initially Linux users. On the opposite hand, Linux Mint make it straightforward for novices to transition to Linux by offering an experience comparable to Windows out of the box.
- For Advanced Users: Advanced users who appreciate customization and direct control might opt for Arch Linux, it is known for its simplistic style and ability to create highly unique systems from the ground up. Another choice is Gentoo, that provides total control of the system but requires manual setup and a lengthy learning process.
- For Developers: Fedora was a popular choice among developers due to its focus upon modern technology and software, making it a perfect platform for software testing and development. On the other hand, Debian is well known for its reliability and extensive package repository, which implies it may be used in both production and development environments.
- For Servers: For server environments, CentOS is a powerful, community-maintained distribution that matches Red Hat Enterprise Linux (RHEL) quite somewhat. As an alternative, Ubuntu Server offers an extensive list of server applications in addition to strong community support and ease of use.
- For Lightweight Systems: Lubuntu is frequently picked by users either like lightweight operating systems or have outdated equipment due to its ability to utilize system resources efficiently while maintaining functionality. Another slim option is Puppy Linux, that is made to run well on outdated hardware while maintaining the essential functions and applications.
Selecting a Ubuntu, Fedora, or Linux Mint distribution which suits your needs is the initial step in the straightforward procedure for installing Linux. Download the ISO file first from the distribution’s official website. Next, utilize an application like Etcher for macOS and Linux or Rufus for Windows to create a bootable USB drive. Following you insert the USB drive into your computer and restart it, you may set the USB drive as the primary boot device by traversing to the BIOS or UEFI settings. Upon booting from the USB the hard drive, the Linux setup will show up. To partition the drive, choose your time zone, create user accounts, and change system settings, simply adhere to the instructions displayed on the screen. When the installation concludes, disconnect the USB drive and turn on your computer normally. For mare detailed way to install the Linux Mint Refer this link.
On Linux, installing software is simple. For Debian-based systems (like Ubuntu), use package managers like apt and sudo apt install package_name; for Fedora, use dnf and sudo dnf install package_name. Software centers are another source for a graphical application installation and searching interface. For Python installation specifics, detailed guidance can be found in the provided link.
- The main advantage of Linux is it is an open-source operating system. This means the source code is easily available for everyone and you are allowed to contribute, modify and distribute the code to anyone without any permissions.
- In terms of security, Linux is more secure than any other operating system. It does not mean that Linux is 100 percent secure, it has some malware for it but is less vulnerable than any other operating system. So, it does not require any anti-virus software.
- The software updates in Linux are easy and frequent.
- Various Linux distributions are available so that you can use them according to your requirements or according to your taste.
- Linux is freely available to use on the internet.
- It has large community support.
- It provides high stability. It rarely slows down or freezes and there is no need to reboot it after a short time.
- It maintains the privacy of the user.
- The performance of the Linux system is much higher than other operating systems. It allows a large number of people to work at the same time and it handles them efficiently.
- It is network friendly.
- The flexibility of Linux is high. There is no need to install a complete Linux suite; you are allowed to install only the required components.
- Linux is compatible with a large number of file formats.
- It is fast and easy to install from the web. It can also install it on any hardware even on your old computer system.
- It performs all tasks properly even if it has limited space on the hard disk.
- It is not very user-friendly. So, it may be confusing for beginners.
- It has small peripheral hardware drivers as compared to windows.
Basic tools for utilizing the command line interface (CLI) to communicate with the operating system are Linux commands. Commonly used commands include ls to list contents of directories, cd to modify directories, and pwd to show the path of the current directory. With commands like cp (copy), mv (move), and rm (delete), someone can manage file activities. Commands for system information and management include free for memory use, df to evaluate disk space usage , and top for monitoring system processes. Utilizing networking commands such netstat, ifconfig, and ping, users can monitor and troubleshoot network connections. Package management differs depending on the distribution; Fedora-based machines use dnf, while Debian-based systems use apt. Commands like cat, grep, awk, and sed are required for editing text files. Knowing and performing these directions well enables. For clear understanding about the Linux commands refer this link.
In this article, we discussed Linux Operating System which is a powerful and flexible open-source operating system based on the Linux Kernel. With a collaborative global community, it offers security, frequent updates, and diverse distributions tailored to user needs. Its architecture, comprising the kernel, system libraries, shell, hardware layer, and utilities, ensures efficient functionality. While Linux boasts high performance, stability, and compatibility, challenges include user-friendliness for beginners and a limited number of peripheral hardware drivers. Despite this, Linux remains a significant player in computing, poised for continued evolution and relevance.
Linux Operating System – FAQs
Linux is an open-source operating system developed by Linus Torvalds in 1991. It provides a customizable and secure alternative to proprietary systems. With its stable performance, Linux is widely used across devices, from personal computers to servers and smartphones. The collaborative efforts of its developer community continue to drive innovation, making Linux a dominant force in the world of computing.
Is There Any Difference between Linux and Ubuntu?
The answer is YES. The main difference between Linux and Ubuntu is Linux is the family of open-source operating systems which is based on Linux kernel, whereas Ubuntu is a free open-source operating system and the Linux distribution which is based on Debian. Or in other words, Linux is the core system and Ubuntu is the distribution of Linux. Linux is developed by Linus Torvalds and released in 1991 and Ubuntu is developed by Canonical Ltd. and released in 2004.
How do I install software on Linux Operating System?
To install software on Linux, we can use package managers specific to your Linux distribution. For example, In Ubuntu, you can use the “apt” package manager, while on Fedora, you can use “dnf.” You can simply open a terminal and use the package manager to search for and install software. For example , To install the text editor “nano” on Ubuntu, you can use the command sudo apt install nano
Can we dual-boot Linux with another operating system?
Yes, we can dual-boot Linux with another operating system, such as Windows. During the installation of Linux, we can allocate a separate partition for Linux, and a boot manager (like GRUB) allows us to choose which operating system to boot when starting our computer.
How can I update my Linux distribution?
We can update our Linux distribution using the package manager of our specific distribution. For instance, on Ubuntu, we can run the following commands to update the package list and upgrade the installed packages: sudo apt update sudo apt upgrade
What are the essential Linux commands for beginners?
Some essential Linux commands for beginners include: ls : List files and directories cd : Change directory mkdir : Create a new directory rm : Remove files or directories cp : Copy files and directories mv : Move or rename files and directories cat : Display file content grep : Search for text in files sudo : Execute commands with administrative privileges
How do I access the command-line interface in Linux Operating System?
To access the command-line interface in Linux , we can open a terminal window. In most Linux distributions, we can press Ctrl + Alt + T to open the terminal. The terminal allows us to execute commands directly, providing more advanced control over our system.

Please Login to comment...
Similar reads.
- How to Get a Free SSL Certificate
- Best SSL Certificates Provider in India
- Elon Musk's xAI releases Grok-2 AI assistant
- What is OpenAI SearchGPT? How it works and How to Get it?
- Content Improvement League 2024: From Good To A Great Article
Improve your Coding Skills with Practice
What kind of Experience do you want to share?
Your submission was sent successfully! Close
You have successfully unsubscribed! Close
Thank you for signing up for our newsletter! In these regular emails you will find the latest updates about Ubuntu and upcoming events where you can meet our team. e.preventDefault()"> Close
Engage pages
Ubuntu case studies, whitepapers and webinars.
Securing Ubuntu Deployments for IoT and edge devices
Steps to maximise the security of Ubuntu-based devices
Cloud-native network transformation and the 5G edge
99% of respondents expect revenue from edge computing
Alternatives à VMware : découvrez l’open source
Vous cherchez des alternatives à VMware ?
Executive Dinner for IT Leaders in Finance, NYC
Getting started with opensearch and opensearch dashboards.
A beginner’s guide to search engine and visualisation tool, OpenSearch
MLOps workshop
Build your tailored MLOps architecture in 5 days. Accelerate time-to-market and elevate in-house expertise.
Accelerate .NET development & deployment on Ubuntu
Discover how Canonical and Microsoft streamline .NET 8 development on Ubuntu Noble Numbat
Spotlight on automotive
Ensuring business continuity and long-term customer success
Meet Canonical at Automation Taipei 台灣機器人與智慧自動化展 \ 台北國際自動化工業大展
8月21-24日 不只是作業系統 - 讓Ubuntu從硬體到AI套件串聯您的邊緣運算
Aperitivo con Canonical
Trasformazione digitale attraverso infrastruttura open source
What is the Cyber Resilience Act?
Understand how the EU’s CRA will impact compliance
The advantages of open source software in EV infrastructure
Is your company missing out?
Understand how the Cyber Resilience Act will impact device manufacturers
The importance of vulnerability and surface attack management
A data lake on your cloud with Spark, Kubernetes and OpenStack
Learn more about the benefits of the data lake architecture, and how you can efficiently adopt this technology at scale using modern private cloud technology
Optimise your ML workloads on Kubernetes
Don’t overspend on GPUs, use Kubernetes
Partner Executive Summit - London 2024
The power of open source event in London
Charmed Kafka 3 Release 1 Reference Architecture Guide
Introducing Charmed Kafka: overview system architecture, the major components, reference deployment architectures, support and maintenance offerings
STIG hardening on Ubuntu 22.04 with Ubuntu Security Guide
Learn about the USG compliance automation tool and how to use it to harden Ubuntu 22.04 LTS to DISA-STIG standards
Is a real-time OS right for your business?
Understanding real-time systems in production
BT Group brings 5G to the UK with the power of open source infrastructure
- Previous page
Introducing technology into the Linux kernel: a case study

New Citation Alert added!
This alert has been successfully added and will be sent to:
You will be notified whenever a record that you have chosen has been cited.
To manage your alert preferences, click on the button below.
New Citation Alert!
Please log in to your account
Information & Contributors
Bibliometrics & citations.
- Kim J Yu J Ahn J Kang S Jung H Ives Z Bonifati A El Abbadi A (2022) Diva: Making MVCC Systems HTAP-Friendly Proceedings of the 2022 International Conference on Management of Data 10.1145/3514221.3526135 (49-64) Online publication date: 10-Jun-2022 https://dl.acm.org/doi/10.1145/3514221.3526135
- Beamonte R Ezzati‐Jivan N Dagenais M (2022) Execution trace‐based model verification to analyze multicore and real‐time systems Concurrency and Computation: Practice and Experience 10.1002/cpe.6974 34 :17 Online publication date: 4-May-2022 https://doi.org/10.1002/cpe.6974
- Liang L McKenney P Kroening D Melham T (2018) Verification of tree-based hierarchical read-copy update in the Linux kernel 2018 Design, Automation & Test in Europe Conference & Exhibition (DATE) 10.23919/DATE.2018.8341980 (61-66) Online publication date: Mar-2018 https://doi.org/10.23919/DATE.2018.8341980
- Show More Cited By
Index Terms
Software and its engineering
Software organization and properties
Contextual software domains
Operating systems
Recommendations
Linux kernel, linux: the complete reference, information, published in.

Association for Computing Machinery
New York, NY, United States
Publication History
Check for updates.
- Research-article
Funding Sources
- Division of Computer and Network Systems
Contributors
Other metrics, bibliometrics, article metrics.
- 20 Total Citations View Citations
- 5,261 Total Downloads
- Downloads (Last 12 months) 27
- Downloads (Last 6 weeks) 0
- Cataldo R Fernandes R Martin K Sepulveda J Susin A Marcon C Diguet J (2018) Subutai Proceedings of the 55th Annual Design Automation Conference 10.1145/3195970.3196124 (1-6) Online publication date: 24-Jun-2018 https://dl.acm.org/doi/10.1145/3195970.3196124
- Cataldo R Fernandes R Martin K Sepulveda J Susin A Marcon C Diguet J (2018) Subutai: Distributed Synchronization Primitives in NoC Interfaces for Legacy Parallel-Applications 2018 55th ACM/ESDA/IEEE Design Automation Conference (DAC) 10.1109/DAC.2018.8465806 (1-6) Online publication date: 24-Jun-2018 https://dl.acm.org/doi/10.1109/DAC.2018.8465806
- Beamonte R Dagenais M (2016) Detection of Common Problems in Real-Time and Multicore Systems Using Model-Based Constraints Scientific Programming 10.1155/2016/9792462 2016 (22) Online publication date: 1-Mar-2016 https://dl.acm.org/doi/10.1155/2016/9792462
- Zhu F Chen Y Wang J Zhang G Zhou Q (2016) Experimental Validation and Exploration of a New Kind of Synchronization in Linux 2016 International Symposium on System and Software Reliability (ISSSR) 10.1109/ISSSR.2016.023 (91-96) Online publication date: Oct-2016 https://doi.org/10.1109/ISSSR.2016.023
- Beamonte R Dagenais M (2015) Linux Low-Latency Tracing for Multicore Hard Real-Time Systems Advances in Computer Engineering 10.1155/2015/261094 2015 (1-8) Online publication date: 2015 https://doi.org/10.1155/2015/261094
- Matveev A Shavit N Felber P Marlier P Miller E Hand S (2015) Read-log-update Proceedings of the 25th Symposium on Operating Systems Principles 10.1145/2815400.2815406 (168-183) Online publication date: 4-Oct-2015 https://dl.acm.org/doi/10.1145/2815400.2815406
- Palix N Thomas G Saha S Calvès C Muller G Lawall J (2014) Faults in Linux 2.6 ACM Transactions on Computer Systems 10.1145/2619090 32 :2 (1-40) Online publication date: 1-Jun-2014 https://dl.acm.org/doi/10.1145/2619090
View Options
Login options.
Check if you have access through your login credentials or your institution to get full access on this article.
Full Access
View options.
View or Download as a PDF file.
View online with eReader .
Share this Publication link
Copying failed.
Share on social media
Affiliations, export citations.
- Please download or close your previous search result export first before starting a new bulk export. Preview is not available. By clicking download, a status dialog will open to start the export process. The process may take a few minutes but once it finishes a file will be downloadable from your browser. You may continue to browse the DL while the export process is in progress. Download
- Download citation
- Copy citation
We are preparing your search results for download ...
We will inform you here when the file is ready.
Your file of search results citations is now ready.
Your search export query has expired. Please try again.
- Embedded/IoT
- Open Source
- System Administration
- Certification
- What is Linux?

- Training and Tutorials
All Stacked Up: A Case Study
For all those who have followed our series so far, we want to thank you for your time, and we’re glad you can join us for this last installment! For those coming to this article on its own, we encourage you to go back and read the rest of our series, starting with our first post . In this final article, we will take a tour through a working case study created by Kenzan. The project leverages Yarn, webpack™, and TypeScript in not one but two GitHub repositories that anyone can clone, run, tinker with, and contribute back to.
Meet the Repos
For this case study, we will demonstrate the stack with React , while the other demonstration stack uses Angular :
React case study – https://github.com/kenzanlabs/react-webpack-stack/
Angular case study – https://github.com/kenzanlabs/angular-webpack-stack/
Why Create Two Repositories?
Great question! There are a few principal objectives we hope to showcase throughout this case study, which will help to address why we went with two repositories.
This stack is intended to be flexible and interoperate easily with any modern JavaScript library or framework. Providing two versions that meet similar goals provides a better apples-to-apples comparison.
In line with the motivations behind TodoMVC , each repository has a reference app of equal feature parity.
With this case study, we can get down to a lower level on the implementation details, which is something we wanted to be mindful of during the other articles.
This article and the accompanying repositories aim to demonstrate the stack in an intuitive and straightforward approach. This will help you understand why a file is there and why a configuration option is what it is.
We chose to eschew using any sort of generators or CLI tools (like Yeoman , Angular CLI, or Create React App ) so we can showcase just the technologies themselves as they are, at their least abstract.
Why Not Just Keep It Simple?
It does feel right to address the absence of a “vanilla” stack example. The simple answer is that, at Kenzan and in the industry as a whole, there are few scenarios where a major project would start without the use of some library or framework and all the nuances that come into play with that. For example, while AngularJS has the concept of modules and dependency injection, the developer still has to ensure correct load order of all JavaScript files, or else risk seeing $injector errors in the browser console.
The goal of this case study is to help readers understand the basics. It’s also to provide exposure to real-world scenarios that factor in the unanticipated complexity that often comes with welding multiple technologies together. These complexities aren’t always immediately obvious from the outside looking in. Our hope is to identify these technical distinctions so that you can better understand what is specific to React or Angular, and what is common to any basic implementation of the stack.
Ultimately, Kenzan believes that Developer Experience is a critical component in successfully delivering an application. We want to balance that fine line between prescriptiveness and flexibility, and allow teams to decide on how to cover the “last mile” of the stack—be it with Angular, React, Vue, or something of your own creation. With that, let’s dive into our stack!

Exercise – Get Ready, Fork, Clone!
Before you continue, we recommend that you fork and clone the React repository, and install dependencies using Yarn. That way you can follow along as we go through the repository in detail. There will also be a couple of exercises that we encourage you to try.
1. You will need to have the correct version of node and Yarn on your system. For details, see the “Project Setup” section in the README:
https://github.com/kenzanlabs/react-webpack-stack#project-setup
2. Fork the React repo:
https://github.com/kenzanlabs/react-webpack-stack
3. Clone your fork of the repo.
4. Open a terminal window and change to the root directory of the cloned repo. Then, install dependencies:
Need some help? See the GitHub documentation on forking and cloning a repository .
Repository Overview
Starting at the root of our project, let’s review some key files and configuration patterns we’ve adopted.
Documentation
Every project should always have a robust README to ensure a good onboarding experience, and to act as a general reference for project practices and decisions. Important sections to include are an Overview, Installation/Setup, Usage (if it’s a library), Development Workflows, and Release Management. Other sections can be added, or links to external documentation can be used as needed.
For projects hosted on GitHub, there are helpful features including templates for issues and pull requests (PRs) as well as for contributing guidelines. You can find them in the .github/ directory of the project. If you are interested to learn more about GitHub best practices, check out Kenzan’s blog post on managing an open source project in GitHub .
Configuration and Code Quality
All configuration files for all tools used in the project are kept at the root of the project. These range from enforcing consistent code quality standards and best practices, to configuring our build tools like webpack or Karma.
. babelrc – Configuration for Babel when using Jest to run unit tests, and for transpiling our ES2015-generated TypeScript. This lets us leverage great plugins from the Babel ecosystem, like babel-preset-env , which provides more fine-grained control of the output of our JavaScript, and which pulls in plugins and polyfills as needed. (Imagine Can I Use as an npm package.)
.editorconfig – Rules for EditorConfig , a popular IDE-based plugin for high-level formatting rules.
.eslintrc – Linting and style rules for ESLint ® . A consistent style guide is critical for a project. While this project primarily relies on TSLint, we still want to ensure consistency in any JavaScript files in the project (like our webpack configuration files and unit tests). When it comes to linting, whatever the opinions of the team are, the most important thing is to pick a definitive rule set and enforce that throughout the entire codebase.
jest.config.js / karma.conf.js – Configuration files for Jest (React) and Karma (Angular) respectively. Unit testing is a critical part of application development at Kenzan. We chose Jest and Karma for their deep understanding of the ecosystems they support, as they were created by the respective projects they are most associated with. For more on our principles and practices around unit testing, check out this video on test-driven development from a recent Kenzan-hosted Meetup. It should be noted there is no reason one could use Jest to test Angular, or Karma to test React.
tsconfig.json / tslint.json – Configuration files for TypeScript (one for the TypeScript compiler and one for TSLint ). We’ll cover these more in depth in the TypeScript section of this article.
webpack.config.*.js – webpack configuration files for the project. These are divided into three parts for composability across our different development lifecycles (more on this later).
yarn.lock – The auto-generated lock file for Yarn. The lock file should always be committed to the repository when there are dependency changes to the project’s package.json .
Project Layout
A designated src/ directory contains all of the project’s source code. The directory is organized into general categories, following a component-based paradigm.
index.js – The main entry point into the project. This acts as the application’s bootstrapping “glue” mechanism to kick off the app.
vendor.js – Third party npm dependencies. These let us configure wepack and provide an additional entry point.
components/ – The application’s components. Component-driven development is a mature development practice and is strongly advocated by all modern frameworks. Common examples are header , footer , navigation , contacts-list , and so on.
services/ – The application’s services. Generally, a service is a class that handles data or connects to a backend, and that does not interact with the DOM in any meaningful way.
views/ – Interchangeable with pages or screens. These are (container) components mapped to routes in an application, and serve as the shell or wrapper for a tree of components. Common examples are a Home or About page. The main goal is to support easy composition of components.
Development Workflows
The installation steps in the README only tell a developer to install Yarn and run yarn install . Other than that, all you know is that the project uses webpack and TypeScript. So how do you actually start working on the project? The README must have forgotten to document how to install the rest of the stack, right? Let’s take a look at a project’s package.json , specifically the scripts section.
What we see are commands you can run with the Yarn CLI, using yarn run . These command do the work of calling webpack or Jest, without us having to install any additional development tools. TypeScript, webpack, and the like come with CLI commands of their own. These become available on the command line locally to the project after running yarn install . We can see the entire list available in the node_modules/.bin/ directory. (The list will vary slightly repo to repo.)

The entire project and all of its dependencies, whether for runtime or development, are portable and maintenance free. In addition, we chose to base our scripts on the concept of development “goals” or tasks (akin to Maven lifecycles ). This provides a consistent methodology that can be applied to any project. Tasks are run by executing yarn run <script-name> or just yarn <script-name> as run is assumed.
develop – Used for development. This task leverages our “develop” webpack configuration ( webpack.config.develop.js ) and starts webpack-dev-server .
build – Runs a production build using webpack and our “prod” webpack configuration ( webpack.config.prod.js ).
lint – Convenience task for linting all files in the application.
test – Runs unit tests, both locally and as part of a CI build process.
serve – Runs a production webpack build and serves it up locally. It is important to be able to easily run a production build locally, for example, to tackle a production-only bug.
What is important here is that our scripts are focused and deliberate. They are intended to be named intuitively and in a way that can be applied to any project. One nice feature about this setup is that the developer doesn’t have to know about the tools being used under the hood. If the team decides to choose a different testing framework, the script and dependencies just need to be updated. As far as anyone else is concerned, yarn test will continue to just work.
Continuous Integration
Let’s briefly talk about Continuous Integration . If you look in the bin/ folder, you will see a build script called build.sh . For all our projects at Kenzan, being able to run a build against any change to the repository is critical to ensure that building the project from scratch is reliable and stable. This includes installing dependencies, running tests, linting, and of course a production webpack build.
At Kenzan, we use Jenkins with our clients to automate the building and deployment of PRs and projects. For our open source projects, like these two repositories, we have chosen to use CircleCI instead. That’s because it is a hosted and managed CI platform that we can share with all contributors. You can see the configuration in the .circleci/config.yml file in the repository.
Whatever CI tool is used, it’s important to have a consistent Continuous Integration server or environment where we can execute a versioned build script ( build.sh ). The build script runs each time a PR is opened or updated. Automation around deployments, while out of scope here, is a critical part of any infrastructure for our project. That’s why we felt it was important to showcase at least the “CI” in “CI/CD”, as a reflection of our best practices and standards.
For webpack, the main point to review is our configuration composition, which follows the recommendations of the webpack advanced usage documentation . During the discussion about configuration, code quality, and npm scripts, we mentioned that there are three configuration files: webpack.config.develop.js , webpack.config.prod.js , and a shared config called webpack.config.common.js . Let’s start with the common config.
webpack Config – Common
Creating a common configuration file lets us create additional composable and focused webpack configurations to support various goals, like develop and build . The common configuration is principally responsible for the following concerns.
entry / output – The point from where webpack will start building the dependency graph of our application, and the location of the build output.
rules (loaders) – File processing for our application that will handle our styles, images, TypeScript, HTML, and anything else that is required to build our application from source code and vendor dependencies.
plugins – Shared post compilation for:
- Injecting our script and style paths into index.html using HtmlWebpackPlugin .
- Configuring code splitting using CommonsChunkPlugin . In this case, we are creating a common chunk, unsurprisingly called “common”, which includes the common code from our entry points. This can be part of an effective caching strategy.
- Exposing non-modular vendor libraries (like jQuery ® references in Bootstrap ) to webpack using the ProvidePlugin . The left side is the global reference as found in the vendor code. The right side tells webpack to map that reference to the equivalent of a require(‘jquery’) command.
Note: For React with HMR support, we have added react-hot-loader to our TypeScript loader configuration
Note: For Angular, we needed to add the ContextReplacementPlugin to resolve a warning emitted by Angular. We also disabled minification of HTML in our rule configuration based on an issue with html-loader that we ran into.
We will now look at how we can re-use this configuration using webpack-merge to support our develop and production workflows.
webpack Config – Develop
Using webpack-merge , we can compose our own webpack configuration together, to reduce duplication and bloat. If we examine the webpack.config.develop.js file, we can see there’s actually very little to it. We require our common configuration and pass that to webpack-merge along with an additional object just for our development-related webpack configuration.
output – For HMR, we need to configure an output file.
webpack-dev-server – Configuration for our local development server. Note that this is where we enabled the hot flag to enable HMR.
rules (loaders) – Special development-specific SCSS/CSS file processing. For development only, we have a loader configuration for SCSS/CSS that puts all our styles in a <style> tag. This is less intensive for development workflows.
plugins – Development-specific plugins:
Hot Module Replacement makes the magic happen. You’ll get to experience HMR yourself in the exercise below!
webpack Config – Prod
For our production builds, we will use webpack.config.prod.js . As with webpack.config.develop.js , we include our common configuration, and pass in an object along with additional production-specific configurations.
rules (loaders) – Used to generate a standalone .css file using ExtractTextPlugin , for better control over debugging, caching, and distribution of the application’s CSS.
plugins – Production-specific plugins:
webpackMd5Hash – Used to generate a [chunkhash] based on the contents of our files. This is an effective technique to implement as part of a caching strategy, as we can use the file contents, and whether they changed or not, to dynamically determine the file name generated by webpack. In this way, a chunk or file can cache bust itself only when needed. Pretty neat!
UglifyJSPlugin – When shipping an application to production, it is important to minify and strip out all excess whitespace and comments from our files, to help reduce the overall bundle size. This plugin does exactly as advertised!
ExtractTextPlugin – Used to generate a standalone .css file for better control over debugging, caching, and distribution of the application’s CSS (as opposed to the approach we used just for development purposes).
Exercise – Swap Modules with HMR
One of the great features we discussed in our webpack article is Hot Module Replacement (HMR) . HMR lets you make changes to parts of a running application (such as changing HTML, JavaScript, or CSS) without having to reload the entire application, while it preserves any current state.
This is huge. Think back to our example of filling out a form, from our article on webpack. Imagine you want to test validation rules or submit/rejection functionality. Every change to the code in most build pipelines would reload the entire page, forcing the developer to tediously walk back through all the steps of filling out the form. Help us, HMR!
To demonstrate, let’s work through an example to see how HMR can save developers time during the development process.
Note: For now, given the complexities of Angular and our desire to keep the repos simple, you will only be able to use the React repo to complete this exercise. We’ll be doing a followup on HMR in Angular on the Kenzan Tech Blog , so stay tuned!
1. To begin, start the webpack development server ( webpack-dev-server ). Open a terminal window and change to the root directory of the cloned repo. Then run the develop task:
A browser window opens and loads the application’s home page. You’ll see a button to add a new contact.
2. Click Add contact to display a form for adding a new contact. There are fields for name, email, phone, and more.
3. Fill out part of the form with some user information, like your first and last name.

Here’s where it gets fun. We’re going to try making some style changes. The background color of the page is a little on the plain side, so let’s change it. Normally we would expect this to reload our page and force us to fill out all the form fields again. But will it?
4. In a text editor, open src/components/bootstrap/bootstrap.scss and add the following CSS:
5. Save the change to bootstrap.scss . When you do, the develop task automatically runs again. Look at that—the page changed color, but our form field entries were preserved. The state of our component remained unchanged!

That’s pretty cool. But you might be thinking there’s no way this will work if you change the actual ContactsListForm component. Let’s put that to the test.
6. In a text editor, open src/components/contacts-list-form/contacts-list-form.tsx (for React) or src/components/contacts-list-form/contacts-list-form.html (for Angular).
7. Let’s change the label for the First Name field to note that it’s required. Find the following text:
And add (required) after the field label, like so:

Hopefully this has helped demonstrate the power of HMR, as well as the kind of infrastructure and development platform webpack brings to the table.
As our previous article on TypeScript focused primarily on syntax, this walkthrough will focus on the configuration elements of TypeScript.
TSConfig (tsconfig.json)
TypeScript allows developers to use a JSON file to configure the TypeScript compiler . That config is automatically used when the compiler ( tsc ) is invoked (via command line, webpack loader, or the like). While we won’t go over every TypeScript compiler option available, let’s discuss a few options that are most meaningful to the setup of these projects.
noImplicitAny – This is set to true and requires everything (argument, return value, variable, and so on) in our application to require a type.
target – Specifies the version of the compiled JavaScript output we want from the TypeScript compiler. In our case, since we want to take advantage of Babel to further refine our generated JavaScript for production, we choose to have TypeScript output ES2015-compatible JavaScript.
module – We chose “commonjs” here since we have certain external npm packages that don’t support ECMAScript module syntax. Otherwise we would have chosen ES2015.
awesomeTypescriptLoaderOptions (useBabel) – Configuration specifically for the webpack loader awesome-typescript-loade r. As the name implies, it really is awesome! We think so especially for its support of Babel , which is important to us because, as mentioned before, we think babel-preset-env is a powerful and versatile tool. We love the ability to write in TypeScript but transpile down to JavaScript that only polyfills the native browser features missing from our target browser demographic, delivering a much more fine-grained and slimmer bundle to our users.
Note: For our React repository, we enable the JSX flag to enable JSX support in the TypeScript compiler.
Note: For our Angular repository, we enabled the emitDecoratorMetadata and expirementalDecorators options since Angular leverages the ES2016 Decorators feature ,
TSLint (tslint.json)
When it comes to linting and coding styles, every team and project has its preferences. At Kenzan, we understand those preferences are important and meaningful, and they they were picked for a reason. Our focus is not so much on what a team decides, but rather that the team makes these decisions binary (for example, the linter will either pass or fail on a given rule violation). This isn’t meant to be nitpicky but rather to ensure consistency, especially for code reviews.
One thing that we are excited to follow is a WIP (work-in-progress) plugin for ESLint that would extend to TypeScript files, allowing for consistent rules across all JavaScript projects.
Type Definitions (@types)
It is worth touching upon how TypeScript type definitions are managed. As discussed in our last article, Type Definitions are an important part of the TypeScript ecosystem . They allow non-TypeScript projects to play nicely within the TypeScript based ecosystem of your application. If you look in package.json , you will see a number of entries in the devDependencies section that start with @types/ . This is the new workflow successor to using typings , available in TypeScript 2.0+. It allows developers to install definition files available from Definitely Typed using their package manager without any additional configuration. An example using Yarn would look like:
Note: For those who may not be familiar with @ syntax, this is referred to as a scoped package .
Exercise – Try Out TypeScript
To demonstrate some of the features of TypeScript and how they improve the developer experience, let’s start making some changes and see what happens.
1. Open a terminal window and change to the root directory of the cloned repo. Then run the develop task:
A browser window opens and loads the application UI.
2. In a text editor, open src/views/home/home.tsx and find the following text:
3. Also open src/services/contact.service.tsx and find our interface ( ContactInterface ) and our class ( ContactService ).
You’ll notice that buildName takes a single parameter, of type ContactInteface , which itself defines the properties and value types of a “contact” in the context of our application. In our case, a contact has properties like firstName , lastName , phone , and email . Some of these properties are optional, as denoted by a question mark ( ? ).
4. Let’s make a change to the code in home.tsx to see TypeScript in action. Instead of passing a ContactInteface parameter, pass a string (like your name) instead:
5. Save the change to home.tsx . When you do, the develop task is automatically run again. You’ll immediately see an error in the terminal, indicating that we are calling buildName incorrectly.

Luckily, most IDEs have TypeScript support, so a developer can get feedback that way as well. Here’s an example:

6. Let’s try another experiment. First, undo the change you made to home.tsx and save the file. (Notice in the terminal that it builds correctly now.)
7. Now let’s make a change to ContactInterface in contact.service.ts . We’ll remove firstName from the interface. Find the following line and delete it:
8. Save the file and notice what happens in the terminal when the develop task automatically runs.
As we saw in the previous example, TypeScript can let us know if we are using part of our application incorrectly. This safety net is especially helpful in maintaining integrity in the entire application.

This time, we see two errors pop up in two different files. The errors show all the places where this change will cause an issue. This is helpful for refactoring, or just for catching an errant mistake by a developer at build time.
The type system of the application, in particular through the use of interfaces, helps developers ensure integrity throughout the codebase by providing core objects that can model our application domain and keep all components in sync. So we can see that, as a project grows and scales, TypeScript becomes more valuable at communicating the potential widespread impact of a given change.
As soon as you save the file, the develop task runs, and this time it should be happily error-free. Thanks, TypeScript!
We hope that this case study on our modern front-end stack has been valuable, and that it provided a good complement to our blog series. We strived to make sure the technologies used and the decisions made were as deliberate and intuitive as possible, so that the best practices we’re promoting are as accessible as possible. We hope you will contribute and ask questions through the issue trackers of our repositories. And if you have an improvement you would like to make, please feel free to submit a PR!
Kenzan is a software engineering and full service consulting firm that provides customized, end-to-end solutions that drive change through digital transformation. Combining leadership with technical expertise, Kenzan works with partners and clients to craft solutions that leverage cutting-edge technology, from ideation to development and delivery. Specializing in application and platform development, architecture consulting, and digital transformation, Kenzan empowers companies to put technology first.
Read the previous articles in the series:
A Modern Day Front-End Development Stack
Untangling Package Management in JavaScript Applications
Faster Tied Together: Bundling Your App with webpack
TypeScript: Our Type of JavaScript
RELATED ARTICLES MORE FROM AUTHOR

Webinar: Harden Your Security Mindset: Break Down the Critical Security Risks for Web Apps

Kickstart Your Career & Save Up To 40%!

Further Your Education with Courses & Certifications

Save BIG on Earth Day Deals with Sitewide Savings!

Leap into Learning and SAVE up to 50% off!
Case Study: Building a Secure Operating System for Linux
Cite this chapter.

- Trent Jaeger 2
Part of the book series: Synthesis Lectures on Information Security, Privacy, and Trust ((SLISPT))
206 Accesses
The Linux operating system is a complete reimplementation of the POSIX interface initiated by Linus Torvalds [187]. Linux gained popularity throughout the 1990s, resulting in the promotion of Linux as a viable alternative to Windows, particularly for server systems (e.g., web servers). As Linux achieved acceptance, variety of efforts began to address the security problems of traditional UNIX systems (see Chapter 4). In this chapter, we describe the resulting approach for enforcing mandatory access control, the Linux Security Modules (LSM) framework. The LSM framework defines a reference monitor interface for Linux behind which a variety of reference monitor implementations are possible.We also examine one of the LSM reference monitors, Security-enhanced Linux (SELinux), and evaluate how it uses the LSM framework to implement the reference monitor guarantees of Chapter 2.
This is a preview of subscription content, log in via an institution to check access.
Access this chapter
Subscribe and save.
- Get 10 units per month
- Download Article/Chapter or eBook
- 1 Unit = 1 Article or 1 Chapter
- Cancel anytime
- Available as PDF
- Read on any device
- Instant download
- Own it forever
- Compact, lightweight edition
- Dispatched in 3 to 5 business days
- Free shipping worldwide - see info
Tax calculation will be finalised at checkout
Purchases are for personal use only
Institutional subscriptions
Unable to display preview. Download preview PDF.
Trellis: Privilege Separation for Multi-user Applications Made Easy

Antikernel: A Decentralized Secure Hardware-Software Operating System Architecture

HiddenApp - Securing Linux Applications Using ARM TrustZone
Author information, authors and affiliations.
The Pennsylvania State University, USA
Trent Jaeger
You can also search for this author in PubMed Google Scholar
Rights and permissions
Reprints and permissions
Copyright information
© 2008 Springer Nature Switzerland AG
About this chapter
Jaeger, T. (2008). Case Study: Building a Secure Operating System for Linux. In: Operating System Security. Synthesis Lectures on Information Security, Privacy, and Trust. Springer, Cham. https://doi.org/10.1007/978-3-031-02333-0_9
Download citation
DOI : https://doi.org/10.1007/978-3-031-02333-0_9
Publisher Name : Springer, Cham
Print ISBN : 978-3-031-01205-1
Online ISBN : 978-3-031-02333-0
eBook Packages : Synthesis Collection of Technology (R0) eBColl Synthesis Collection 2
Share this chapter
Anyone you share the following link with will be able to read this content:
Sorry, a shareable link is not currently available for this article.
Provided by the Springer Nature SharedIt content-sharing initiative
- Publish with us
Policies and ethics
- Find a journal
- Track your research
Case Study Linux Foundation

“Open source is all about community and trust. Pingboard helps us save time and be efficient while supporting the community.” Mike Woster • CRO/COO and Founding Executive Team Member
The Linux Foundation is the not-for-profit that enables mass innovation through open source. It has a virtual workforce that mirrors the open source community at large—geographically dispersed, but generously collaborative.
Over 175 international employees work interdependently to accelerate the adoption of the Foundation’s hosted projects and support their developer, sysadmin and corporate communities. The flexibility of having a virtual workforce has reaped enormous benefits for the Foundation, including higher productivity and retention, and given them the ability to recruit from a deeper international talent pool.
But this arrangement also comes with a challenge: How do you maintain a true sense of community in a rapidly growing organization when employees rarely meet in the flesh?
“We needed a tool to help employees discover and know each other, and to continue having a sense of community.”
The Challenge of Staying Lean & Connected as a Virtual Team
Before Pingboard, the Foundation’s teams had to manually enter their information into Google Docs Spreadsheets and file their paid time off notices on a shared Google Calendar. Putting a colleague’s face to their name meant visiting their LinkedIn profile, and keeping track of who was working on any of the Foundation’s several projects at any given time was complicated.
Mike, the Foundation’s Chief Revenue Officer and one of its founding members, saw an opportunity to find a more efficient solution.
“As a non-profit, it’s extremely important that we be very lean,” he explains. We have very little overhead, no admins and no assistants, so the tools we choose have to be designed to maximize the productivity of each of our employees.”
Mike began looking for a way to improve the new employee onboarding process and employee directory.
“With 175 people, Pingboard pays for itself. We save at least one hour per employee every month, plus several hours per new onboarded employee so they can learn the org and make connections to colleagues faster.”
Because the Foundation’s work is so collaborative, it was critically important to help foster connections so that every employee can tap the supportive colleagues around them.
“We needed a tool to help employees discover and know each other; to facilitate a sense of community in a virtual environment,” Mike explains. “With so many open source projects and communities that we support, being able to learn who’s working on what is important for sharing best practices.”
“As a non-profit, it’s extremely important that we be very lean—we have very little overhead, no admins, no assistants.”
Integrations Improve Efficiency
After discovering Pingboard, one of the first things Mike noted was the level of integration available with the tools their teams were already using.
“The Google Apps integration was critical—especially being able to turn individual syncing on or off selectively.” Mike explains. “Not everyone who is a Google app account holder is an employee, and Pingboard allows for this use case.”
Another helpful element of the Google Apps integration was a far more streamlined system for sharing Out of Office and paid time off notices.
“We’ve always had one shared calendar, but now people can just use the Pingboard app to say they’re out or travelling instead of manually updating the Google Calendar,” Mike shares. “Pingboard auto-updates the calendar and we get weekly notices when travel statuses are updated, which is a nice feature out of the box.”
“The Google Apps integration was critical.”
Helping Co-Workers Feel Connected
As a virtual team, the Foundation’s employees connect using IRC, Slack, Google Hangouts, Skype, mobile phones and more.
Pingboard integrates directly with Slack—and using custom fields, Mike was able to choose which contact information (like Skype) was mandatory. This ensured employees would have everything they needed to connect with those around them.
Add in profile pictures and a built-in company org chart , and Pingboard has become a critical community-building tool, helping employees get to know their colleagues.
“It’s a way better directory,” Mike says. “Now, employees have an up-to-date org chart; they can see the picture of the person they want to connect with and they have instant access to contact them.”
As an organization built on trust, another attraction to Pingboard was the ability to give employees ownership of their own information.
“We want our team to be able to own the information that matters and help them communicate with their colleagues,” Mike explains. “With Pingboard, we’re able to make the updating of their demographic, contact, and status information convenient.”
“Now, employees have an up-to-date org chart; they can see the picture of the person they want to connect with and they have instant access to contact them.”
When employees do meet face-to-face, it’s often at one of the 50+ events the Foundation puts on for the technology community every year.
For this, Pingboard’s “Who's Who Game” where employees must guess the names belonging to the pictures of their colleagues, has been surprisingly useful.
“It sounds cheesy, but the face game is valuable,” smiles Mike. “When you’re going to an event and you have a bunch of new staff, it’s great to be able to plan ahead and put a face to the name of someone you’re meeting for the first time.”
Growing Together in the Future
As someone who’s always looking for ways to stay lean and efficient, Mike appreciates that Pingboard’s team doesn’t just pay lip service to client feedback, but actively use it to shape the product’s future.
“Pingboard’s team is nimble… they solicit customer input and map it into how they’re going to expand their offering, and we find that very valuable.”
For example, Mike’s team wanted to have “Click to Skype” built into the tool and presented it to Pingboard, who added it to their development pipeline.
This kind of open, honest collaboration aligns with the values the Foundation was built on.
“Open source projects are all about community and trust, and the meritocratic development process. Pingboard helps us get things done, save time and stay efficient while helping us facilitate that community.”
“Pingboard solicits customer input and maps it into how they’re going to expand their offering, and we find that very valuable.”
The Linux Foundation is the organization of choice for the world's top developers and companies to build ecosystems that accelerate open technology development and commercial adoption. Together with the worldwide open source community, it is solving the hardest technology problems by creating the largest shared technology investment in history. Founded in 2000, The Linux Foundation today provides tools, training and events to scale any open source project, which together deliver an economic impact not achievable by any one company. More information can be found at linuxfoundation.org .
🏷️ Save 40% on Training & Certifications - Aug 27-28 SAVE NOW
Hyperledger Foundation
The linux foundation builds the global foundation for open source enterprise blockchain technologies.
Blockchain technology powers distributed ledgers and smart contracts and gained initial prominence as the public networks behind cryptocurrencies. However, business applications of blockchains differ from what you’ll find in Bitcoin or Ethereum. Most enterprise blockchain applications are built on permissioned networks that link a group of stakeholders to streamline critical, often proprietary business processes and transactions.
All businesses participating in a commercial ecosystem need a ledger to record transactions. Any business network that records transactions—and does not want to depend on a central proxy that everyone must trust—can be remade through blockchain technology.
Blockchains and their underlying distributed ledger technologies (DLTs) can be used to record promises, trades, transactions, or any items we never want to disappear. Mirrored exactly across all nodes in a given network, the distributed ledger gives everyone in an ecosystem an identical copy of the common system of record.
When used as an enterprise software solution, blockchain enables trust where it did not exist and removes layers of inefficiency. And when built as open source software, blockchain serves as a common and open platform that enterprises can build collectively and use confidently as shared infrastructure for multiparty systems.
Opportunity
Delivering on the full promise of blockchain across industries and use cases requires openness, trust and common building blocks, all hallmarks of an open source, community development model. The economies of scale, transparency and shared infrastructure of a multi-vendor, multi-stakeholder approach has proven to be an optimal way to address enterprise scenarios with widely varied requirements for decentralization, trust, continuity, and confirmation times.
In 2015, the Linux Foundation recognized the importance of blockchain and set out to advance its development and deployment across many industries. It launched Hyperledger as a project seeded by 21 founding members.
Six years later, Hyperledger has become Hyperledger Foundation and is home to 18 projects, including six graduated ones, and more than 75 technologies under development in the Hyperledger Labs. There is a growing, global community with hundreds of members, thousands of lines of code contributions, and hundreds of thousands of library downloads. Today, more than 350 companies have participated in contributing code to Hyperledger’s projects.
Following the model of the Linux Foundation, Hyperledger Foundation provides a neutral, open community supported by technical and business governance. Hyperledger Foundation hosts a number of open source software projects that serve as the building blocks for enterprise blockchain deployments. These projects are conceived and built by the Hyperledger developer community as freely available, enterprise-grade software that vendors, end user organizations, service providers, start-ups, academics, and others can use to build and deploy blockchain networks and even commercial solutions.
The role of Hyperledger Foundation is to ensure the health and transparency of the community and all its projects, including managing the development cycle, software licensing, security audits, and provenance tracking for every line of code. In short, Hyperledger Foundation provides the backbone of services that open source projects require to ensure community growth. This increases the willingness of enterprise software companies, start-ups, and independent developers to commit resources to open source projects.
In just a few years, the first wave of enterprises adopting Hyperledger technologies moved from early-stage testing to proofs of concept to production systems. These deployments confirmed that strategically developed and implemented blockchain delivers unprecedented gains in speed, security, and transparency. Now, Hyperledger technologies are being used in everything from powering global trade networks and supply chains to fighting counterfeit drugs, banking “unbanked” populations, and ensuring sustainable manufacturing. Already, more than half of the companies on the Forbes Blockchain 50, a list of companies that lead in employing distributed ledger technology, use Hyperledger-powered networks.
“Hyperledger’s prolific code projects include solutions that support the most secure, private, multi-party ledger networks as well as solutions that work with the largest public networks, and most of the space in between. Even in this new and emerging ecosystem, multiple recent surveys and reports have shown that Hyperledger has leading market share among major enterprises that are implementing DLT solutions.”
– Robert Palatnick, Managing Director and Global Head of Technology Research and Innovation, DTCC
Like the internet, this space will take years to fully mature. But the race is on to put this technology to work. Concerns about public health, climate change, social justice, misinformation, privacy, and other issues are fueling the urgency for multiparty systems that increase trust, boost efficiency, and ensure authenticity. All of this is accelerating adoption of enterprise blockchain technologies.
To drive widespread adoption of enterprise blockchain, Hyperledger Foundation must continue to fuel the development of both the technology and ecosystem of developers, service providers, and users. It is well positioned, as part of the larger Linux Foundation, to foster a growing, global community that is engaged and committed to advancing the development and deployment of its technologies.
Learn more about Hyperledger and the Hyperledger Foundation at https://www.hyperledger.org/
Stay Connected with the Linux Foundation
Home » Articles » A Linux Forensics Starter Case Study
A Linux Forensics Starter Case Study
Linux is the dominant operating system used for the millions of web servers on which the Internet is built. ZDNet reports , in fact, that 96.3% of web servers run Linux. Because of this, a large number of incidents involving web servers will involve analyzing Linux based systems.
Nonetheless, free material to learn and understand Linux forensics is lacking. That lack led to the creation of this case and the training material that accompanies it.
Due to the dominance of Linux web servers, this case covers a compromised web server running Ubuntu Server. This article covers not only how to investigate a compromised Linux web server, but also the different locations where the artifacts can be found and how to extract and analyze them. The case uses basic methods and assumes no Linux forensics or Linux usage background is required.
This case was presented at OSDFCon 2019 and was covered as a workshop at the same conference, plus DFRWS 2020.
Mounting and Verification
To start analyzing our case, we need to set up our analysis environment. First we will create a directory to mount the case image for analysis. Next, since we are using an .E01 image, we can use ewfverify from libewf to verify the image’s integrity. Then, using mmls from The Sleuth Kit (TSK) , we can see the volumes that are present on the disk image.
Get The Latest DFIR News
Join the forensic focus newsletter for the best dfir articles in your inbox every month..
Unsubscribe any time. We respect your privacy - read our privacy policy .
In this case, we are interested in the volume at index 6, which is labeled as a Linux Logical Volume Manager (LVM) volume (see Figure 1.1). LVM allows you to create Logical Volumes that can span across multiple disks or Physical Volumes. These Logical and Physical volumes are associated with each other through a Volume Group.
Once we have the image mounted to our analysis environment, we will need to map these Logical and Physical volumes in order to access the file system inside the LVM volume.

Figure 1.1 – mmls output showing LVM volume
Next we will use ewfmount from libewf to get a raw representation of the contents of the .E01 image that we can mount for analysis. If you see a file called ewf1 appear in the directory you ran ewfmount against, you can proceed.

Figure 1.2 – Running ewfmount
Now, we want to create a mapping of the LVM volume on the drive so we can analyze its contents. To do this, we will use kpartx to automatically detect and create these mappings for us (see in Figure 1.3).
The -a option is used to detect and add all partition mappings the tool finds. You can use -l to display what mappings kpartx will be able to find and add. And -v can be used for increased verbosity.
Ensure you run kpartx without the -l option in order to create the partition mappings, since this option only shows what partitions will be mapped and then removes the devices as seen in the yellow box in Figure 1.3.

Figure. 1.3 – Checking mappings and creating mappings for LVM volume with kpartx
Once the partition mappings are created, we can look at information about the Logical Volumes using lvs or lvdisplay, information about the physical volumes using pvs or pvdisplay, and information about the volume groups using vgs or vgdisplay.
Using lvdisplay, we can see the names of each Logical Volume as well as the Volume Group they are part of. We can also ensure they are read only and active (see Figure 1.4). If you see “NOT available” under the “LV Status” line, you can use vgchange -ay vg_name to activate all Logical Volumes in the Volume Group. The volume being active allows us to mount and analyze its contents with our tools.

Figure. 1.4 – Output of lvdisplay. Note LV Status
You can also use dmsetup info to get the UUID of each logical volume (see Figure 1.5). Note that the volume must be active to be displayed by this command.

Figure. 1.5 – Output of dmsetup
Now we can mount the root volume which contains the data. The “swap” volume is only a supplement to system memory. However, running a normal mount command gives us an error. This is because the filesystem was unmounted improperly and needs to be checked using the filesystem journal before it can be mounted again.
To get around this, we can add the noload option to our mount command to prevent the journal from being checked while mounting (see Figure 1.6).

Figure. 1.6 – Successful mounting of root volume
Now all of the files on the root volume can be viewed and processed by pointing to the “case1/” directory.
We recommend familiarizing yourself with the Linux File System Hierarchy before proceeding, as it will help you navigate through Linux systems easily and inform you of where files should be stored on any Linux system. You should also check the timezone of the image by looking at the file at “case1/etc/timezone”.
Looking at login logs
To start our analysis, we can look at the log files. You can find most system and application log files by looking under “/var/log” on a Linux system. In this case, we are most interested in “wtmp”, “btmp”, “auth.log”, and “lastlog” to start our investigation, since all of these files store login attempts.
While the “btmp” file only stores failed login attempts, the “wtmp” file stores all logins to the system and is the default file used by the last command to show the last users logged in. We can view both of these files using the last command on our analysis machine, pointing it to the files in our image using the -f option.

Figure. 2.1 – Contents of btmp

Figure. 2.2 – Contents of wtmp
From Figure 2.1, we can see there are a lot of failed login attempts coming from the IP address 192.168.210.131. We also see the user “mail” was logged into from the same IP address, and we can see they logged in four separate times in Figure 2.2.
Next, we can analyze “auth.log” to confirm any findings from “wtmp” and “btmp” logs. We can also see more information about the types of logins, any uses of sudo, and more auth related events.

Figure. 2.3 – Section of auth.log
From a quick search of the “auth.log” file looking for the IP address and the username “mail”, we can see some of the suspicious activity already in Figure 2.3. We can see the many failed password attempts against root, likely from a brute force attack. Approximately an hour after the end of the failed brute force attempts, we see the php user created and added to the “sudo” group as well as the user mail being given a login shell, password, and being added to the sudo group. From this we can determine the attacker found another way into our system.
Finally, we can look at the “lastlog” file, which shows the last login of each user on the system and where it came from. In our case, the “lastlog” file has been damaged, but we can still find some information from it using the strings command. As you can see in Figure 2.4, the same IP from the “wtmp”, “btmp”, and “auth.log” file can be seen.

Figure. 2.4 – Result of strings on lastlog file
Using The Sleuth Kit (TSK)
Next we want to find out what happened to the “lastlog” file. TSK is a great set of tools for performing analysis on a file system level. Since it works on a file system level, you need to point it directly towards a file system.
When we were performing the mounting process, we mapped the file systems in the LVM volume to their own devices using kpartx. To access the file system we are interested in, we can look under the “/dev/mapper” directory on our analysis machine.

Figure. 3.1 – Mapped mount points
In this case, our file system is “/dev/mapper/VulnOSv2–vg-root” (See Figure 3.1). We can use this path to run TSK tools on the file system to find out what happened to the “lastlog” file. First we can run fls with the -l option to find the inode for the “/var” directory. The fls command will list out all the files on the root of the file system in long listing mode.
From there, we can find what is the inode number of the /var directory. Using the fls -l command is similar to running the normal Linux ls -l command. The output provides a long list of details, including the indoe number, the owner of the file, the group owner of the file, permissions, time stamps, etc.
Figure 3.2 shows the output that we get with the inode of the “/var” directory. Note that the output has been truncated by using grep to find the line referencing the “/var” directory.

Figure. 3.2 – Finding “/var” directory using fls
Next, we can list the contents of the “/var” directory by appending the inode we found to our previous command (e.g. sudo fls -l VulnOSv2–vg-root 523266) to find the inode of the “/var/log” directory. Then we can use the inode we find for the “/var/log” directory to list its contents and find out what happened to the “lastlog” file.

Figure. 3.3 – lastlog inodes shown
In Figure 3.3 we can see that the “lastlog” file has a “.swp” and “.swpx” version of it. Unfortunately, as is common, these inodes have been reallocated, so we cannot extract data from them. However, we can determine that this file was modified based on the fact that these “.swp” and “.swpx” files existed, since they are created when a file is edited in the vi editor as a temporary file that can be recovered if vi crashes.
Users and Groups, etc.
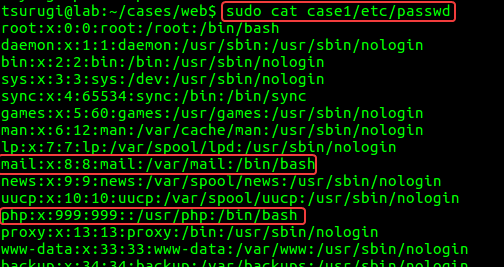
Next, we can gather information on what users and groups are on the system. To do this, we start by looking at three files under the “/etc” directory: “passwd”, “shadow”, and “group”.
- The passwd file will contain a list of all users on the system, their home directory, login shell, and UID and GID numbers.
- The shadow file contains hashed user passwords.
- Finally, the group file keeps a list of all the members of each group on the system.
We found two suspicious users earlier, “mail” and “php”. We can use these files to investigate them.
Firstly, we can check the “passwd” file to see if the “mail” and “php” uses entries. We can see that both users are using bash as their login shell and we can see each user’s home directories in Figure 4.1.
Next, we can check the “shadow” and “group” files for these users. The command seen in Figure 4.2 prints the contents of each file to stdout, then searches for entries with “mail” or “php” using “grep” and displays those to us.
We can see that both “mail” and “php” have a password from the shadow file, and that “mail”’s password will never expire. From the “group” file, we can see that both “mail” and “php” are a part of the “sudo” group, which gives them access to the sudo command.

Figure 4.1 – passwd file contents

Figure 4.2 – Results of searching shadow and group file contents
Next, in Figure 4.1, we can see the “mail” and “php” users home directories. Checking the contents of these directories in Figure 4.2, we can see the “php” user only has the files created from the skeleton used to create the user.
The “mail” user, however, has a “.bash_history” file we can analyze. This is a hidden file, denoted by the “.” prefix, that logs the commands that were run in the bash shell.

Figure 4.3 – php and mail users home directories
In Figure 4.3, we can see the “mail” user mainly used “sudo su -” to gain access to root privileges. With this knowledge, we can check the “root” user’s “.bash_history” in figure 4.4, which confirms that the “lastlog” file was modified and gives us two new files to check, “update.php” and a “.c” file with a suspicious name.

Figure. 4.4 – mail user’s .bash_history

Figure. 4.5 – root user’s .bash_history
File Carving/Recovery on ext4
Based on the contents of the .bash_history, we notice that there are some deleted files we’re interested in recovering. Now, since we are dealing with an EXT4 file system, this means that if the file was deleted, then all the metadata that points to the actual location of the file is now gone.
In other words, the pointers are no longer pointing to the file inside the volume. Therefore we need another method to recover the deleted files. There are two approaches to recover the data, only one is covered in this article as the other is still being researched.
Our recovery method depends on the file system’s EXT4 journal file . In order to extract the journal, we will be using the debugfs tool. All we need to do is request debugfs to execute the dump command and dump the file that has the inode number 8, which is the journal’s inode. This can be done using the following command:
$ sudo debugfs -R ‘dump <8> ./journal’ /dev/VulnOSv2-vg/root
The result should be saved in a file named “journal” and is 128MB in size.
We also need to define our search window before we start our recovery process. To do that, we will create two variables. Based on the case details of when the suspicious activity happened. One variable is named AFTER that holds the date Oct. 5th, 2019, and one is named BEFORE that holds the date Oct. 8th, 2019, as seen in Figure 5.1.

Figure 5.1 – Defining Search duration
Our next step is recovering the deleted files. For this, we will use the tool Ext4magic. Using our previously defined variables, we will configure Ext4magic to search for files that were deleted after Oct. 5th and before Oct. 8th and use the journal file to assist with that.
We specified where we want the results of our recovery to be stored (“output1”) and to search for files that were deleted from the “tmp” directory, since that is where we noticed files were deleted from. The command used can be found in Figure 5.2.

Figure 5.2 – Recovery Attempt using Ext4magic
We can see that only five files were recovered from the volume using this command. However, we can try a different way. This time, we will be using the same tool again, but try to recover all deleted files using the -m option instead of -r and storing the results in the “output2” directory as seen in Figure 6.3.

Figure 5.3 – Using Ext4magic to Recover All Deleted Files
As you can see, more files were recovered and we can now skim through the files and analyze them. We can also see a top-level root hierarchy of the file system recovered and stored in the output2 directory as seen in Figure 5.4.

Figure 5.4 – File System Hierarchy of Recovered Files in Output2
By searching through the recovered files in the “output2” directory, we will be able to locate the kernel exploit that was used to exploit the system to gain root privileges.
Finding Out How
From our examination of the logs, we know that the threat actor did not gain access to the system using the brute-force attack, which means there is another way they gained access to the server.
Now, since we know this is a web server, it is important to check what web applications are being used and if any of them are vulnerable or not. By checking the files in the “/var/www/html” directory, we found that there is a Drupal web application being used from the index.php file as seen in Figure 6.1.

Figure 6.1 – Name of Web Application used as seen in Index File
Now we need to find the Drupal web application version number to see if this web application is vulnerable or not. This was done using the find with grep commands as seen below:
$ find -type f -exec grep -il version {} \;
The version number can be found in the file named bootstrap.inc found under “./jabc/includes” directory. And as we see in Figure 6.2, the web server was using Drupal version 7.26, which is vulnerable to CVE-2014-3704 .

Figure 6.2 – Drupal Version Number found in bootstrap.inc File
Now from the CVE, we found that this vulnerability was being exploited using a POST request, which means we can now narrow down our search in the Apache logs to look for POST requests only and within a certain time frame.
By doing that, we found three POST requests, as seen in Figure 6.3. We notice that there is a blob of data being sent from the suspicious IP address 192.168.210.131 that we previously found.

Figure 6.2 – POST Request found in Apache’s access.log File
Now let’s focus on one of those POST requests, as seen in Figure 6.3, by copying the blob to a file and naming it blob.txt.

Figure 6.3 – Blob of Data in POST Request
If we look closely at the data, we can see that it looks like Base64 encoded data. The good thing is we can easily decode it using the base64 command found on Linux, which can be seen in Figure 6.4.

Figure 6.4 – Decoding the Base64 POST Request
IIf we examine the decoded data carefully, we can see that it is, first, a php script which is doing some kind of network activity. If we further examine the code, we can understand that it is actually a reverse shell written in PHP and is used to create a TCP socket to connect back to the suspicious IP address of our threat actor on port 4444.
If we compare the timestamps of when this file was uploaded to the server and when the users were added to the server, we can confirm that this is the method used by the threat actor to gain access to the system.
Another method that could be used to validate this, is to run a timeline analysis, which we are leaving as an exercise for the reader. All you need to do is run the two commands below and sift through the data.
Generating the timeline:
$ sudo log2timeline.py -z timezoneValue -t / –parse linux,apache_access,apt_history case1.timeline case1
Sorting and filtering the timeline:
$ sudo psort.py -z timezoneValue -o L2tcsv -w webserver.csv case1.timeline “date > ‘2019-10-05 00:00:00’ AND date < ‘2019-10-08 00:00:00’”
Linux forensics need not be intimidating, even if you don’t have a strong command of the operating system. In this article, we took you step by step through mounting a case image and mapping its volumes before mounting the relevant root volume. We walked through looking at login logs to recognize suspicious activity and used TSK to work out what happened to the damaged lastlog file.
From there, we gathered information on users and groups in the system. This investigation gave us two new files to check, and deleted files to carve and recover that ultimately show how the attacker exploited the system.
Dr. Ali Hadi is a Senior Information and Cybersecurity Specialist with 14+ years of industrial experience in Information Technology. He is currently a full time professor and researcher for both the Computer and Digital Forensics and Cybersecurity Departments at Champlain College, Vermont, USA. He holds a Bachelor’s degree in computer science, and both Master’s and PhD degrees in Computer Information Systems. Dr. Hadi provides consulting in several areas of security including digital forensics and incident response, cyber threat hunting, penetration testing, and vulnerability assessments. Dr. Hadi is also an author, speaker, and freelance instructor where he has delivered technical training to law enforcement agencies, banks, telecoms, private companies, and other institutes. Dr. Hadi’s research interests include digital forensics, incident response, and cyber threat hunting. More details can be found here .
Leave a Comment Cancel reply
You must be logged in to post a comment.

Jad Saliba, Founder & Chief Innovation Officer, Magnet Forensics

Book Your Place At The Refuge Tech Safety Summit 2024

Forensic Focus Digest, August 23 2024

Next Level In Mobile Data Extraction And Decoding – XRY 10.10.1

Andrea Lazzarotto, Digital Forensics Consultant and Developer

GMDSOFT Tech Letter: Unveiling Critical Evidence From Signal App Backup File Analysis
Join Our Newsletter
Join our subscribers list to get the latest news, updates and special offers directly in your inbox
- Interview Q & A
- Linux System Admin Interview Q & A
[2024] Common Linux System Administrator Interview Questions
Prepare for your next linux system administrator interview with this comprehensive list of common questions and answers. from basic commands to advanced system management, these questions cover everything you need to know to ace your interview and land your next sysadmin role..
![[2024] Common Linux System Administrator Interview Questions](https://www.webasha.com/blog/uploads/images/202408/image_750x_66cec19a39ea5.webp "case study on linux")
1. What is the Linux file system hierarchy?
2. how do you check the available disk space on a linux system, 3. what are the different runlevels in linux.
- 0: Halt (shutdown)
- 1: Single-user mode
- 3: Multi-user mode without a graphical interface
- 5: Multi-user mode with a graphical interface
4. How do you manage services in Linux?
5. what is the purpose of the /etc/fstab file, 6. how do you manage user accounts in linux, 7. what is the difference between chmod and chown , 8. how do you monitor system performance in linux, 9. what are cron jobs, and how do you manage them, 10. how do you troubleshoot network issues on a linux system, 11. what is ssh, and how do you configure it, 12. how do you configure a firewall in linux, 13. what is the purpose of the sudo command, 14. how do you manage package installations in linux, 15. what are selinux and apparmor, 16. how do you create and manage logical volumes in linux, 17. what is the purpose of the /var/log directory, 18. how do you configure raid in linux, 19. what is the difference between hard and soft links in linux, 20. how do you secure a linux server.
- Regularly updating the system and applying security patches
- Configuring firewalls and disabling unnecessary services
- Using strong, unique passwords and enabling SSH key-based authentication
- Monitoring logs and setting up intrusion detection systems (IDS)
- Implementing SELinux or AppArmor for additional security controls
21. What is a kernel in Linux, and what is its role?
22. how do you check the current kernel version in linux, 23. what is a swap partition, and how is it used, 24. how do you configure a static ip address in linux, 25. what is the difference between soft and hard limits in linux, 26. how do you automate tasks using shell scripting in linux, 27. what is the purpose of the fstab file, and how do you edit it, 28. how do you manage process priorities in linux, 29. what is the purpose of the /proc directory, 30. how do you monitor disk usage in linux, 31. how do you configure nfs (network file system) in linux, 32. what is the purpose of the /etc/hosts file, 33. how do you check for open ports on a linux system, 34. what is the difference between kill and killall commands, 35. how do you secure ssh access on a linux server.
- Change the default SSH port from 22 to a non-standard port
- Disable root login by setting PermitRootLogin no in the /etc/ssh/sshd_config file
- Use SSH key-based authentication instead of password authentication
- Implement fail2ban or similar tools to block repeated failed login attempts
- Restrict SSH access to specific IP addresses using firewall rules
36. What is a cron job, and how do you create one?
37. how do you configure and manage swap space in linux, 38. how do you handle system logs in linux, 39. what is the purpose of iptables in linux, 40. how do you perform a system update in linux, conclusion:.
- Linux system administrator interview questions
- Linux admin interview questions
- Linux sysadmin interview prep
- common Linux interview questions
- Linux administration
- Linux system admin job questions
- Linux commands
- Linux troubleshooting
- Linux system management
- Linux networking.

Ashwini Ghugarkar
Related Posts
![[2024] Top Linux System Admin Interview Questions for Beginners](https://www.webasha.com/blog/uploads/images/202408/image_650x434_66cec182eb677.webp "case study on linux")
[2024] Top Linux System Admin Interview Questions for Beginners
![[2024] Popular Linux System Admin Interview Questions](https://www.webasha.com/blog/uploads/images/202408/image_650x434_66cec10744cda.webp "case study on linux")
[2024] Popular Linux System Admin Interview Questions
![[2024] Linux System Admin Scenario-Based Interview Questions](https://www.webasha.com/blog/uploads/images/202408/image_650x434_66cec72a48048.webp "case study on linux")
[2024] Linux System Admin Scenario-Based Interview Questions
Popular posts.

How to Install Red Hat Enterprise Linux (RHEL) 9 ? RHEL...
Aayushi May 18, 2022 12152

Get 50% Discount on Azure Certification Exam Voucher AZ...
Aayushi Oct 15, 2022 9591

50% Discount on CKA, CKAD and CKS Certification 2023 |...
Aayushi Oct 11, 2022 9440

What is Linux Operating System and its Evolution and Fu...
Aayushi May 3, 2020 7505

50% Discount on Cisco( New CCNA & CCNP) Certification f...
Aayushi Feb 25, 2021 7120

Know Everything about RHCSA (Red Hat Certified System A...
Aayushi Sep 15, 2022 1487

Red Hat Remote Individual Certification Exams of RHCSA,...
Aayushi May 22, 2020 2667

Why is Certified Ethical Hacker (CEH v12) So Popular Ce...
Aayushi May 21, 2020 3399

What is kubernetes and Containers? Why is So Popular?
Aayushi May 15, 2020 2096
- Networking (5)
- Security (128)
- Interview Q & A (253)
- Python Interview Q & A (13)
- Common Interview Q & A (17)
- Cloud Admin Interview Q & A (39)
- Linux System Admin Interview Q & A (14)
- Networking Interview Q & A (1)
- Penetration Testing Interview Q & A (0)
- WAPT Interview Q & A (0)
- VAPT Interview Q & A (50)
- Ethical Hacking Interview Q & A (76)
- Study Material (2)
- IT Exams (39)
- Red Hat Certification (5)
- AWS Certification (1)
- Cyber Security Certification (3)
Random Posts

What is Linux and why it is most Popular OS?
Network Engineer Career Roadmap After 12th | Eligibility, Course, Fees...
[2024] Top 50+ CISM Interview Questions and Answers
[2024] CCNA Sample Interview Questions
Why Python is So Popular Programming Language? Making Career in Python...
- Ethical Hacking Risks
- role of artificial intelligence in cybersecurity
- business case studies
- CKA Study material
- DevOps pipeline security
- Cloud Service Providers
- entry-level job interviews
- Cloud Administration certification
- data protection in VAPT
- IoT Data Protection
- cybersecurity training
- advanced git interview questions
- learn cybersecurity
IMAGES
VIDEO
COMMENTS
•To know a little of the history of UNIX from which Linux is derived •To understand some principles upon which Linux's design is based •To examine the Linux process model and lifecycle •To describe how Linux schedules processes, provides kernel synchronization, and provides inter-process communication 11. UNIX Case Study (I) 2
Learn how various open source projects hosted by the Linux Foundation achieve their goals and innovate with the support of the foundation. See examples of projects in security, AI, blockchain, IoT, energy, and more.
Case Study on Linux Prof. Sujata Rizal 2 • Unix V6, released in 1975 became very popular. Unix V6 was free and was distributed with its source code. • In 1983, AT&T released Unix System V which was a commercial version. • Meanwhile, the University of California at Berkeley started the development of its own version of Unix.
Linux History. Linus Torvalds designed the free and open-source Linux operating system kernel in 1991. Torvalds set out to develop a free and flexible system for personal computers, drawing ideas from the UNIX operating system and the MINIX operating system. Teamwork in development was encouraged with the initial release of the Linux kernel, which attracted developers and enthusiasts globally ...
A modern free OS based on UNIX standards. Originally a small self-contained kernel in 1991 by Linus Torvalds, release open-source. Designed for eficiency on common PC hardware but now runs on a huge range of platforms. Kernel entirely original but compatibility gives an entire UNIX-compatible OS, for free.
Case Study: Machine learning drives down operational costs in media & entertainment industry. Learn how Canonical Managed Kubeflow helped create a modernised AI strategy. LXD, hypervisors, containerisation, virtualisation.
The Linux Security Modules (LSM) framework is a reference monitor system for the Linux ker-nel [342]. The LSM framework consists of two parts, a reference monitor interface integrated into the mainline Linux kernel (since version 2.6) and a reference monitor module, called an LSM, that implements reference monitor function (i.e., authorization ...
Linux. Linux is a popular open-source operating system. It was initially created by Linus Torvalds in 1991. At the time, Torvalds was a computer science student at the University of Helsinki, Finland and began working on the Linux project as a personal endeavor. The name Linux is a combination of his first name, Linus, and Unix, the operating ...
A data lake on your cloud with Spark, Kubernetes and OpenStack. Learn more about the benefits of the data lake architecture, and how you can efficiently adopt this technology at scale using modern private cloud technology. Private cloud, Kubernetes, Big data, Data Platform.
Because Linux is an interesting representative of existing software systems, we chose to examine it as a case study. In particular, we studied the Linux kernel, which is respon- sible for process, memory, and hardware device manage- ment. The Linux kernel is itself a large system (approxi- mately 800 KLOC).
This video covers the History and the Design Principles of the Linux Operating System authored from the book Operating System Concepts - 9th Edition by Silbe...
The RCU API's evolution over time clearly shows that Linux's extremely diverse set of workloads and platforms has changed RCU to a far greater degree than RCU has changed Linux---and it is reasonable to expect that other technologies that might be proposed for inclusion into Linux would face similar challenges.
Because Linux is an interesting representative of existing software systems, we chose to examine it as a case study. In particular, we studied the Linux kernel, which is respon- sible for process, memory, and hardware device manage- ment. The Linux kernel is itself a large system (approxi- mately 800 KLOC). Although there is some existing docu-
12. UNIX Case Study (II) 11 808 Chapter 18 The Linux System kernel virtual memory memory invisible to user-mode code stack memory-mapped region memory-mapped region memory-mapped region run-time data uninitialized data initialized data program text the 'brk' pointer forbidden region Figure 18.6 Memory layout for ELF programs.
With this case study, we can get down to a lower level on the implementation details, which is something we wanted to be mindful of during the other articles. This article and the accompanying repositories aim to demonstrate the stack in an intuitive and straightforward approach.
Abstract. We use 810 versions of the Linux kernel, released over a period of 14 years, to characterize the system's evolution, using Lehman's laws of software evolution as a basis. We investigate different possible interpretations of these laws, as reflected by different metrics that can be used to quantify them.
UNIT V CASE STUDY. 18 The Linux System. x An operating system is a program that acts as an interface between the user and the computer hardware and controls the execution of all kinds of programs. The Linux open source operating system, or Linux OS, is a freely distributable, cross- platform operating system based on UNIX. x The Linux consist ...
The Linux operating system is a complete reimplementation of the POSIX interface initiated by Linus Torvalds [187]. Linux gained popularity throughout the 1990s, resulting in the promotion of Linux as a viable alternative to Windows, particularly for server systems (e.g., web servers). As Linux achieved acceptance, variety of efforts began to ...
Case Study on Linux - Free download as Word Doc (.doc / .docx), PDF File (.pdf), Text File (.txt) or read online for free. Case Study on Linux for FY BscIT Sem-1 Literature Review Linux Milestone Introduction Open Source Linux Linux Operating System Virtual Memory, Linux Today Features of Linux Why use or recommend Linux? System Requirements for Linux User Interface Desktop Programming on ...
Unit 5: Case study on Linux 1. Explain evolution of UNIX. UNIX development was started in 1969 at Bell Laboratories in New Jersey. Bell Laboratories was (1964-1968) involved on the development of a multi-user, time- sharing operating system called Multics (Multiplexed Information and Computing System). Multics was a failure.
Linux Foundation. "Open source is all about community and trust. Pingboard helps us save time and be efficient while supporting the community.". The Linux Foundation is the not-for-profit that enables mass innovation through open source. It has a virtual workforce that mirrors the open source community at large—geographically dispersed ...
In 2015, the Linux Foundation recognized the importance of blockchain and set out to advance its development and deployment across many industries. It launched Hyperledger as a project seeded by 21 founding members. Six years later, Hyperledger has become Hyperledger Foundation and is home to 18 projects, including six graduated ones, and more ...
ZDNet reports, in fact, that 96.3% of web servers run Linux. Because of this, a large number of incidents involving web servers will involve analyzing Linux based systems. Nonetheless, free material to learn and understand Linux forensics is lacking. That lack led to the creation of this case and the training material that accompanies it.
As a Linux System Administrator, you are responsible for managing and maintaining Linux-based systems, ensuring their optimal performance, security, and reliability. Whether you are preparing for a job interview or looking to strengthen your skills, understanding common interview questions can help you stand out as a candidate.