How to Insert PowerPoint into Word: A Step-by-Step Guide for Beginners
Inserting a PowerPoint into Word might sound tricky, but it’s easier than you think! You’ll just need to follow a few simple steps to effectively embed a PowerPoint presentation into a Word document. Whether you’re working on a report, creating a comprehensive guide, or just want to mix things up, this guide will show you how to seamlessly integrate your slides into Word.

How to Insert PowerPoint into Word
In this guide, we’ll cover the steps to insert a PowerPoint presentation into a Word document. The process is straightforward and can be completed quickly, enhancing your document with the visual elements from your PowerPoint slides.
Step 1: Open Word and PowerPoint
First, you need to open both the Word document and the PowerPoint presentation you want to merge.
Make sure you have both files ready and accessible. It helps to have them side by side on your screen or in minimized windows for quick toggling.
Step 2: Select the Slide in PowerPoint
In your PowerPoint presentation, choose the slide that you want to insert into your Word document.
Click on the specific slide thumbnail in the left pane of PowerPoint to highlight it. This step is crucial because you need to know which slide you’re working with.
Step 3: Copy the PowerPoint Slide
Right-click on the selected slide and click "Copy" or simply press Ctrl+C .
Copying the slide places it on your clipboard. You can now move to the Word document and prepare to paste the slide.
Step 4: Go to Your Word Document and Position the Cursor
In your Word document, place your cursor where you want the PowerPoint slide to appear.
This ensures you insert the slide exactly where you intend, preventing any need for adjustments later.
Step 5: Paste the Slide into Word
Right-click where your cursor is in the Word document and click "Paste" or press Ctrl+V .
This action embeds the PowerPoint slide into your Word document. You should see the slide appear immediately in the exact spot you chose.
Step 6: Adjust the Slide Size and Position
Click on the inserted slide within Word to resize or reposition as necessary.
You can drag the corners to resize the slide or click and drag to move it to the perfect spot.
Once you’ve completed all the steps, your PowerPoint slide will be part of your Word document. You can now save your Word document, and it will contain the slide you just inserted, adding a visual element to your text.
Tips for Inserting PowerPoint into Word
- Use High-Resolution Slides : Ensure your PowerPoint slides are high quality so they appear clear and professional when inserted into Word.
- Keep Formatting Consistent : Maintain consistent fonts and colors between your slides and Word document for a cohesive look.
- Use Slide Titles : Titles on your slides help provide context within the Word document, making it easier for readers to follow.
- Check File Size : Embedding large PowerPoint files can increase your Word document’s size. Compress images if necessary.
- Preview Your Document : Always preview your final document to ensure everything appears as intended before sharing or printing.
Frequently Asked Questions
Can i insert multiple slides at once.
Yes, you can insert multiple slides by selecting and copying them in PowerPoint and then pasting them into Word.
Does the inserted slide remain editable?
Yes, the inserted slide can often be edited within Word, though it may depend on the version of Word and PowerPoint you’re using.
Will the animations and transitions from PowerPoint work in Word?
No, animations and transitions won’t work in Word. Only the static content of the slide is inserted.
Can I link the PowerPoint to Word instead of embedding?
Yes, you can link to the PowerPoint file, which allows updates in PowerPoint to reflect in Word. Use the "Paste Special" option to do this.
Is it possible to convert the whole PowerPoint to a Word document?
Yes, you can export your PowerPoint to Word by using the "Export" or "Create Handouts" feature in PowerPoint.
- Open Word and PowerPoint
- Select the Slide in PowerPoint
- Copy the PowerPoint Slide
- Go to Your Word Document and Position the Cursor
- Paste the Slide into Word
- Adjust the Slide Size and Position
Inserting PowerPoint into Word can elevate your documents by combining text and visual elements seamlessly. Whether you’re preparing a report, crafting a detailed guide, or simply wanting to enhance your presentation, knowing how to insert a PowerPoint into Word is a handy skill. Remember, both the content and appearance are crucial, so take the time to ensure everything looks polished and professional. If you need further assistance, don’t hesitate to explore more resources or seek help from knowledgeable colleagues. Now, go ahead and try it out in your next document – you’ll be amazed at how much it can improve your presentation!

Kermit Matthews is a freelance writer based in Philadelphia, Pennsylvania with more than a decade of experience writing technology guides. He has a Bachelor’s and Master’s degree in Computer Science and has spent much of his professional career in IT management.
He specializes in writing content about iPhones, Android devices, Microsoft Office, and many other popular applications and devices.
Read his full bio here .
Share this:
- Click to share on Twitter (Opens in new window)
- Click to share on Facebook (Opens in new window)
- Click to email a link to a friend (Opens in new window)
- Click to share on LinkedIn (Opens in new window)
- Click to share on Reddit (Opens in new window)
- Click to share on Pinterest (Opens in new window)
- Click to share on Tumblr (Opens in new window)
Related posts:
- How to Duplicate a Slide on Google Slides
- How to Hide a Slide in Google Slides
- How to Change Slide Dimensions in Google Slides
- How to Delete a Slide on Google Slides
- How to Delete Multiple Slides in Google Slides
- How to Remove Text Box in Powerpoint 2016
- How to Put Canva Slides into Google Slides: A Step-by-Step Guide
- How to Number Slides in Google Slides
- How to Make Columns in Google Slides
- How to Print Multiple Slides on One Page – Powerpoint 2013
- How to Embed Video in Powerpoint 2013
- How to Import Slides in Google Slides: A Step-by-Step Guide
- How to Turn a PowerPoint into Google Slides: A Step-by-Step Guide
- How to Copy and Paste Multiple Slides in Google Slides: A Simple Guide
- How to Hide a Slide in Powerpoint 2013
- How to Put YouTube Videos in Google Slides
- How to – Powerpoint Vertical Slide Setting in Powerpoint for Office 365
- How to Insert Videos in Google Docs
- How to Make Google Slides Play Automatically: A Step-by-Step Guide
How to Convert PowerPoint to Word: A Step-by-Step Guide
Converting a PowerPoint presentation to a Word document can be a useful skill, whether you’re looking to create handouts, collaborate on content, or just prefer the Word format. It’s a pretty straightforward process that involves a few simple steps using Microsoft Office’s built-in features. After reading this paragraph, you’ll have a basic understanding of how to convert your PowerPoint file into a Word document.
Step by Step Tutorial: Converting PowerPoint to Word
Before jumping into the steps, it’s important to understand that converting your PowerPoint to Word will create a new document that displays the content of your slides in Word format. This can be handy for editing or sharing in a more universally accessible format.
Step 1: Open your PowerPoint presentation
First things first, you need to have your PowerPoint presentation open. Make sure it’s the final version, as any changes made after conversion won’t be reflected in the Word document.
Opening your PowerPoint presentation is the initial step in the conversion process. Ensure that all the information you want to convert is included and that you’re satisfied with the layout and content of your slides.
Step 2: Click on ‘File’ in the top-left corner
Once your PowerPoint is open, you’ll need to access the File menu to begin the conversion process.
Clicking on ‘File’ will bring up a list of options, including ‘Save As’ and ‘Export,’ which are the two main routes you can take to convert your PowerPoint into a Word document.
Step 3: Select ‘Export’ from the drop-down menu
After clicking on ‘File,’ you’ll see an option labeled ‘Export.’ Click on this to move forward with the conversion.
In the ‘Export’ menu, you’ll find different options for how you can convert and save your PowerPoint presentation. You’ll want to look for ‘Create Handouts.’
Step 4: Choose ‘Create Handouts’
Within the Export menu, you’ll see an option to ‘Create Handouts.’ This is the feature that will allow you to convert your PowerPoint slides into a Word document.
When you choose ‘Create Handouts,’ a new menu will pop up, giving you a few different options for how your content will appear in the Word document.
Step 5: Select ‘Create Handouts in Microsoft Word’
Click on the ‘Create Handouts in Microsoft Word’ button to initiate the conversion process.
After clicking this button, you’ll be prompted to choose how you want the slides to be arranged in the Word document. You can choose to have slides with notes next to them, blank lines next to the slides for audience notes, or just the slides themselves.
Step 6: Choose your page layout and click ‘OK’
Decide how you want your slides to be laid out in the Word document. You can have them appear as thumbnail images with or without accompanying notes.
Once you’ve selected your desired layout, click ‘OK.’ The PowerPoint will then convert and open as a Word document, which might take a few moments depending on the size of your presentation.
After completing these steps, you’ll have a new Word document with the content of your PowerPoint slides. You can now edit, format, and save this document just like any other Word file.
Tips: Making the Most of Your PowerPoint to Word Conversion
- Save your PowerPoint presentation before starting the conversion process to ensure you don’t lose any work.
- Consider the layout of your slides and how they will translate to a Word document. Some complex designs might not convert cleanly.
- If you have extensive notes in your PowerPoint, make sure to choose a layout that includes these in the Word document.
- Review and edit your converted Word document to fix any formatting issues that may have arisen during conversion.
- Save your new Word document in a location you’ll remember, and consider giving it a descriptive name that differentiates it from the original PowerPoint file.
Frequently Asked Questions
What versions of microsoft office do i need to convert powerpoint to word.
You will need a version of Microsoft Office that includes both PowerPoint and Word. Generally, any version from Office 2007 onwards should have this capability.
Can I convert a PowerPoint to Word on a Mac?
Yes, the process is similar to the one described above for Windows. The menus might look slightly different, but the overall process is the same.
Will animations and transitions in PowerPoint transfer to Word?
No, animations and transitions are specific to PowerPoint. When you convert to Word, these will not be included in the document.
Can I convert a PDF of a PowerPoint presentation to Word?
While it’s not the same process, you can use a PDF converter tool to convert a PDF into a Word document. However, the formatting may not be as clean as converting directly from PowerPoint.
What should I do if my formatting looks off after converting?
You may need to manually adjust the formatting in your Word document. This could include fixing line breaks, image placement, and text formatting.
- Open your PowerPoint presentation.
- Click on ‘File’ in the top-left corner.
- Select ‘Export’ from the drop-down menu.
- Choose ‘Create Handouts’.
- Select ‘Create Handouts in Microsoft Word’.
- Choose your page layout and click ‘OK’.
Converting a PowerPoint presentation to a Word document is a useful skill that can make your content more accessible and easier to distribute. Whether you’re a student wanting to create study guides or a professional needing to share presentation notes, mastering this process can save you time and make your work more versatile. Remember, the key is to carefully choose the layout that best fits your needs and to make any necessary formatting adjustments once the conversion is complete. With these tips and steps in mind, you’re ready to convert your PowerPoint to Word with confidence.

Matthew Burleigh has been writing tech tutorials since 2008. His writing has appeared on dozens of different websites and been read over 50 million times.
After receiving his Bachelor’s and Master’s degrees in Computer Science he spent several years working in IT management for small businesses. However, he now works full time writing content online and creating websites.
His main writing topics include iPhones, Microsoft Office, Google Apps, Android, and Photoshop, but he has also written about many other tech topics as well.
Read his full bio here.
Share this:
Related posts:.
- Can I Convert My Powerpoint to Google Slides?
- How to Create Powerpoint Handouts in Microsoft Word: A Step-by-Step Guide
- How to Save Powerpoint as PDF with Notes
- How to Convert a PowerPoint to Word and Edit with Ease
- How to Check Word Count on Powerpoint 2010
- How to Convert PPT to Word: The Ultimate 2024 Guide
- How to Drag Slides From One PowerPoint to Another: A Step-by-Step Guide
- How to Convert PowerPoint Presentations to HTML: A Step-by-Step Guide
- How to Make a Powerpoint Slide Vertical in Powerpoint 2013
- How to Convert Google Slides to PDF
- How to Change a PowerPoint to a Handout Layout: A Step-by-Step Guide
- How to Set Time for Slides in Powerpoint
- How to Embed a Word Document Into PowerPoint 2000: A Step-by-Step Guide
- How to Convert an Adobe PDF to Word: A Step-by-Step Guide
- How to Convert HTML Pages Into Powerpoint: A Step-by-Step Guide
- How to Do Handout Formats on a PowerPoint for a Mac: Step-by-Step Guide
- How to Convert DBF to XLS: A Step-by-Step Guide
- How Do You Print Handouts in Powerpoint 2010?
- How to Change Hyperlink Color in Powerpoint 2010 (An Easy 5 Step Guide)
- How to Convert an Adobe Pagemaker 6.5 File to Word: A Step-by-Step Guide
Byte Bite Bit
How to Insert PowerPoint into Word: Step-by-Step Guide
Ever found yourself juggling between Microsoft PowerPoint and Microsoft Word, wishing you could merge those vibrant slides into your well-structured documents seamlessly? You’re not alone. I remember the headaches before I got the hang of it. But guess what? It’s easier than you think, and I’m going to show you exactly how.

To start, visualize copying a slide from your PowerPoint presentation and dropping it into Word. Simply click on the slide in PowerPoint, copy it, jump to Word, and paste it directly where your cursor is positioned. Voila! Now, you’ve got a PowerPoint slide sitting pretty in your Word document.
If linking the slide dynamically to keep it updated is more your style, use the “Insert” tab in Word, select “Object,” and browse to your PowerPoint file. This method embeds the slide as a PowerPoint object, giving you the flexibility to double-click and edit it right there in Word. No more back-and-forth hassle.
- 1.1 Using the Insert Tab for Text and Images
- 1.2 Embedding Files and Objects
- 2.1 Incorporating Content from Other Microsoft Applications
- 2.2 Organizing Slides and Content for Impact
- 3.1 Linking Objects Across Files
- 3.2 Managing and Updating Linked Data
Inserting Content Into Your Document
When adding content to a Microsoft Word document, it’s essential to know the right tools for the task. This guide will cover inserting text, images, embedding files, and objects, ensuring your content is well-presented.
Using the Insert Tab for Text and Images
Inserting text or images into your Word document is straightforward. Place your cursor where you want to add the content.
- Go to the Insert tab on the Ribbon.
- Choose Text Box for additional formatting options, or select Pictures to insert an image.
For images, you have options to insert from your device or online sources. I often prefer local images because of their reliability and control over resolution.
Once inserted, click on the image to access the Picture Format tab. Here, you can adjust size, style, and effects to get the desired look. This is an easy way to make your document look professional and visually appealing.
Embedding Files and Objects
Embedding files and objects can enhance your document’s functionality by including external information directly.
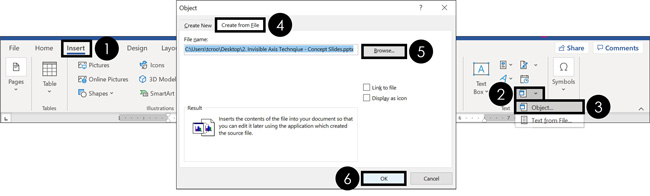
- On the Insert tab, click Object in the Text group.
- Select Create from File and browse for your file.
For instance, embedding a PowerPoint slide can be done by choosing the specific slide to display its content within Word. This method keeps the object updated alongside its source file if linked, ensuring consistency.
Embedded objects, like Excel charts, still retain their functionality, allowing for interactivity within your document. The embedded content is a static snapshot unless you choose to link them, making the data dynamic.
This approach is handy for keeping everything in one file, which is particularly convenient for presentations or collaborative projects.
Mastering PowerPoint Presentations
To create impactful PowerPoint presentations, it is essential to incorporate content from other Microsoft applications effectively and to organize slides and content for maximum impact. Here’s how you can do this efficiently.
Incorporating Content from Other Microsoft Applications
When working on a PowerPoint presentation, borrowing content from other Microsoft applications can be a game-changer. By incorporating charts from Excel, text from Word, or even other slides from separate PowerPoint files, you can enhance the richness of your presentation.
I start by using the Insert Object feature. It allows embedding elements like Excel charts directly into slides. This method keeps the data live and editable. To do this:
- Go to the Insert tab.
- Select Object in the Text group.
- Choose Create from File and browse for the necessary file.
For Word documents, I paste formatted sections into my PowerPoint, ensuring text consistency and professionalism. This seamless integration makes my presentations informative and visually cohesive.
Organizing Slides and Content for Impact
Effective organization of slides can elevate your presentation from average to exceptional. Arranging slides in a logical order ensures the audience can follow your narrative without confusion. Here’s how I manage this:
- Outline View: I use the Outline view to structure my content logically.
- Thumbnails: I rearrange slide thumbnails to ensure a natural flow.
- Group Similar Slides: I group related slides together to build story segments.
- Use of Visuals: Incorporate images, charts, and tables to break up text-heavy slides.
Example: Instead of one bulky slide, I break it into smaller, digestible parts using visuals and bullet points.
This approach keeps the audience engaged and enhances their retention of the material. Remember, a well-organized slide show speaks volumes about your professionalism and attention to detail.
Advanced Techniques for Linking and Updating
The power and flexibility of linking and updating PowerPoint slides within a Word document can greatly streamline your workflow, especially in dynamic environments. In the following subsections, we will discuss how to link objects across files and manage linked data effectively.
Linking Objects Across Files
Linking a PowerPoint slide in a Word document helps you maintain a dynamic connection to the source file.
Steps to Link a PowerPoint Slide:
- Open the Word document and place the cursor where the slide should appear.
- Go to the “Insert” tab.
- Click on “Object” in the “Text” group.
- In the dialog box, select “Create from File” and browse to your PowerPoint file.
- Check the “Link to File” box.
You can also use Paste Link if you have the slide copied. This ensures any updates in the source file reflect in the Word document, saving you time and maintaining consistency.
Managing and Updating Linked Data
After linking, it’s crucial to manage and update the linked data to keep it current.
Updating a Linked Object:
- Right-click the linked object.
- Select “Linked Slide Object” then “Links…”.
- In the dialog box, click “Update Now” to refresh the data.
In scenarios where the linked source file moves or changes, you might need to re-establish the link. Right-click the linked object, choose “Linked Slide Object”, and go to “Change Source…” to locate the new file.
Setting security measures is also crucial. Restrict permissions or use a read-only option to protect sensitive data. If a link is no longer needed, use the “Break Link” option to prevent updates and turn the linked object into a static image.
These techniques will make your life easier and keep your documents up to date 📝.
Related posts:
- How to Save PowerPoint as Video: Step-by-Step Guide for Beginners
- How to Add Notes to PowerPoint: A Step-by-Step Guide for Enhanced Presentations
- How to Edit Background Graphics in PowerPoint: Step-by-Step Guide for Effective Presentations
- How to Track Changes in PowerPoint: A Step-by-Step Guide
- How to Create Master Slides in PowerPoint: Easy Guide for Professionals
- How to Compress Media in PowerPoint: Enhancing Performance and Quality
- How to Make a Shape Transparent in PowerPoint: Step-by-Step Guide
- How to Change Footer in PowerPoint: A Step-by-Step Guide
- How to Save a Template in PowerPoint: A Step-by-Step Guide
- How to Add Multiple Animations to One Object in PowerPoint: Step-by-Step Guide
- What Is Microsoft PowerPoint Used For? Discover Its Essential Applications
- How to Lock Aspect Ratio in PowerPoint: A Step-by-Step Guide
Leave a Comment Cancel reply
Save my name, email, and website in this browser for the next time I comment.
- PRO Courses Guides New Tech Help Pro Expert Videos About wikiHow Pro Upgrade Sign In
- EDIT Edit this Article
- EXPLORE Tech Help Pro About Us Random Article Quizzes Request a New Article Community Dashboard This Or That Game Happiness Hub Popular Categories Arts and Entertainment Artwork Books Movies Computers and Electronics Computers Phone Skills Technology Hacks Health Men's Health Mental Health Women's Health Relationships Dating Love Relationship Issues Hobbies and Crafts Crafts Drawing Games Education & Communication Communication Skills Personal Development Studying Personal Care and Style Fashion Hair Care Personal Hygiene Youth Personal Care School Stuff Dating All Categories Arts and Entertainment Finance and Business Home and Garden Relationship Quizzes Cars & Other Vehicles Food and Entertaining Personal Care and Style Sports and Fitness Computers and Electronics Health Pets and Animals Travel Education & Communication Hobbies and Crafts Philosophy and Religion Work World Family Life Holidays and Traditions Relationships Youth
- Browse Articles
- Learn Something New
- Quizzes Hot
- Happiness Hub
- This Or That Game
- Train Your Brain
- Explore More
- Support wikiHow
- About wikiHow
- Log in / Sign up
- Computers and Electronics
- Microsoft Office
Step-By-Step Guide to Convert PowerPoint to Word: Windows + Mac
Last Updated: December 18, 2023 Fact Checked
This article was co-authored by wikiHow staff writer, Darlene Antonelli, MA . Darlene Antonelli is a Technology Writer and Editor for wikiHow. Darlene has experience teaching college courses, writing technology-related articles, and working hands-on in the technology field. She earned an MA in Writing from Rowan University in 2012 and wrote her thesis on online communities and the personalities curated in such communities. This article has been fact-checked, ensuring the accuracy of any cited facts and confirming the authority of its sources. This article has been viewed 735,957 times. Learn more...
This wikiHow article teaches you how to convert a Microsoft PowerPoint presentation into a Microsoft Word document by using the "Create Handouts" feature on PowerPoint for Windows, or by exporting an RTF (Rich Text Format) file using PowerPoint for Mac. The current version of PowerPoint for Mac does not have the "Create Handouts" feature. RTF files are not able to accurately convert the formatting of some PowerPoint features, so many images and backgrounds may not be supported.
Things You Should Know
- To convert a PowerPoint file to Word, first open the PowerPoint presentation.
- On Windows, go to File > Export > Create Handouts and click "OK."
- On Mac, go to File > Export > File Format > .rtf > Export. Open the RTF in Word, then go to File > Save As > Format > .docx and click "Save."

- If you want the Word document to update whenever the original PowerPoint presentation is changed, click on Paste link .
- If you want the Word document to remain unchanged whenever the original PowerPoint presentation is updated, click on Paste .

- The PowerPoint will open in Word so you can save it and view it later as a .docx document. [1] X Trustworthy Source Microsoft Support Technical support and product information from Microsoft. Go to source

- In most instances, the formatting and pagination will not match the original PowerPoint presentation, and the RTF format may not support many pictures or backgrounds. Be sure to go through the Word document and adjust it to your liking.
- Alternatively, you can easily convert a Word document to PowerPoint .
Expert Q&A
- Use online converters, like Zamzar, to convert PPT to Word docs without Microsoft software. Thanks Helpful 0 Not Helpful 0
- If you get the error "PowerPoint couldn't write to Microsoft Word," restart your computer and try the conversion again. Converting PowerPoint to Word takes a lot of memory, so if you have a lot of programs open or have a few browser tabs open, you can keep getting an error. Thanks Helpful 0 Not Helpful 0
- You can also use the Create Adobe PDF to see the PowerPoint easily. Thanks Helpful 0 Not Helpful 0

You Might Also Like

- ↑ https://support.microsoft.com/en-us/office/edit-or-print-powerpoint-handouts-in-word-09256fc0-3b3e-4a43-9c83-3cfde594fed4?ui=en-us&rs=en-us&ad=us
About This Article

- Send fan mail to authors
Is this article up to date?

Featured Articles

Trending Articles

Watch Articles

- Terms of Use
- Privacy Policy
- Do Not Sell or Share My Info
- Not Selling Info
wikiHow Tech Help:
Tech troubles got you down? We've got the tips you need
Critical PowerPoint Shortcuts – Claim Your FREE Training Module and Get Your Time Back!
How to Convert PowerPoint to Word (Step-by-Step)
- PowerPoint Tutorials
- Shortcuts & Hacks
- October 2, 2019
In this article, you’ll learn how to convert PowerPoint to Word so that you can edit your handouts or speaker notes directly in Microsoft Word.

The only issue you need to be aware of is the content on your slides.
Converting PPT to Word does NOT convert the content of your slides into a Microsoft Word document. Instead, the process exports your slides as thumbnails in one of five following handout layouts:

The five handout options when converting PowerPoint to Word are:
- Notes next to slides
- Blank lines next to slides
- Notes below slides
- Blank lines below slides
- Outline only
There is currently no way to convert the content of your individual slides – text boxes, shapes, SmartArt graphics, etc. – into a native Word document. For that, you will unfortunately have to copy and paste your information manually, slide by slide.
Below you’ll find a variety of methods to convert your PowerPoint slides to Word. Choose the method that works best for you.
NOTE: If you are just trying to convert your slides into the PDF file format, you DO NOT need to convert your PowerPoint presentation into a Word document first. Instead, you can simply save your PowerPoint presentation in the PDF file format. Read our guide here for details .
Table of Contents
[watch] convert powerpoint to word (speaker notes only).
You are currently viewing a placeholder content from YouTube . To access the actual content, click the button below. Please note that doing so will share data with third-party providers.
Exporting your slides to Microsoft Word like this embeds your slides as thumbnails within a table.
While you cannot edit the individual PowerPoint slides, you can manipulate the table to format your handouts any way you like.
To see an example of how to convert PowerPoint speaker notes to Word without the thumbnail, watch the short video above. To learn more different ways you can print PowerPoint notes, read our guide here .
How to Convert PowerPoint to Word

To convert your PowerPoint slides into Microsoft Word handouts, simply:
- Navigate to the File tab
- Select Export
- Click on the Create Handouts section
- Select the Create Handouts command
- Choose your Handout Type
- Select Paste or Paste Link (explained below)
As a result, Microsoft Word opens, and your PowerPoint slides are converted into handouts based on your selection. For example, here’s how your slides look for the ‘Blank lines next to slides’ option.

Paste vs. Paste Link Options
At the bottom of the Send to Microsoft Word dialog box, you are given the option to Paste or Paste link (as pictured below).

Paste: Exports your slides to Microsoft Word as a standalone file. Any updates or edits you make to your slides in PowerPoint will not be reflected in Word.
If you update your slides and want those changes reflected in Word, you will need to export your slides all over again.
Paste link: Exports your slides to Word as linked thumbnail images. Any edits you make to your slides in PowerPoint will be automatically updated within the thumbnail images inside Word.
This is all great. However, there are two caveats to the Paste link option to be aware of. Read on to see what they are.
Caveat #1: Only the PowerPoint thumbnails are linked to Word
The link created only updates the thumbnails of your slides in Word.
That means that if you export your slides to Word with your Speaker Notes beneath the slides, and you later update those speaker notes in PowerPoint, your changes will not be reflected in the Word document.
You’ll need to follow the steps above to convert PPT to Word all over again, to have your changes accurately reflected.
Caveat #2: The Word thumbnails only live in Word
Any updates and edits you make to your slides in PowerPoint will be updated in Microsoft Word.
But if you delete slide thumbnails in Word or move things around, none of those changes will be reflected in PowerPoint.
In fact, any changes like these will be overwritten as soon as PowerPoint pushes its latest updates back to Word.
How to View linked PowerPoint Slides in Microsoft Word

To view any linked PowerPoint slides you have in Microsoft Word, simply:
- Select the Info tab
- Click Edit Links to Files
This opens the Links dialog box, which you can see below.

This is where you can update, edit, and manage any linked files to your Word document. Here is a quick rundown of what each of these options does:
Update Now: This forces Word to update based on whatever is in your PowerPoint file. This normally happens by default whenever you save your PowerPoint presentation, but you can control when it happens here.
Open Source: This will open the PowerPoint presentation from which these slides are linked. This can be faster than trying to find the original presentation you used to create your handouts.
NOTE: If you move your PowerPoint presentation to a different place on your computer or change its file name after you convert PowerPoint to Word, you will get the following error: “This object is corrupt or no longer available”.
To fix this, simply use the Change Source option to re-locate the file. It’s either in a different location on your computer or has a new name.

Change Source: This allows you to change which PowerPoint file you are linked to. It’s useful if you have updated the name of your PowerPoint file after you converted it to Word.
To maintain an active link between PowerPoint and Word, the PowerPoint file’s name needs to be the same.
Break Link: This allows you to break the PowerPoint to Word links for individual slides. When you break the link to a slide (as discussed further below), it will no longer update in Word as you edit it in PowerPoint.
Update method for selected link: If you don’t want your files to automatically update, you can choose to manually update them instead.
How to Update a Linked PowerPoint Slide
Now that you know how to link PowerPoint slides to Word, there are two ways that you can update the links. Both methods achieve the same goal, so just pick the one that makes the most sense (and is easiest to remember) for you.
1. Right-click the slides in Word

To update an individual linked PowerPoint slide in Word, simply:
- Navigate to the slide you want to update
- Right-click the slide’s thumbnail picture in Word
- Select Update Link
NOTE: This only updates the converted PowerPoint slide you selected. If you want to update the rest of your slides, you’ll need to right-click them individually or use the next technique.
2. Use the Edit Links to Files command

To update all your linked PowerPoint slides in Microsoft Word, simply:
- Click the Info tab
- Select Edit Links to Files
- Select the slide you want to update
- Click Update Now
If you have multiple slides you want to update, you can continue selecting slides and updating them in Word.
If your document is set to Automatic Update, you can also just close and reopen Word to have all of your links automatically update (as long as you have saved and closed your PowerPoint presentation).
How to Break Linked PowerPoint Slides in Word

To break the links between your PowerPoint and Word files, from within Microsoft Word, simply:
- Select the linked slide you want to break
- Click Break Link
Because each PowerPoint slide thumbnail is considered a link, if you want to remove all the links, you will need to click on each slide and break it individually.
How to Insert PowerPoint into Word (as an embedded presentation)
An alternative to converting PowerPoint to Word as handouts is to instead embed your presentation inside of Microsoft Word.
When you do this, instead of inserting pictures of your slides, your entire PowerPoint presentation is is embedded. You can then double-click it to launch your presentation in PowerPoint.
To embed a PowerPoint presentation inside of Word, from within Microsoft Word simply:
- Navigate to the Insert tab
- Open the Object dropdown menu
- Select Object
- Choose Create from file
- Click Browse
- Navigate to and select your PowerPoint file
- Choose Link to File (assuming you want changes to automatically update)
As a result, your PowerPoint presentation becomes embedded in your Word document.

As you can see, there are several ways to convert PowerPoint to Word depending on what you are trying to accomplish. In addition, you have several options to choose from for each method.
Is it worth your time to link the two programs together? That depends on how frequently you need to update your PowerPoint slides (and want those updates reflected in Word). If you decide to go this route, I recommend spending a few extra minutes reviewing the tips above on linking and updating links, so you know what to expect (and how to fix things if your links get broken).
If you decide not to link PowerPoint to Word, you can always easily export your PowerPoint slides to Word whenever you update them. This is my recommendation for you if you are not updating your slides frequently.
If you enjoyed this article and want to learn more about our online training courses and resources, you can visit us here .
🔒 Unlock the PowerPoint Shortcuts Trusted by Industry Leaders KKR, American Express, HSBC, and More!
Join over 114,880 professionals from diverse fields including consulting, investment banking, advertising, marketing, sales, and business development who have supercharged their PowerPoint game with our proven methods.
✅ Customize compelling presentations effortlessly.
✅ Master time-saving techniques for faster deck creation.
✅ Boost your career prospects with top-notch PowerPoint skills.
Get FREE access to the Critical PowerPoint Shortcuts module of our premium training course by entering your name and email below.
DISCLAIMER: PC Users Only!
We respect your privacy and will keep your info safe and confidential.
Related Articles
About the author.

This Post Has 2 Comments

This is great, but the file size becomes enormous once in word.

Yes this is true. You can check the compression options in Word to try to reduce the file size. Select a picture, go to Picture Format tab > Compress (inside Adjust) and select either Print or Web. It’s the same steps as for PPT, as we cover in our tutorial here: https://nutsandboltsspeedtraining.com/powerpoint-tutorials/powerpoint-compress-images/
Comments are closed.
Popular Tutorials
- How to Strikethrough Text (l̶i̶k̶e̶ ̶t̶h̶i̶s̶) in Word, Excel & PowerPoint
- How to Make Animated Fireworks in PowerPoint (Step-by-Step)
- Strikethrough Shortcut (l̶i̶k̶e̶ ̶t̶h̶i̶s̶) for Word, Excel & PowerPoint
- How to Create a Flash Card Memory Game in PowerPoint (Like Jeopardy)
- Keyboard Shortcuts Not Working: Solved
PowerPoint Tutorial Categories
- Strategies & Opinions
- Presentation Design
- Pictures, Icons, Videos, Etc.
- New Features
- Miscellaneous
- Charts & Data Viz
We help busy professionals save hours and gain peace of mind, with corporate workshops, self-paced courses and tutorials for PowerPoint and Word.
Work With Us
- Corporate Training
- Presentation & Template Design
- Courses & Downloads
- PowerPoint Articles
- Word Articles
- Productivity Resources
Find a Tutorial
- Free Training
- For Businesses
We help busy office workers save hours and gain peace of mind, with tips, training and tutorials for Microsoft PowerPoint and Word.
Master Critical PowerPoint Shortcuts – Secure Your FREE Training Module and Save Valuable Time!
⌛ Master time-saving expert techniques.
🔥 Create powerful presentations.
🚀 Propel your career to new heights.
We value your privacy – we keep your info safe.
Discover PowerPoint Hacks Loved by Industry Giants - KKR, AmEx, HSBC!
Over 114,880 professionals in finance, marketing and sales have revolutionized their PPT skills with our proven methods.
Gain FREE access to a full module of our premium PowerPoint training program – Get started today!
We hate spam too and promise to keep your information safe.
You are currently viewing a placeholder content from Facebook . To access the actual content, click the button below. Please note that doing so will share data with third-party providers.
How to Embed a PowerPoint Slide in a Word Document

Did you know you can embed a PowerPoint slide in a Word document? How about inserting a link to a PowerPoint presentation into a Word document?
Microsoft Word and Microsoft PowerPoint work well together in various ways. Both of these apps are included with a Microsoft 365 subscription . One thing you can do while using both together is adding a presentation into a Word document as an object. Here’s how to embed a PowerPoint slide in a Word document and why it’s a useful tool.
Embed a PowerPoint Slide
There are two ways you can add PowerPoint content into a Word document. You can either paste content by pressing Ctrl + V or insert it as a linked or embedded object. With the latter, you can still with the object in the original app. In this case, after inserting a PowerPoint object into Word, you can double-click the slide to use PowerPoint.
As Microsoft explains :
If you insert the slide into the document as a PowerPoint object, Word runs PowerPoint when you double-click the slide, and you can use PowerPoint commands to work with the slide. When you insert an entire PowerPoint presentation as an object, the document displays only one slide. To display different slides, double-click the PowerPoint object, and then press Enter to run the slide show.
How to Insert a Linked Object or Embed a PowerPoint Slide
When it comes to PowerPoint and Word, you can link or embed one or more slides or embed the entire presentation. When you double-click the object, Word runs the PowerPoint slide show. However, you cannot edit the presentation within the document. And, the presentation object can be embedded only, not linked.
Note: The main difference between linked objects and embedded objects is where the data is stored and how you update the data after placing it in the Word file.
- Open your Word document where you want to insert an object.
- Next, open the PowerPoint presentation that includes the slides you want to create a linked object or embedded object from.
- Select the entire presentation or the slides you want in PowerPoint.
- Choose Ctrl+C on your keyboard to copy the slides.
- Click where you want to add your PowerPoint content over in your Word document.
- On the Home tab, in the Clipboard group, click the arrow under Paste , and then click Paste Special .
- In the As list, select Microsoft PowerPoint Presentation object or Microsoft PowerPoint Slide object .
- Select Paste to insert an embedded object, or select Paste link to insert a link to the object, and then click OK .
In this case, you’ve embedded an object. When an object is linked, information can be updated if the source file is modified. Linked data is stored in the source file. When you embed a PowerPoint object, information in the Word file doesn’t change if you modify the source PowerPoint file. Embedded objects become part of the Word file and, after they are inserted, they are no longer part of the source file.

Inserting a Link
As an alternative, you can insert a link to the object by following the directions below:
- Click where you want to insert a link to your PowerPoint content in your Word document.
- Choose the Insert tab , then click the arrow next to Object in the Text group.
- Select Object .
- In the box, choose the Create from File tab , then browse to the location of your presentation.
- Choose Link to File or Display as icon , then click OK .
In this case, you’ve inserted a link to the entire PowerPoint presentation.

About Updates
Linked objects get updated automatically. Because of this, Word updates the linked information every time the Word file is open or any time the source PowerPoint file changes while the Word file is open. However, you can change the settings for individual linked objects so that the linked object is not updated or so that it is updated only when the reader of your document chooses to update it manually.
Additionally, you can prevent Word from updating links in all the documents that you open. You can do this as a security measure, thereby preventing updating documents with files that are perhaps from an untrusted source.
You can also permanently break the connection between a linked object and its source PowerPoint file . When the connection is broken, you can no longer edit the object in the document, and it becomes a picture of the PowerPoint content.
Manually Update Links
To manually update links in Word:
- Right-click the linked object, click Linked Slide Object or Linked Presentation Object and then click Links .
- Click the link that you want to update manually, and then under Update method for selected link , click Manual update .

Prevent Linked Objects From Being Updated
If you won’t want a linked object to get updated:
- Click the link that you want to prevent from being updated, and then under Update method for selected link , select the Locked check box.

There’s much you can do with PowerPoint and Word that you might have never considered. For example, did you know you can make a PowerPoint presentation read-only or that you can convert a Word document to a PowerPoint presentation? Also, don’t forget you can get all office apps as part of a suite of software with a Microsoft 365 subscription.
Your email address will not be published. Required fields are marked *
Save my name and email and send me emails as new comments are made to this post.
Recommended for you

- Is a new Google device on the way?
Converting PowerPoint Slides to Word Documents
- Brock University
Bruce Mars/Pexels
Sometimes you want the simplicity of a Word document to back up or print handouts of an important presentation. Find out how to convert a PowerPoint into a Word Document.
Instructions in this article apply to PowerPoint for Microsoft 365, PowerPoint 2019, PowerPoint 2016, PowerPoint 2013, and PowerPoint 2010.
Convert PowerPoint Handouts to Word
When you want to edit PowerPoint handouts, convert the handouts into a document that can be edited in Word.
To convert handouts to Word format:
Open the PowerPoint presentation that you want to convert to a Word document.
Select File > Export . In PowerPoint 2010, select File > Save & Send .
Select Create Handouts and choose Create Handouts . In PowerPoint 2010, select Create Handouts under File Types and select Create Handouts under Create Handouts in Microsoft Word. The Send to Microsoft Word dialog box opens.
Select the page layout option you want to use.
Converting PowerPoint presentations to Word documents can be done in five different ways:
- Notes next to slides
- Blank lines next to slides
- Notes below slides
- Blank lines below slides
- Outline only
Comparing the options can help you choose the best one for you.
Notes Next to Slide on Handout
The first option when converting PowerPoint presentations to Word is the most commonly used printout option. A miniature version of the slide is printed on the left and a box showing any speaker notes written to accompany the slide are shown on the right.
Three thumbnail versions of your slides print on each page.
Blank Lines Beside Slide on Handouts
The second option when converting PowerPoint presentations to Word is to print blank lines beside the slide on the handout for the audience to make notes during your presentation.
Three thumbnail slides print on each page.
Notes Below Slides on Handouts
The third option when converting PowerPoint presentations to Word is to print speaker notes below the slide for easy reference during the presentation.
One slide prints on each page.
Blank Lines Below Slides on Handouts
The fourth option when converting PowerPoint presentations to Word is to print blank lines below the slide on the handout for the audience to make notes during your presentation.
One thumbnail version of the slide prints on each page.
Outline Only
When converting PowerPoint presentations to Word, the fifth option is to print an outline of all the text in the PowerPoint presentation. No graphics are shown in the outline, but this view is the quickest to use when editing is needed.
Paste or Paste Link
Another feature that PowerPoint offers when it converts your presentation to a Word document is the choice of Paste or Paste Link. Here is the difference.
- Choose Paste to create the handout in the style you have chosen.
- Choose Paste Link to create a handout in the style you choose as well. However, if the PowerPoint presentation is later edited, the changes appear in the Word document the next time it is opened. This is not the case when you choose the Paste command.
When you have made all your selections select OK and a new Word document opens with the PowerPoint handouts in the format you selected.
Get the Latest Tech News Delivered Every Day
- How to Add PowerPoint Slides Into a Word Document
- Change the Case of Text in PowerPoint Presentations
- Create Pictures From PowerPoint Slides
- The 10 Most Common PowerPoint Terms
- What Is Microsoft PowerPoint?
- How to Add Page Numbers in PowerPoint
- What's New in Microsoft PowerPoint 2010?
- Use This PowerPoint Template for a Multiple Choice Quiz
- How to Merge PowerPoints
- How to Use PowerPoint Slide Master Layouts
- How to Print Multiple Slides on One Page in PowerPoint
- How to Hide and Unhide a Slide in PowerPoint
- Copy Slides to Another PowerPoint Presentation
- How to Use Portrait and Landscape Slides in the Same Presentation
- How to Change PowerPoint Slide Orientation
- How to Create a New Line Without a Bullet in PowerPoint
How-To Geek
How to convert a word document to a powerpoint presentation.

Your changes have been saved
Email Is sent
Please verify your email address.
You’ve reached your account maximum for followed topics.
Could Switching to ARM Save the Xbox?
Smart glasses don’t need ar or social media—just give me a camera, my android phone is 4 years old: here are the signs it’s getting too much, quick links, what you need to know, how to convert word to powerpoint on the web.
You might have converted a PowerPoint presentation to a Word document before so that you could edit it. But did you know that you can do the reverse? Take your Microsoft Word document and turn it into a Microsoft PowerPoint slideshow.
Related: How to Convert a PowerPoint to Word and Make It Editable
Maybe you want a jumpstart on creating your presentation using the text that you've saved in Word. Or maybe you've realized that your document would be better presented as a PowerPoint slideshow. With Word on the web, you can convert your document easily.
Here are a few things to keep in mind in terms of converting Microsoft Word documents to PowerPoint presentations. These points might be updated over time. The feature began rolling out in early 2021 :
- The ability to convert PowerPoint presentations is currently only available in Word for the web.
- The option is currently only available in English.
- The feature is not currently available when using Safari or Internet Explorer.
- At the time of writing, text content is available for export. If you have media content in your Word document, you'll need to add it to the PowerPoint presentation separately.
Now, if you're ready to give this feature a try, let's get to it! Head to the Microsoft Office online website, sign in to your account, and open your document in Word. You do not have to open PowerPoint in another tab or window.

Click File > Export and choose the "Export to PowerPoint Presentation" option.

You'll see a pop-up window with a collection of themes. Select the theme that you want to use and click "Export." You can change the theme in PowerPoint once it's exported if you like.

After several moments, you'll receive a notification that your newly converted presentation is ready. Click the "Open Presentation" button.

The slideshow will open in Microsoft PowerPoint for the web in a new tab.

The presentation will be saved to OneDrive automatically with the same name as your Microsoft Word document. If you haven't named your document, the slideshow will have a default name, such as Document 1. Click the name in the top-left corner and give it a new file name.

Styles like headings and bullet points should transfer as such. However, this could change depending on the theme that you select. Keep in mind that you might need to make some adjustments to the slideshow after you export it.
Check out some of our tips for making great PowerPoint presentations !
Related: 8 Tips to Make the Best PowerPoint Presentations
- Microsoft Office
- Microsoft Word
How to insert a word document into PowerPoint: Step-by-Step Guide
Inserting a Word document into PowerPoint can be a game-changer when you’re trying to create a dynamic presentation. With just a few clicks, you can integrate all the information from a Word doc into your slides, making it easier for your audience to follow along. So, let’s dive in and learn how to do it!
Step by Step Tutorial on How to Insert a Word Document into PowerPoint
Before we jump into the steps, know that inserting a Word document will save you loads of time copying and pasting text. You can insert the whole document, or just parts of it, into your presentation.
Step 1: Open your PowerPoint presentation
To start, open the PowerPoint presentation where you want to insert the Word document.
Opening PowerPoint is as simple as clicking on the icon on your desktop or searching for it in your computer’s search bar. Once the program is open, you can either create a new presentation or open an existing one where you want to insert the document.
Step 2: Click on the "Insert" tab
Look for the "Insert" tab at the top of the PowerPoint window and click on it.
The "Insert" tab is where all the magic happens. It’s where you can add all sorts of things to your slides, like pictures, charts, and yes, documents!
Step 3: Select "Object" in the "Text" group
Within the "Insert" tab, you’ll find a group labeled "Text." Click on "Object" located in this group.
When you click on "Object," a dialog box will pop up that offers you several options for what kind of object you want to insert. This is where you’ll be able to insert your Word document.
Step 4: Choose "Create from file" and browse for your Word document
In the dialog box, select "Create from file," then click "Browse" to find and select your Word document.
Choosing "Create from file" allows you to insert the document as is, without any need to modify it first. Once you’ve found the file, select it and click "OK."
Step 5: Decide whether to link to the Word document
You have the option to link to the Word document. If you choose this, any changes made to the Word file will update in PowerPoint.
Linking to the Word document can be handy if you’re working on a document that’s frequently updated. However, if the file is final, you might not want to link it.
Step 6: Click "OK" to insert the Word document into your slide
After making your choice about linking, click "OK," and your Word document will be inserted into your PowerPoint slide.
And just like that, your document is now a part of your PowerPoint presentation! You can resize and move the object around on your slide to fit your layout.
After completing these steps, your Word document will be successfully inserted into your PowerPoint presentation. You can now manipulate the document within your slide, zoom in on specific sections, or scroll through the pages.
Tips for Inserting a Word Document into PowerPoint
- Make sure your Word document is finalized before inserting it to avoid unnecessary edits in PowerPoint.
- If you link the Word document, remember that any changes made to the original file will reflect in the presentation.
- Keep your Word document short and concise; lengthy documents can be overwhelming in a presentation.
- Consider breaking up the document into sections and inserting them on different slides for clarity.
- Use the "Format Object" options in PowerPoint to enhance the inserted document’s appearance with borders or effects.
Frequently Asked Questions
Can i edit the word document once it’s inserted into powerpoint.
No, you can’t directly edit the Word document in PowerPoint. You’ll need to edit the original Word file and then re-insert or update the link in PowerPoint.
Will the formatting from the Word document transfer over to PowerPoint?
Yes, most formatting will transfer over, but some complex elements may not appear exactly as they do in Word.
What if I only want to insert part of the Word document?
You can either edit the Word document before inserting it or take a screenshot of the part you want and insert it as an image.
Can I insert a Word document into PowerPoint on a Mac?
Yes, the process is similar on a Mac. You’ll use the "Insert" tab and the "Object" option to insert the Word document.
Is it possible to insert a Word document into an existing text box in PowerPoint?
No, you cannot insert a Word document into an existing text box. The document is inserted as an object that can be resized and moved, but not within a text box.
- Open your PowerPoint presentation
- Click on the "Insert" tab
- Select "Object" in the "Text" group
- Choose "Create from file" and browse for your Word document
- Decide whether to link to the Word document
- Click "OK" to insert the Word document into your slide
Inserting a Word document into PowerPoint is a seamless way to enhance your presentation without the hassle of manually copying text. It’s a straightforward process that can save you time and keep your slides looking professional and uniform. Whether you’re presenting in a classroom, a boardroom, or at a conference, the ability to incorporate a Word document directly into your PowerPoint slides is an invaluable skill.
Remember, once inserted, treat the document as you would any other element in PowerPoint. Resize it, position it, and make sure it complements your presentation’s overall flow. And don’t forget, if you link the document, any updates you make in Word will automatically reflect in PowerPoint, keeping your content fresh and up-to-date.
Now that you know how to insert a word document into PowerPoint, start integrating your reports, essays, and other documents into your presentations to create a more dynamic and informative experience for your audience. Happy presenting!

Matt Jacobs has been working as an IT consultant for small businesses since receiving his Master’s degree in 2003. While he still does some consulting work, his primary focus now is on creating technology support content for SupportYourTech.com.
His work can be found on many websites and focuses on topics such as Microsoft Office, Apple devices, Android devices, Photoshop, and more.
Share this:
- Click to share on Twitter (Opens in new window)
- Click to share on Facebook (Opens in new window)
Related Posts
- How to Rotate a Powerpoint Slide Presentation
- How to Insert Word Doc into PowerPoint: A Step-by-Step Guide
- How to Download a Google Slides Presentation as a Powerpoint File
- How to Insert an Excel Spreadsheet Into Powerpoint: A Step-by-Step Guide
- How to Do a Powerpoint Google Slides Presentation Conversion
- How to Make Google Slides Vertical (5 Quick Steps)
- How to Insert Slides from Another Presentation: Powerpoint 2024 Guide
- How to Add a Hyperlink on Google Slides
- How to Add a New Slide in Google Slides: A Step-by-Step Guide
- How to Delete a Slide in Powerpoint 2010: Step-by-Step Guide
- How to Merge Files in Powerpoint: A Step-by-Step Guide
- How to Delete Multiple Slides in Google Slides: A Step-by-Step Guide
- How to Hide a Slide in Powerpoint 2010: A Step-by-Step Guide
- How to Make a Powerpoint Slide Vertical in Powerpoint 2013: A Step-by-Step Guide
- How to Convert Powerpoint to Google Slides: A Tech Solution
- How to Remove Slide Numbers in Powerpoint 2019: Easy Steps
- How to Insert a File Into a Word 2013 Document: A Step-by-Step Guide
- How to Duplicate a Slide in Powerpoint: A Step-by-Step Guide
- How to End Powerpoint on Last Slide in Powerpoint 2010: A Step-by-Step Guide
- How to Insert a Google Slides Page Number: Step-by-Step Guide
Get Our Free Newsletter
How-to guides and tech deals
You may opt out at any time. Read our Privacy Policy
- Skip to main content
- Skip to secondary menu
- Skip to primary sidebar
- Skip to footer
Erin Wright Writing
Writing-Related Software Tutorials
How to Convert Microsoft Word Documents to PowerPoint Slides Using Word for the Web
By Erin Wright
This tutorial shows how to convert Microsoft Word documents to PowerPoint slides using Word for the web.
We will also look at how to download the converted file to your computer so you can finish customizing the slides in the desktop version of PowerPoint.
Watch all the steps shown here in real time!
Explore more than 250 writing-related software tutorials on my YouTube channel .
Table of Contents:
How to Convert Word Documents to PowerPoint Slides
- How to Download PowerPoint for Web Files to Your Computer
Your Word document’s first-level heading will become the cover slide. Your second-level headings will become the individual slide titles. For information about creating headings, see “ How to Create and Customize Headings in Microsoft Word (PC & Mac) .
- Log in to your Microsoft 365 account at microsoft365.com using a browser such as Edge or Chrome. (This feature isn’t available in the Safari browser.)
- If your Word file is stored on your computer, select the Upload option.

- Locate and select the Word file in the Open dialog box and then select the Open button.

- After your file opens, select the File tab.

- Select the Export tab.
- Select the Export to PowerPoint presentation option.

- Select a design option from the Export to presentation dialog box. (Select the See more themes button, if necessary.)
Pro Tip: You can change and customize your design later, so don’t worry if you can’t find one that is perfect.
- Select the Export button.

- Select the Open Presentation button.

Your Word document will appear as slides in PowerPoint for the web. The new PowerPoint (.pptx) file should be saved in your OneDrive account. Continue to edit the slides in PowerPoint for the web, as you normally would.
Alternatively, download the file to your computer in order to customize your slides in the PowerPoint desktop app.
How to Download PowerPoint for the Web Files to Your Computer
- Select the File tab.

- Select the Save as option.

- Select the Download a copy option.

- Select the Download button in the dialog box.

- Locate and select the file in your browser’s Download folder or press Windows + E to open File Explorer.
- Select the PowerPoint file in your Downloads folder to open it in your desktop PowerPoint app.
Friendly Reminder: Remember to save your PowerPoint file in another location other than your Downloads folder.
Related Resources
How to Convert a Microsoft Word Outline into PowerPoint Slides
How to Convert a Microsoft Word Outline into PowerPoint Slides on Mac
How to Insert a Linked PowerPoint Slide in Microsoft Word
- Microsoft Word Tutorials
- Adobe Acrobat Tutorials
- PowerPoint Tutorials
- Writing Tips
- Editing Tips
- Writing-Related Resources
Unsupported browser
This site was designed for modern browsers and tested with Internet Explorer version 10 and later.
It may not look or work correctly on your browser.
- Presentations
How to Insert Word Documents into PowerPoint Quickly and Easily (+Video)
- Bahasa Indonesia
- العربية/عربي
Most Microsoft Office apps play nicely together. Word and PowerPoint are no exception! You can quickly insert Word document into PowerPoint slides. It’s a great way to insert files in PPT for your presentation audience to review.

In this tutorial, you’ll learn how to insert a document into PowerPoint. We’ll take a Microsoft Word file and add it to a PowerPoint presentation. It’s a great example of how Microsoft Office apps work well together, to help you work more efficiently.
We also have a helpful complement to this tutorial. Download our FREE eBook: The Complete Guide to Making Great Presentations . Grab it now before you read on.

How to Insert Word Documents Into PowerPoint Quickly (Quickstart Video)
In this tutorial we use the Simphony template . You can find more great PPT presentation templates on Envato Elements in our Ultimate Guide to the Best Microsoft PowerPoint Templates .

To learn more, read the tutorial below.
Jump to content in this section:
- Find the Insert > Object Menu
- Insert Word Document Into PowerPoint
- Place on Your Slide
How to Insert a Word Doc in PPT
Ready to learn how to insert a Word doc in PowerPoint? We've got you covered with a written set of instructions.
Let’s work through how to insert document in PowerPoint presentations from Microsoft Word. It’s an easy process that you’ll find yourself using often. Learning how to insert document in PowerPoint files helps you add more content.

For this quick tutorial, we’ll work with the beautiful Simphony Presentation Template from Envato Elements. It’s a stunning design that you can use to learn how to insert a file into PPT from Microsoft Word.
1. Find the Insert > Object Menu
Ready to learn how to insert a document in PowerPoint with ease? It’s time to get started! With the Simphony template open, navigate to a slide where you want to insert files in PPT. This template is compatible with our insert files in PPT steps.
Once you’re there, find PowerPoint’s ribbon. The ribbon is the series of menu bars across the top of the screen. You’ll see these labeled Home, Insert, Draw, Design , and more. In this case, find Insert and click on it.

The Insert tab opens, with an array of options displayed. They’re grouped into several distinct categories. Among these is the Text group. Find it, then choose Object .
2. Insert Word Document Into PowerPoint
When you click the Object button, you’ll see the menu that lets you insert file into PPT. It’s the Insert Object menu, and with it you can see how to insert a file into PPT.
On the left, locate the Create from file bubble. Click it. This feature lets you navigate to a file that you've got stored on your computer. Then, use it to watch how to insert a Word doc in PowerPoint.

Now, click Browse . A file explorer window opens. On it, browse to a Word document that you've got stored on your computer. When you find it, click to select it. Then, choose OK . This is the key step as you learn how insert a Word doc in PowerPoint.
3. Place on Your Slide
You’re ready to insert file into PPT from your Word document! It’s a good idea to show the document’s icon right on the slide. This way, your audience knows that you've got a file ready to share.

To do this, click the Display as icon check box on the Insert Object menu. If you don’t check this, you’ll see the contents of your Word document appear right on the slide.
This can be a useful option, but it’s often better to show an icon rather than the full file. Finally, click OK.

That’s it! You’ve just learned how to insert a Word document into PowerPoint. You’ll see a small Word thumbnail appear on your slide. Click and drag to move it around the slide. Pick a convenient spot, and you’re all set! Readers of your slides can now click and explore the document that you’ve attached.
Learn More About Microsoft PowerPoint with Envato Tuts+
You just learned how to insert a Word doc in PowerPoint. It's a crucial skill to bring together the best of two files. When you insert files in PPT, your viewer can jump between documents easily.
Learn more in our PowerPoint tutorials and quick video tutorials on Envato Tuts+. We've got an assortment of PowerPoint material to help you work better with images in your presentations:

Find More Templates (For Great PowerPoint Presentations in 2024)
Thinking of how to insert a document into PowerPoint, remember premium templates. They’re your best friend in 2024! Use them to unlock design inspiration and save time.
It can be hard to choose a great PowerPoint template. That’s because there are so many options! To help you decide, we’ve collected some of the very best Envato Elements PowerPoint templates. Explore these collections today to find your new favorite template:

Make Great Presentations ( Free PDF eBook Download )
We also have the perfect complement to this tutorial, which walks you through the complete presentation process. Learn how to write your presentation, design it like a pro, and prepare it to present powerfully.

Download our new eBook: The Complete Guide to Making Great Presentations . It's available for free with a subscription to the Tuts+ Business Newsletter.
The Top Source for the Best PowerPoint PPT Templates (With Unlimited Downloads)
Envato Elements is the ultimate source for the very best premium PowerPoint templates. With thousands to pick from , finding the perfect one is truly a breeze.
The Elements offer is powerful: unlimited downloads. For a flat monthly rate, download and use as many premium PowerPoint templates as you want! Use these to insert files in PPT from Word and other Microsoft Office apps. They help you share your content in style.
And that’s not all. As an Elements subscriber, you’ll enjoy unlimited access to over 15 million digital assets. These include:
- stock photos
Combine them with your favorite PPT templates to create unforgettable presentations.

Embrace the premium templates from Envato Elements and enjoy:
- Sleek, modern designs. These elegant layouts can’t be found for free online. They’re hand-crafted by creative experts with you in mind.
- Inspiring features. Can’t decide how best to share your content with your audience? Just fill in the blanks in an Elements template! You’ll find new ways to present on every slide.
- Easy-to-use layouts. Not a presentation design expert? You don’t have to be! Templates from Elements are intuitive and simple to work with. Plus, many include helpful tutorial guides in the download.
As you can see, if you want to insert files in PPT, Elements templates are your best friend. Join today and get to work downloading cool new designs for all of your presentation needs.
Insert Files in PPT Today - Quickly and Easily!
In a few steps, you’ve just learned how to insert a document into PowerPoint. Consider the possibilities. Now, you can share detailed documents with your presentation audience. But you don’t have to tie up valuable slide space or interrupt the flow of your presentation!
Instead, you can seamlessly attach documents for your viewers to read - all on their own schedule. Do it with a premium Envato Elements PowerPoint template to create incredible slide decks that audiences will love.
So, what are you waiting for? Put your new skills to work now. Insert file into PPT and watch as audiences learn more and benefit from the full scope of your creative content.

- Accessories
- Entertainment
- PCs & Components
- Wi-Fi & Networks
- Newsletters
- Digital Magazine – Subscribe
- Digital Magazine – Info
- Smart Answers
- Best laptops
- Best antivirus
- Best monitors
- Laptop deals
- Desktop PC deals
When you purchase through links in our articles, we may earn a small commission. This doesn't affect our editorial independence .
How to convert a Word document to a PowerPoint presentation

Whether you’re more comfortable working in PowerPoint or you’d like to present the content of your Word document in a different way, we’ve got you covered, There are a few different ways to convert a Word document to a PowerPoint presentation. If you have a Microsoft 365 account, you can use Word for the Web to make the conversion or you can do it directly with PowerPoint. There’s another option, too. Don’t want to convert your document to a presentation, but still need to use it as a reference? You can insert it as an object directly in a slide. If this all sounds super complicated, don’t worry. We’ll guide you each step of the way.
Convert a Word Document to a PowerPoint Presentation Using Word for the Web
First, open your web browser and log in to Office. Once logged in, open the document you want to convert in Word for the Web, and click the “File” tab in the top-left corner of the window.

IDG / Marshall Gunnell
Click “Export” in the left-hand pane and select “Export to PowerPoint Presentation (Preview).”

The Export to Presentation window will appear. Here, select the design theme you’d like to use and click “Export.”

Word for the Web will then begin preparing your new presentation. Once ready, click “Open Presentation.”

Your presentation will open in PowerPoint for the Web. If you need a local copy, you can always download it by going to File > Save as > Download a Copy.
Convert a Word Document to a PowerPoint Presentation Using PowerPoint
You can convert your Word document to a PowerPoint presentation using PowerPoint itself, but you’ll need to make sure your Word document is properly formatted for the conversion first. For content that you want to use as a slide title, make sure you give it the Heading 1 style. For content you want to use as text in the slide, give it the Heading 2 style.
Once you’re ready, open PowerPoint and make sure you’re in the “Home” tab. Next, select “New Slide” in the ribbon and then “Slides from Outline” from the bottom of the menu that appears.

From here, locate the Word document you want to use, select it, and click “Insert.”

PowerPoint will then do its thing. While this way isn’t as good as using Word for the Web, it’ll still get the job done.
Insert Your Word Document as an Object in Your Presentation
If you’re not interested in converting your Word document to a PowerPoint presentation, you can insert it as an object for quick access.
Before we proceed, it’s important you understand the difference between the two types of objects you can insert your document as: Linked or Embedded.
The main difference between the two is where the data is stored. If you embed the object in your presentation, the data from that object is stored in the presentation. This is good if you’re worried about the location of the word document changing (which can break a linked object), but it will increase your file size. A linked object only inserts a link to the source file. In other words, the data from the object isn’t stored in the presentation—it simply links to it. This will keep your file size down, but that link may break if the source file is moved to a different location.
To insert your Word document as an object in your presentation, open your presentation and navigate to the slide you would like to add the object to. From there, click the “Insert” tab and select “Object.”

The Insert Object window will appear. Select “Create from File and click “Browse.”

Locate and select the document you would like to insert. Once inserted, you have two choices. You can either display the entire Word document in the PowerPoint slide or simply display the document icon. If you choose the latter, the document will open in Word when selected.

Click “OK” to insert the object. That’s all there is to it!
Author: Marshall Gunnell
Recent stories by marshall gunnell:.
- How to add the Developer tab to the Microsoft Office Ribbon
- How to block (and unblock) someone in Gmail
- How to enable dark mode in Microsoft Office
Convert a DWG and DXF file to a PDF format.
Select converter:, how to convert autocad to pdf for free.
- Simply choose the DWG or DXF CAD files you wish to convert and upload them to our AutoCAD to PDF converter.
- Our online AutoCAD to PDF converter turns your file into a single PDF in seconds.
- Download it and save it to your computer. Once your AutoCAD drawings have been converted to PDFs, all other files will be removed from our servers.
The Best Free AutoCAD to PDF Converter
Convert your AutoCAD drawings to PDF easily and for free using our online converter. You can also use our suite of other conversion tools, all while ensuring the safety and security of your data. Our converter supports multiple AutoCAD formats, making the process simple and hassle-free.
Get a subscription
By signing up for a monthly, annual, or unlimited membership, you will have access to exclusive perks such as unlimited file sizes and unlimited use of our AutoCAD to PDF converter and other tools. Otherwise, you can continue to use our free online AutoCAD to PDF converter.
Lots of tools
Apart from our AutoCAD to PDF converter, we provide a wide range of PDF editing tools that enable you to compress, merge, split, and rotate your PDFs effortlessly. These tools facilitate the process of working with PDF files.
256-bit SSL encryption
Our top priority is ensuring the safety of your data and information. All uploaded files are encrypted using 256-Bit SSL Encryption. This means that unauthorized third parties cannot crack the encryption and therefore cannot access your data. We guarantee that we will never sell or provide your information to any third parties.
Files are automatically deleted
Once you've used our online AutoCAD to PDF converter, you'll have a three-hour window to download and save your converted PDF files. After that time, we'll automatically remove the files from our servers to ensure the safety of your sensitive information.
Convert AutoCAD to PDF from anywhere
You can convert DWGs into PDF anytime you need to by using our AutoCAD to PDF converter online for free, as long as you have internet access. Our converter is compatible with any device and operating system, including Windows, Mac, and Linux, so you can use it from any device.
- Faster conversions
- Unlimited conversions
- Unlimited file size
- Advanced features
Please wait or sign up to convert the next file.
You need the PRO version to use the full functionality of the PDF Converter.
How to Embed a Video in PowerPoint and Elevate Your Slides
Senior Marketing Manager at Loom

Have you ever sat through a dull PowerPoint presentation that left you struggling to keep your eyes open? Static slides crammed with text and bullet points aren’t enough to captivate your audience.
You can turn a monotonous presentation into an engaging one by embedding videos into your slide deck. Not only do they attract attention, videos also create stronger feelings of connection between viewers and presenters.
Learn how to embed a video in PowerPoint and hold your audience’s attention during your presentation. Plus, get ideas for alternative ways to engage your audience, like using video creation tools to add visual demonstrations and explanations to your slide deck.
How to embed a video in PowerPoint
Ready to spice up your presentation? Let’s look at how to embed a video file saved to your laptop and how to embed an online video in your slides using the online version of Microsoft PowerPoint.
Embed videos from your laptop
If your video is saved to your computer, embedding it in PowerPoint only takes a few steps:
1. Open your PowerPoint presentation and click on the slide where you’d like to embed your video, then click “Insert” to open a new toolbar at the top of the window.

2. With the Insert tab open, tap the arrow beside “Video”, and then select “This Device” or “Video on My PC.”

3. A new window will open. Search your computer for the video file you want to embed, tap the file name, and then choose “Insert.”

4. You can now drag and resize your video thumbnail to position it on your slide. You can also select your video thumbnail and open the Video toolbar to use the built-in PowerPoint video trimmer and add video captions.

Embed an online video
Have PowerPoint for Microsoft 365, PowerPoint 2021, or PowerPoint 2019? Then you can embed an online video from YouTube and similar sites into a presentation slide. Here’s how to do it:
1. Find the video you want to embed and copy the video URL. On YouTube, you can do this by tapping the Share button below the video and then tapping the blue “Copy” link in the new window that pops up. You can also choose to copy the video embed code that appears when you tap the Embed option.

2. Open your PowerPoint presentation and select the slide where you want to embed the video. Then tap “Insert” to find the video embed options.

3. In the Insert toolbar, choose “Video > Online Video.” This should open a new window where you can paste the video link.

4. Paste your video link in the highlighted dialog box. PowerPoint should load a thumbnail preview of the video—if it doesn’t, double-check that you’ve copied the correct link. Tap “Insert” to embed your video.

5. You can now drag and resize your video thumbnail to position it on your slide.
Embedding a video link allows you to view and play the video from the hosting website. But keep in mind you won’t be able to apply PowerPoint playback features like fade, bookmark, and trim. You’ll also need an internet connection to play the embedded video.
How to ensure your embedded video plays during your presentation
The best way to make sure you don’t run into any hiccups during your presentation is to test out your embedded video beforehand:
1. Follow the tutorial to embed your video into your PowerPoint presentation.
2. Select the slide where your video is embedded and tap the video thumbnail to play it. This is also a good time to test controls such as pause, fast forward, and rewind.
3. Next, tap the “Present” button in the top-right corner of the PowerPoint window to open a full-screen version of your presentation and click through your slides until you get to your embedded video.

4. Depending on your video playback settings, your video should either play automatically or when you click. If it’s not set to play automatically, click to make sure it plays properly.
How to automatically play embedded PowerPoint videos
If you’re using the PowerPoint app, you can change the video playback settings so your video automatically plays or only plays when you click it.
1. Select the embedded video thumbnail on your PowerPoint slide. This should open a Video Tools toolbar at the top of the window.
2. Tap the “Playback” tab and then tap the drop-down menu next to “Start.”
3. Choose how you want PowerPoint to play your video:
In Click Sequence: This is the default setting when you’re using the PowerPoint app. It plays your video anytime you click on the slide to advance to the next step.
Automatically: This plays the video automatically. If you include animations on the same slide, this setting completes any animations you’ve set to play first and then plays your video.
When Clicked On: This is the default setting when you’re using the PowerPoint browser app. It requires you to click on the video thumbnail to play it.
Note that if you use the browser version of PowerPoint, you won’t have any playback options and your video will only play when you click on it.
Pros and cons of embedding a video link versus a file
Should you embed a link to an online video or upload your video file? Take a look at these pros and cons to decide the best approach for your situation:
Embedding a web video link
You don’t have to worry about video or audio file compatibility.
No storage space is required to save the video on your device.
You must have an internet connection to play the video.
You can’t use PowerPoint’s built-in video trimmer or add captions.
Embedding a video file
You don’t need internet access to play the video.
You can further edit the video using PowerPoint’s built-in tools.
An embedded file increases your PowerPoint presentation file size.
You need to ensure you use the right video and audio file formats.
How to troubleshoot common video embedding issues
Having trouble embedding your video or getting it to play? Here are some common PowerPoint video issues and how to solve them.
Issue: PowerPoint can’t insert a video
1. Double-check that you’ve grabbed the full link for the video you want to embed, including “https://” at the beginning of the link.
2. Check that you’re using a version of PowerPoint that supports video embedding . PowerPoint for Android, PowerPoint for iOS, and PowerPoint Mobile for Windows, as well as some PowerPoint versions for Mac, don’t let you insert videos and play them.
3. If your version of PowerPoint supports video embeds, check if there are any updates available for it, then download and install them.
Issue: My YouTube video won’t play
If your embedded YouTube video won’t play, you can try copying and pasting the embed code instead of the video link. To do this:
1. Find the YouTube video you want to embed and tap the “Share” button.
2. A new pop-up window should appear. When it does, choose “Embed” from the options.
3. Copy the entire embed code.
4. Open PowerPoint and select the “Insert” toolbar, then tap the down arrow next to “Video” and choose “Online Video.” A new window should appear.
5. Paste the embed code and select “Insert.” Click the video thumbnail to see if your video plays correctly.
Issue: PowerPoint says I need Internet Explorer to play my video link
If you’re embedding an online video link, PowerPoint requires Internet Explorer to play the video.
Wait, wasn’t Internet Explorer retired in 2021 ? Yes, but don’t worry, there’s a workaround. Here’s how to turn on Internet Explorer mode in Microsoft Edge and fix your video link playback issues:
1. Open Microsoft Edge and type “edge://settings/defaultbrowser” into the address bar, then hit “Enter.”
2. Toggle on the option to “Allow sites to be reloaded in Internet Explorer.”
3. Restart Microsoft Edge and PowerPoint, then try to play your video again.
Issue: PowerPoint won’t embed my video file
If you’re trying to embed a video file from your device into PowerPoint and running into issues, the problem could be the video format. PowerPoint supports the following video file formats :
.asf and .avi
.mp4, .m4v, and .mov
.mpg and .mpeg
.avi and .vfw
.mp4 and .mpg4 as well as .mpg, .mpeg, .mpe, .m75, and .m15
.m4v, .m2v, and .ts
.mov and .qt
While it supports a number of video formats, you’ll likely get the best performance if you use PowerPoint’s recommended format of .mp4.
Upgrade your presentation with a Loom video
Trying to embed a video in your slide deck but the site you’re using isn’t supported by PowerPoint—or the file doesn’t load correctly? Record a Loom video while you present your PowerPoint presentation instead.
Loom video presentations give you the freedom to present any content you want. As long as you can share it on your screen, Loom records it alongside your webcam and audio to create memorable explanations, pitch decks , and training videos .
In addition to being able to personalize your slideshow, your teammates can view your Loom recording at any time. Plus, time-stamped comment and emoji reaction features give them a chance to respond to your video. So go ahead, ditch the slide deck, cancel that meeting, and create a captivating presentation with Loom’s screen recorder.
Aug 1, 2024
Featured In:
Share this article:.
Jeong Lee works in Marketing at Loom.
How can I add audio to my PowerPoint presentation to create a video with sound?
May 13, 2024 /
To add audio to your PowerPoint presentation and create a video with sound, follow these steps:
- Open your PowerPoint presentation and go to the slide where you want to add audio.
- Click on the “Insert” tab in the top menu.
- In the “Media” group, click on the “Audio” button and select “Audio on My PC” if you have the audio file saved on your computer, or choose “Online Audio” to search for audio files online.
- Locate and select the audio file you want to add, and click on the “Insert” button.
- A speaker icon will appear on your slide. You can resize and reposition it as needed.
- To adjust the audio settings, click on the speaker icon and go to the “Audio Tools” tab in the top menu.
- In the “Playback” group, you can set options such as starting the audio automatically or when clicked, adjusting the volume, and looping the audio if needed.
- Once you have added and adjusted the audio, you can save your PowerPoint presentation as a video file by going to the “File” tab, selecting “Export,” and choosing the desired video format.
By following these steps, you can easily add audio to your PowerPoint presentation and create a video with sound.
- How can I effectively incorporate audio into my PowerPoint presentations?
Popular Posts

Common Challenges in Tailoring Presentations—and Solutions

Dos and Don’ts of Pre-Seed Pitch Deck Creation

How to Write a Teaser Pitch Deck that Captivates

Tips for a Persuasive How It Works Slide

What Not to Do When Presenting Funding History

Why Raising Funds Without a Pitch Deck Can Backfire
- How to Login
- Use Teams on the web
- Join a meeting in Teams
- Join without a Teams account
- Join on a second device
- Join as a view-only attendee
- Join a breakout room
- Join from Google
- Schedule a meeting in Teams
- Schedule from Outlook
- Schedule from Google
- Instant meeting
- Add a dial-in number
- See all your meetings
- Invite people
- Meeting roles
- Add co-organizers
- Hide attendee names
- Tips for large Teams meeting
- Lock a meeting
- End a meeting
- Manage your calendar
- Meeting controls
- Prepare in a green room
Share content
- Share slides
Share sound
- Apply video filters
- Mute and unmute
- Spotlight a video
- Multitasking
- Raise your hand
- Live reactions
- Take meeting notes
- Customize your view
- Laser pointer
- Cast from a desktop
- Use a green screen
- Join as an avatar
- Customize your avatar
- Use emotes, gestures, and more
- Get started with immersive spaces
- Use in-meeting controls
- Spatial audio
- Overview of Microsoft Teams Premium
- Intelligent productivity
- Advanced meeting protection
- Engaging event experiences
- Change your background
- Meeting themes
- Audio settings
- Manage attendee audio and video
- Reduce background noise
- Voice isolation in Teams
- Mute notifications
- Use breakout rooms
- Live transcription
- Language interpretation
- Live captions
- End-to-end encryption
- Presenter modes
- Call and meeting quality
- Meeting attendance reports
- Using the lobby
- Meeting options
- Record a meeting
- Meeting recap
- Play and share a meeting recording
- Delete a recording
- Edit or delete a transcript
- Customize access to recordings or transcripts
- Switch to town halls
- Get started
- Schedule a live event
- Invite attendees
- organizer checklist
- For tier 1 events
- Produce a live event
- Produce a live event with Teams Encoder
- Best practices
- Moderate a Q&A
- Allow anonymous presenters
- Attendee engagement report
- Recording and reports
- Attend a live event in Teams
- Participate in a Q&A
- Use live captions
- Schedule a webinar
- Customize a webinar
- Publicize a webinar
- Manage webinar registration
- Manage what attendees see
- Change webinar details
- Manage webinar emails
- Cancel a webinar
- Manage webinar recordings
- Webinar attendance report
- Get started with town hall
- Attend a town hall
- Schedule a town hall
- Customize a town hall
- Host a town hall
- Use RTMP-In
- Town hall insights
- Manage town hall recordings
- Cancel a town hall
- Can't join a meeting
- Camera isn't working
- Microphone isn't working
- My speaker isn’t working
- Breakout rooms issues
- Immersive spaces issues
- Meetings keep dropping

Present content in Microsoft Teams meetings
When working remotely in Microsoft Teams, you can present content by sharing your screen, your entire desktop, a PowerPoint file, and more.
Start presenting content

Note: If you're using Teams on the web, you'll be able to share your screen only if you're using Google Chrome or the latest version of Microsoft Edge. Screen sharing isn't available for Linux users.
|
|
|
|
|---|---|---|
| Desktop | Show your entire screen, including notifications and other desktop activity. | You need to seamlessly share multiple windows. |
| Window | Show just one window, and no notifications or other desktop activity. | You only need to show one thing and want to keep the rest of your screen to yourself. |
| PowerPoint Live | Present a PowerPoint file others can interact with. | You need to share a presentation and want others to be able to move through it at their own pace. For info on PowerPoint sharing, see . |
| Whiteboard | Collaborate with others in real time. | You want to sketch with others and have your notes attached to the meeting. |
When you're done sharing, select Stop sharing in your meeting controls.
To turn off screensharing if your screen locks:

Turn the Turn off my camera and mic when my screen locks toggle on.
Restart Teams to activate this setting.
Presenter controls
While you're sharing content, use the controls in the presenter toolbar to keep your presentation engaging and running smoothly. The presenter toolbar is only visible to the person presenting.
To bring the presenter toolbar onscreen:

The toolbar will stay in place for a few seconds until you're done adjusting the controls. Then, it'll disappear from view.

Move the presenter toolbar
To keep the presenter toolbar from blocking important content on your screen, move it to any area on the screen you're sharing.
To move the presenter toolbar:

Drag it anywhere on your screen.
Release the drag handle when you've placed it in the right area.
Tip: You can also move the toolbar by clicking and holding any area on the toolbar that isn't interactive (e.g., in between presenter controls) and dragging it.
Control your camera and mic

Give and take control of shared content
Give control.
If you want another meeting participant to change a file, help you present, or demonstrate something, you can give control to that person. While someone has control, they can make selections, edits, and other modifications to the shared screen.
You'll both be in control of the sharing, and you can take back control anytime.
Caution: When you’re sharing an app, only give control to people you trust . People you give control can send commands that could affect your system or other apps. We've taken steps to prevent this but haven't tested every possible system customization.
Start sharing your screen.

Select the person you want to give control to. Teams will notify them that you’re sharing control.
Select Take back to take back control.
Take control
To take control while another person is sharing:
Select Request control . The person sharing can approve or deny your request.
Make selections, edits, and other modifications to the shared screen while you have control.
Select Release control to stop sharing control.
Sharing computer sound lets you stream audio from your computer to meeting participants through Teams. You can use it to play a video or audio clip as part of a presentation.

To learn more, see Share sound from your computer in a Teams meeting or live event .
All sound from your computer, including notifications, will be audible in the meeting.
Optimize for video
Prevent choppiness or lag when you're sharing high-motion content by optimizing video.
To optimize video, select Optimize in your presenter toolbar.

Change your layout
When you're sharing content, you can choose from several different layouts to help make your presentation more engaging.
To change your layout while you're sharing your screen:
Turn your camera on.

Select the layout you want to use:
Content only : Participants will see the content you're sharing in the main Teams window. They'll still be able to see your video feed next to the content.
Standout : This produces an effect on your background that blocks it and helps you stand out in your video feed.
Side-by-side : This view will place you and another participant side-by-side in the meeting window. This helps draw focus to you and other participants who are speaking during the meeting.
Reporter : This layout isolates you from your video feed and places you in front of the content you're sharing, just like a reporter in front of a scene.
Annotate content

To learn more, see Use annotation while sharing your screen in Microsoft Teams .
View participants
After you start presenting, a minimized view of the meeting window will appear next to your shared content.

Stop sharing
Select Stop sharing in the presenter toolbar to stop sharing your screen and return to the main Teams meeting window.
Share content on a Mac
If you're using a Mac, you'll need to grant permission to Teams to record your computer's screen before you can share.
You'll be prompted to grant permission the first time you try to share your screen. Select Open System Preferences from the prompt. If you miss the prompt, you can do this anytime by going to Apple Menu > System Settings > Privacy & Security .
Under Screen & System Audio Recording , make sure the toggle next to Microsoft Teams is turned on.
Go back to your meeting and try sharing your screen again.
Note: If you're using Teams on the web, make sure you've also granted screen recording permission to your browser.
Zoom in to shared content
To get a better look at shared content, click and drag it to see different areas. To zoom into or out of content someone's sharing during a meeting or call, use the buttons at the lower left of your meeting window: [+] to zoom in and [-] to zoom out. You can also try the following:
Pinch in or out on your trackpad.
Use Teams keyboard shortcuts .
Hold the Ctrl key and scroll with your mouse.
Note: Mac trackpads don't support zoom in meetings. If you're on a Mac, use one of the other options. If you're using Linux, giving and taking control of shared content isn't available at this time.
Open shared content in new window
Expand your view by opening shared content in a separate window during your Teams meetings.
To open shared content:
Join your meeting from Teams for desktop .

To minimize content, select X to close the window.
To share content from your mobile device:

| Choose... | If you want to... |
|---|---|
|
| Present a PowerPoint file others can interact with. Choose the PowerPoint you want to share; when you select one, sharing will start automatically. |
|
| Take a photo to share or choose one from your gallery. Choose the photo you want to share and select when you're ready to share. |
|
| Share live video from your camera. Tap when you're ready to share. |
|
| Show your entire screen, including notifications and other activity. You'll be prompted to tap when you're ready to share. Turn on the toggle to share audio from the content on your screen. |
|
| . Whiteboard content will share automatically. |
Tap Stop presenting or Stop sharing when you're done.
Tip: To go forward and back in a PowerPoint presentation, swipe in the direction you'd like to go, or tap the forward and back buttons on the bottom of your screen.
Note: If your role changes from presenter to attendee during a meeting and you're presenting, screensharing will stop.
Zoom in to shared content
Want to get a better look at shared content?
Pinch in or out to zoom, and tap and drag to see different areas.
Note: Zoom isn't currently supported when you're sharing photos and videos.
Minimize shared content
You may want to minimize the content someone is sharing in order to better see the people in the meeting on your mobile device. Here's how:

Tap Minimize content from the menu
This will give you a better look at more of the people in the meeting. You'll still see the shared content on the lower portion of your screen.

Use your phone as a companion device in a meeting
Join a meeting on more than one device for more collaboration and content-sharing options.
If you're already in a meeting on your laptop, for example, you can add your phone as a companion device to present files, share live video, and much more. Any device with the Teams mobile app can be added as a companion device—just make sure the devices you're using are signed in to the same Teams account.
There's a lot you can do when you add a companion device to your meeting experience:
Use mobile video to show things that are out of view for remote participants.
Take a photo to share with everyone or pick one from your camera roll.
Use your phone to control a presentation.
Share your mobile screen.
If you can see it on your phone, you can share it in the meeting!
Tip: For more details, see Join a Teams meeting on a second device .
Add a companion device to a meeting
Open Teams on your mobile phone when you're already in a meeting on another device.
You'll see a message near the top of your screen informing you that you're currently in a meeting on another device, and asking if you want to join it on this one, too. Tap Join .

You'll then see two options: Add this device , and Transfer to this device . Tap Add this device .

If you join this way, we'll mute your companion device's mic and speaker to avoid causing an echo effect.
When you're ready to share something from the companion device, tap Start presenting at the bottom of the screen. On your other device, you'll be able to see what you're sharing, just like everyone else in the meeting.
When you're finished, tap Stop presenting , or simply hang up. Your other device will still be connected to the meeting.

Need more help?
Want more options.
Explore subscription benefits, browse training courses, learn how to secure your device, and more.

Microsoft 365 subscription benefits

Microsoft 365 training

Microsoft security

Accessibility center
Communities help you ask and answer questions, give feedback, and hear from experts with rich knowledge.

Ask the Microsoft Community

Microsoft Tech Community

Windows Insiders
Microsoft 365 Insiders
Was this information helpful?
Thank you for your feedback.
IMAGES
VIDEO
COMMENTS
When you want to use PowerPoint slides in a Microsoft Word document, use the Add from Files tool to import one or more slides from a PowerPoint presentation as images to the Word file. We show you how to do it using Microsoft Word for Microsoft 365, Word 2019, Word 2016, and Word for Mac.
If you insert the slide into the document as a PowerPoint object, Word runs PowerPoint when you double-click the slide, and you can use PowerPoint commands to work with the slide.
Learn how to seamlessly insert PowerPoint slides into a Word document with our beginner-friendly, step-by-step guide. Perfect for enhancing your presentations.
Converting a PowerPoint presentation to a Word document can be a useful skill, whether you're looking to create handouts, collaborate on content, or just prefer the Word format. It's a pretty straightforward process that involves a few simple steps using Microsoft Office's built-in features. After reading this paragraph, you'll have a basic understanding of how to convert your ...
Another way to add an entire PowerPoint presentation is to come up here to the Insert tab and click on what's called the Object option. Use the Create from File tab to insert a PowerPoint slide into Word.
Learn how to insert/embed/integrate PowerPoint presentation into a word document. This tutorial explains embedding PowerPoint into word as an icon, link and without the aforementioned.
You can reference a PowerPoint slide in a Word document by linking or embedding it as an object. Here's how.
Steps to Link a PowerPoint Slide: Open the Word document and place the cursor where the slide should appear. Go to the "Insert" tab. Click on "Object" in the "Text" group. In the dialog box, select "Create from File" and browse to your PowerPoint file. Check the "Link to File" box.
This wikiHow article teaches you how to convert a Microsoft PowerPoint presentation into a Microsoft Word document by using the "Create Handouts" feature on PowerPoint for Windows, or by exporting an RTF (Rich Text Format) file using PowerPoint for Mac. The current version of PowerPoint for Mac does not have the "Create Handouts" feature. RTF files are not able to accurately convert the ...
Want to convert PowerPoint to Word? Discover how to link, embed, and export your PowerPoint presentations into Microsoft Word.
Learn about why you might insert a PowerPoint presentation into a Word document, learn several methods for adding PowerPoint elements to Word documents and view tips.
How to Insert a Linked Object or Embed a PowerPoint Slide When it comes to PowerPoint and Word, you can link or embed one or more slides or embed the entire presentation. When you double-click the ...
Learn how to convert Microsoft PowerPoint files into Word documents with two simple methods. Edit and share the text of your PowerPoint slides with ease.
Sometimes you want the simplicity of a Word document to back up or print handouts of an important presentation. Find out how to convert a PowerPoint into a Word Document. Instructions in this article apply to PowerPoint for Microsoft 365, PowerPoint 2019, PowerPoint 2016, PowerPoint 2013, and PowerPoint 2010.
Embed Word content directly into your PowerPoint presentation. You can import a Word document as an object, which inserts a static snapshot of the document. This is useful when the Word document is a single page and has pictures. Another option is to use a Word outline as the foundation for a presentation.
When you use the Export command and select Export to PowerPoint presentation, Word creates a presentation based on all the summarized sections of the document. It also uses AI to add imagery, icons, videos, themes, and fonts for the design theme you choose for the presentation.
Learn how to insert a Word document into a PowerPoint and discover tips to help you convert documents between these applications based on professional need.
How to Convert a PowerPoint to Word and Make It Editable Maybe you want a jumpstart on creating your presentation using the text that you've saved in Word. Or maybe you've realized that your document would be better presented as a PowerPoint slideshow. With Word on the web, you can convert your document easily.
Learn how to easily insert a Word document into PowerPoint with our step-by-step guide. Enhance your presentations with added text.
Learn how to convert Microsoft Word documents to PowerPoint slides using Word for the web.
Insert a Word document into PowerPoint to add important information or just to save time. This works great for online viewers. Learn how in this short tutorial.
Not sure how to convert a Word document to a PowerPoint presentation? Don't worry, we'll guide you every step of the way.
Our online AutoCAD to PDF converter turns your file into a single PDF in seconds.
Since this morning several client versions of excel that have a pointing to sharepoint (our tenant) give the following message; does this happen to anyone else?
Learn how to embed a video in PowerPoint and enhance your slideshows in our guide, plus discover another way to create captivating presentations with Loom.
Embed Word content directly into your PowerPoint presentation. You can import a Word document as an object, which inserts a static snapshot of the document. This is useful when the Word document is a single page and has pictures. Another option is to use a Word outline as the foundation for a presentation.
Learn how to add audio to your PowerPoint presentation and create a video with sound. Follow our step-by-step guide to enhance your slides with audio and export them as a video file.
Improved document summarization in Copilot in Word. Now with Copilot in Word, users can summarize documents that contain up to 80,000 words (depending on language), about four times more words than Copilot was previously able to summarize. Learn more here. This feature is rolling out in July for web, desktop, and Mac. A 66-page Word document is ...
When working remotely in Microsoft Teams, you can present content by sharing your screen, your entire desktop, a PowerPoint file, and more.