
How to Give a Presentation on Zoom? [A Step-by-Step Guide!]
By: Author Shrot Katewa
![How to Give a Presentation on Zoom? [A Step-by-Step Guide!]](https://artofpresentations.com/wp-content/uploads/2021/03/Featured-Image-How-to-Give-a-Presentation-on-Zoom.jpg "zoom presentation audio")
If you’ve never used Zoom, giving a presentation on it might seem a bit challenging. But, that’s a challenge we will have to learn to overcome as the world moves digital more and more day by day. The key question really is how to give a presentation on Zoom!
To give a presentation on Zoom, first, start by joining a meeting. Now open the presentation file on your computer and share the slides on Zoom using its “Share Screen” feature. You should test your camera, mic, speaker, and internet connection before you start with your presentation.
As easy as it may seem, some of you may need further detailed instructions. So, in this article, I will provide a step-by-step guide on things that you need to do in order to deliver a presentation on Zoom successfully! Plus, I will also share some tips that can help you ace your presentation on Zoom!
So, without any further delay, let’s get started!
Understanding the Zoom Application Interface
Before we understand the steps to give a presentation using Zoom, it is perhaps a good idea to acquaint yourself with the Zoom user interface first. If you are well-versed with it, then perhaps you may want to skip this section and click here instead.
Logging into Zoom
Although you can login to your account using zoom website too, but it is best to download and use the zoom app .
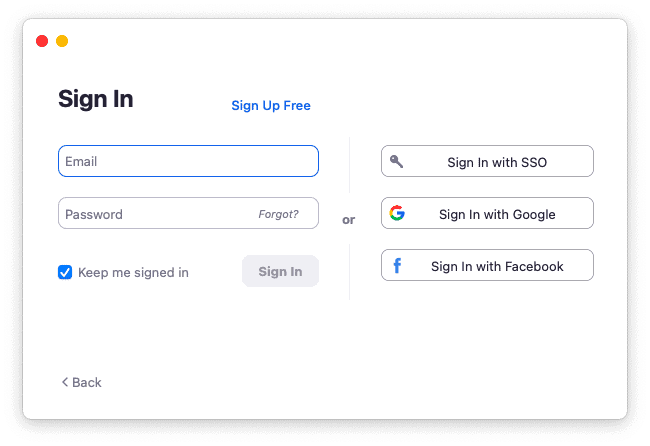
Once you have download the app, you will be prompted to login to your account. If you don’t have an existing account, you can either sign up or even login using your social account such as Google or Facebook. It’s actually quite simple.
If you feel that you don’t want to sign up or even use the social accounts for your meeting, you can choose to use “Sign In with SSO” option. SSO stands for single sign on and this allows you to sign in even when you don’t have an account with Zoom just once.
Zoom Home Screen
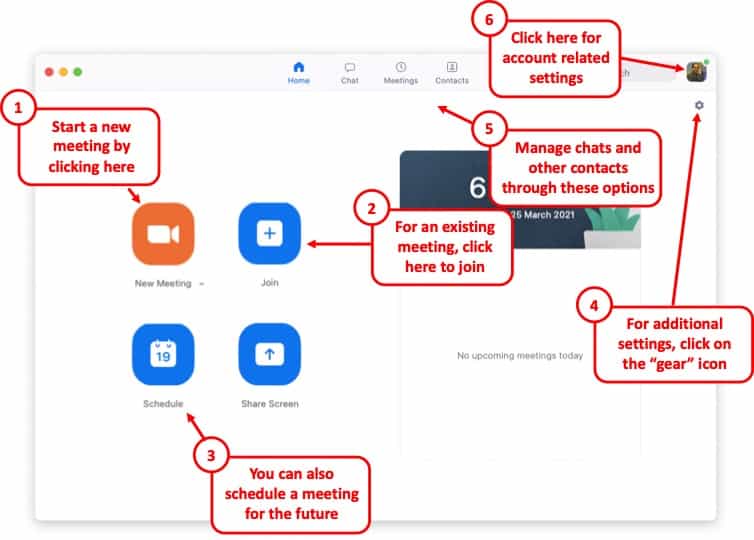
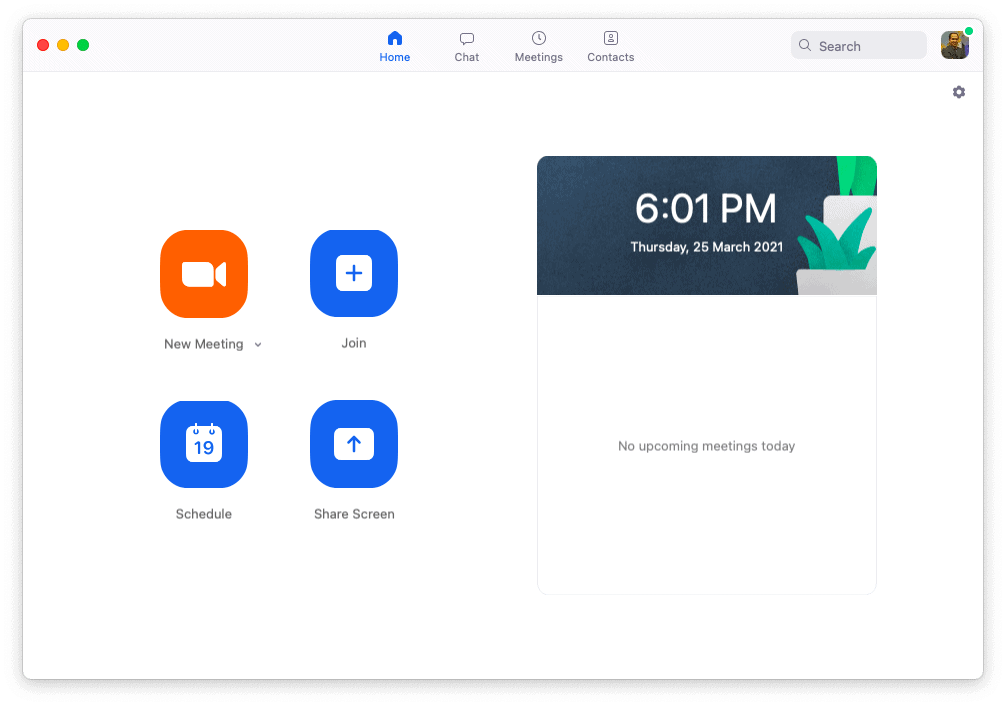
Once you’ve logged in, you will be taken to the home screen on Zoom.
There are a bunch of different things that you ca do with the home screen on Zoom. If you have been invited for a meeting, you will need to click on “ Join “. However, you will also need the meeting ID and the password for the meeting. If you don’t have the details, you will perhaps need to contact the person hosting the meeting.
You can also host the meeting yourself by using the “ New Meeting ” button. You can set a new meeting and invite others to join using this option.
Likewise, you can also schedule a meeting in the future using the “ Schedule ” option.
Furthermore, for changing the account related information, just click on your profile picture in the top-right corner of your window.
Lastly, there are several other detailed settings that you can tweak for your Zoom application. Almost all the other settings can be found in the “ Settings ” section by clicking on the “ Gear Icon “.
Zoom Virtual Meeting Window Interface
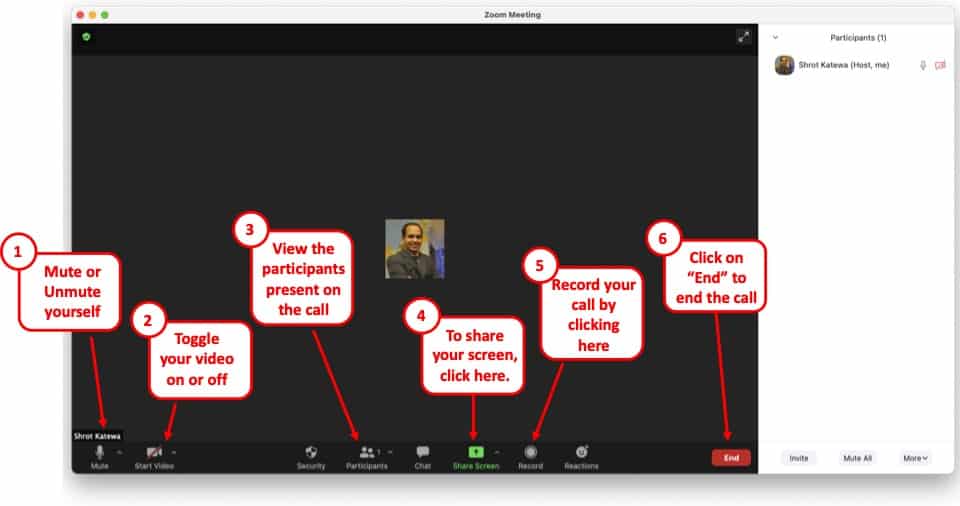
Once you are a participant in a virtual meeting, either by joining an existing meeting or by starting a new meeting, you will be greeted with an image similar to the one mentioned above.
On this screen, you will be presented with several different options. Some of the key functions that you will need to be aware of are as follows –
- Mute – Turning on the Mute or Unmute
- Video – Toggling between your Video
- Participants – Checking the names of the Participants
- Share Screen – to deliver a presentation (more on this later)
- Record – To record a meeting session
- End – Knowing how to end a meeting and exiting a call.
All the above functions will be visible on a small bar at the bottom of the window. If you are not able to see this option bar at the bottom, just hover over at the bottom part of your screen and all the options will appear .
Although there are other features that are also available for a zoom user or a participant, however, the aforementioned features should be good enough to deliver a presentation. These 6 features are at the very least something that you should be aware of.
How to Give a Presentation on Zoom (Step-by-Step)
Zoom has become a common tool for giving virtual presentations today. It is a widely used tool at conferences, meetings, and other events! If you are giving a presentation on Zoom for the first time, then perhaps you should be aware of a few things –
Here is a quick step-by-step guide on how you can give a presentation on Zoom:
Step 1: Install Zoom
Download and install the Zoom application to your desktop. To download the application, visit https://zoom.us/download and download the Zoom Client to your computer.
Step 2: Login to your Zoom Account
After installing the application, open it and log into your Zoom account. If you don’t have one, you can sign up for free using your email account.
Zoom also has options to sign in using SSO (Single Sign-On) or with your Facebook or Google account.
Step 3: Test Audio and Video Settings
Before you start or join a meeting, you will need to configure and test your audio and video settings.
To do that click on the gear icon on the Zoom application’s home screen. This will open the settings menu.
Now click on the “Audio” tab and select the microphone you are going to use. Try our different audio settings. After the microphone, select the speaker for audio output. If you can’t hear anything, try out another speaker source.
After configuring audio, click on the “Video” tab. From there, select the camera that is connected to your desktop. Tweak different video settings and find out what works best for you.
Step 4: Join or Schedule a Meeting
Now start a meeting by clicking on “New meeting”. You can also schedule a meeting on Zoom. To do that, click on “Schedule” and set up when you want to start the meeting. After completing the set-up, Zoom will give you a URL. Share it with the team members to join the meeting.
Or you can join a meeting by clicking “Join” on the Zoom client’s home screen. You can use a meeting ID or URL to join a meeting in Zoom.
Step 5: Open the Presentation
Once you have everything setup, you then need to prepare to show your presentation with your audience. To do that, open the presentation slides on your computer.
Step 6: Share Your Presentation
The last step in giving your presentation is to make sure that you share your presentation with your audience. To do that, click on “Share Screen” from the Zoom clients meeting window , select the screen where your presentation slides are open, and click “Share”. Now start presenting your slides to the audience.
Step 7: Stop Sharing to end the Presentation
One thing to know is how to end the presentation. To stop screen sharing, simply click on “Stop Share” located at the top of the screen . This option will only appear when you start sharing your screen.
How to Share a PowerPoint with Presenter View on Zoom?
To share your PowerPoint presentation slides with presenter view on Zoom, follow the steps given below:
Step 1: Open the Zoom App and Login
The first step really is to open the zoom app and login to your account.
Step 2: Join or Setup a Virtual Meeting on Zoom
Next, join the meeting. Remember, you need the meeting ID and password to join a meeting. Make sure you have requested for the details beforehand.
Step 3: Open Your PowerPoint Presentation
First step is really to open your presentation file that you want to present on the PowerPoint application.
Step 4: Put the Presentation in Presenter View
Now select the “Slide Show” tab from the top of the screen and click on either “From Beginning” or “From Current Slide” depending on your preference. This will open the slides in the “Presenter” view.
Step 5: Switch to the Zoom Application
Now, go to the Zoom application, start or join a meeting. While you are in the “Presenter” view on PowerPoint, press “ Alt+Tab ” to switch between applications in Microsoft Windows-powered computers. For iMac, use “Command+Tab” to move through open apps.
Step 6: Share Screen on Zoom’s Meeting Window
Once you are in Zoom’s meeting window, click on “Share Screen”, select the window where your PowerPoint slides are open in the presenter’s view, and click “Share”.
And that’s all you have to do in order to share PowerPoint with the presenter’s view in your Zoom meetings.
How to Share PowerPoint on Zoom Without Showing Notes?
There are two methods that you can use to share PowerPoint slides on Zoom without sharing your presenter notes. For the first method, you will need to have two monitors connected to your computer.
As for the second one, you can still share your PowerPoint slides on Zoom without sharing your notes (and you won’t need two monitors either). I’ve briefly explained both methods below.
Method 1 – Dual Monitor Method
In this method, you will be presenting your PowerPoint file on one monitor while looking at your presenter’s notes on the other one. Here’s how you can do that:
Step 1: First of all, open your slides on PowerPoint.
Step 2: Now join or start a Zoom meeting.
Step 3: Now click on “Share Screen” and select “Screen 1”. Then click “Share”. Here, “Screen 1” is your primary monitor.
Note: If you are not sure which one is your primary monitor, select where the PowerPoint file opened in.
Step 4: Now go to the PowerPoint application, click on the “Slide Show” tab, and from there click on “Monitor” and select “Primary Monitor”.
Step 5: Open the presentation file in the presenter’s view by clicking on the “Slide Show” tab and selecting “From Beginning” or “From Current Slide”.
If you have done everything correctly, participants will only be able to see the presentation slides while you have your presenter’s notes open on the second monitor.
In case you shared the wrong monitor on Zoom, click on “Screen Share” on Zoom’s meeting window, select “Screen 2” and click on share. This should fix your problem.
When you are sharing a screen on Zoom, you will notice a green border around that screen. This indicates which monitor you are currently sharing.
Method 2 – Sharing Portion of Your Screen
Follow the steps below if you have only a single monitor connected to your computer.
Step 1: Join or start a meeting on Zoom.
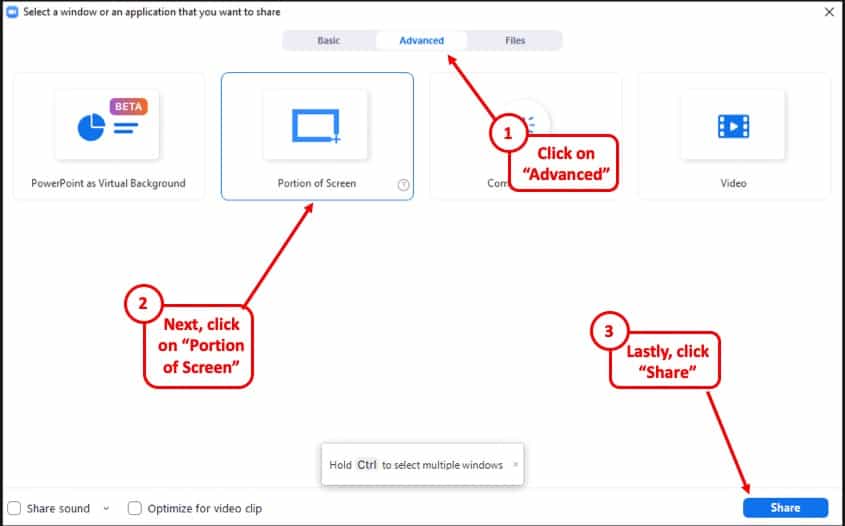
Step 2: Click on “Share Screen” and from the pop-up window select “Advanced”. From there select “Portion of Screen” and click on “Share”. This will give you a green border on your screen that you can adjust. Only the things that are inside this border will be shared on Zoom.
Step 3: Now open the presentation file in PowerPoint, and go to the presenter’s view by selecting “Slide Show> From Current Slide or From Beginning”.
Step 4: Adjust the size of the green border so that it only shows the presentation slides in the presenter’s view.
And that’s all you have to do. By doing so, your audience will only see the slides that you are presenting, but not your notes.
How to Show Yourself During a Zoom Presentation?
Ensuring that you are visible from time to time during a presentation can make it slightly more engaging and much more interactive. Here is how you can do that-
Step 1: First, start or join a Zoom meeting.
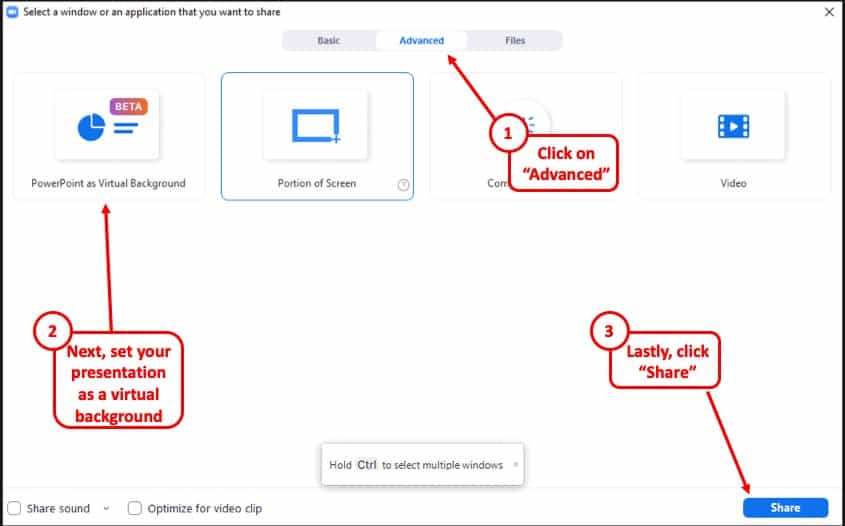
Step 2: Click on “ Share Screen ” and select the “ Advanced ” option. From there, select “ PowerPoint as Virtual Background ” and select the file you want for your presentation. Then click on “ Share ”.
Step 3: Make sure your video is switched on so that you are also visible to your audience. You can do that by clicking on “ Start Video ” on the Zoom Virtual Meeting Interface.
It will take some time for your slides to appear on the Zoom client. When it is done, participants will be able to see your face in front of the slides in Zoom. Make sure that your camera is connected to your computer and configured correctly.
This feature works best if you have a green screen behind you . If you have one, go to Zoom’s settings menu, select the “Background and Filter” tab and check “I have a green screen”. If you want to stop showing yourself during a zoom presentation, click on “Stop Video” on the meeting window and that will do the job.
Furthermore, you may sometimes want to show just yourself to the audience and not show the presentation at all. For that, all you need to do is simply click on “Start Video” in the Zoom Virtual Meeting Interface.
How to Record a Presentation on Zoom?
If you want to record your presentation on Zoom, you can do it easily. After joining or starting a meeting on Zoom, click on the “Record” icon located at the bottom of the meeting window. Once the recording starts, you can pause the recording or stop it whenever you like.
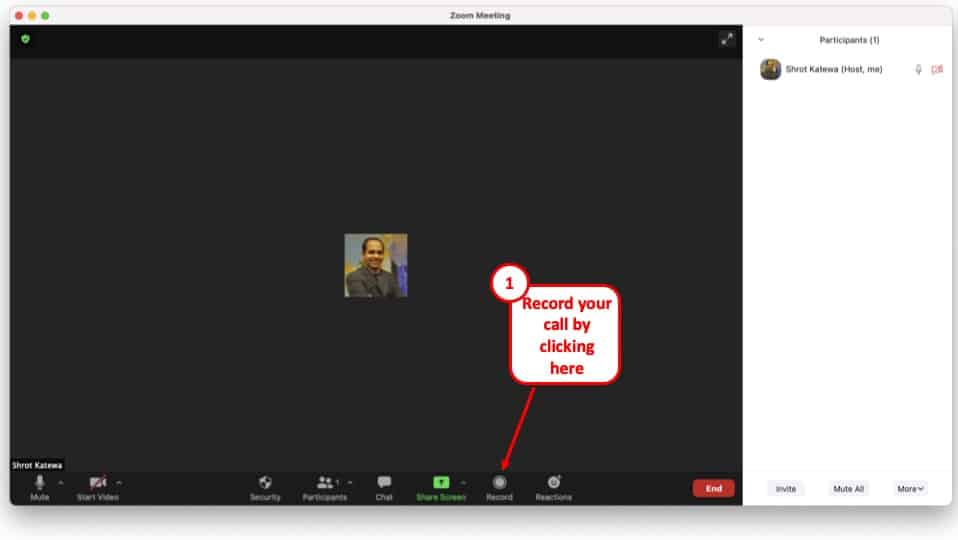
After the end of the meeting, the recorded video will be automatically converted into “.mp4” format and stored on your computer.
Tips for Giving an Awesome Presentation on Zoom
Giving a presentation in front of an audience is always a challenging task. Especially if it is online, many things can go wrong during your presentation. This is why I’m sharing some tips that can help you deliver an awesome presentation on Zoom. These are as follows –
1. Make a Professional Looking Presentation
There are several ways to make your presentation look really professional and high quality. One obvious method is to outsource your presentation to a specialised design agency! But, that can become really expensive depending on your budget.
Another (non-obvious) option is to use a PowerPoint Presentation Template! There are several high-quality and professional templates that you can get quite easily! In fact, using these Presentation Designs is quite inexpensive! You can download as many presentation templates as you want for as little as $16.5/month!
My favorite one is Agio PowerPoint Presentation template. It is perfectly suited to give a professional look to your presentation and yet it is quite quick and easy to use. Check out some of the images below –
Agio PowerPoint Presentation Template
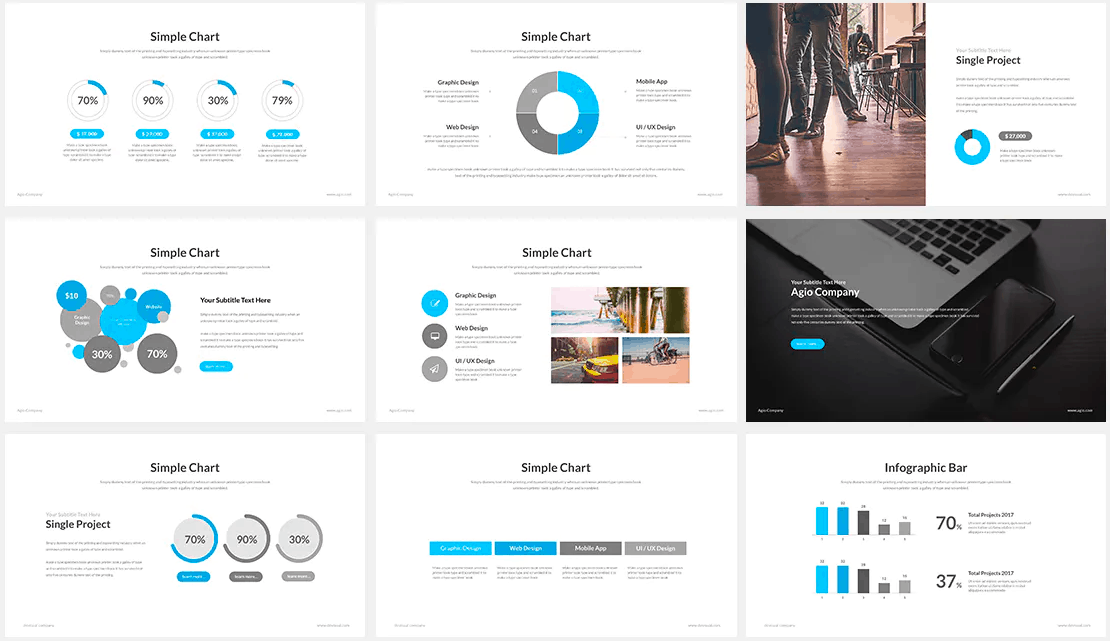
Furthermore, make the presentation as simple and straightforward as possible. Do not confuse your audience with a network of colorful texts, graphs, or other contents.
Only use data and graphs that are relevant to your presentation. Also, the clever use of transition animations can make the slide appear much more engaging.
2. Check Your Equipment Beforehand
Whenever you are giving your presentation online, many things can go wrong. For example, your camera or mic may not function properly. Such interruptions will only make you a laughing stock in front of the participants.
Check your mic, camera, and speakers to find out whether they are working properly or not. Also, check your internet connection and your laptop’s battery level. If everything is ok, then you are good to go on with your presentation.
More Related Topics
- Change the Style of Your Bullet Points and Stand-out from the Crowd!
- 7 EASY Tips to Always Make your Presentations Attractive! (Even if You are a Beginner)
- How to Reduce the Size of Your PowerPoint File? The Perfect Method!
- Auto Create Your PowerPoint Slides using Design Ideas Feature!
- Main Features of PowerPoint! [I bet You DIDN’T Know These]
Credit to Cookie_Studio for the featured image of this article
Unsupported browser
This site was designed for modern browsers and tested with Internet Explorer version 10 and later.
It may not look or work correctly on your browser.
- Communication
How to Record a PowerPoint Presentation on Zoom (Audio & Video)
In recent years, we’ve seen the rise of virtual meetings. It’s now possible to connect with a global team from anywhere! When you learn how to video record yourself presenting a PowerPoint on Zoom , your content is accessible to all.

Sometimes, not everyone can attend a Zoom meeting in real-time. This is especially true if your team works across the globe. Luckily, there’s an easy solution! Let's learn how to record a PowerPoint presentation in Zoom.
Why You Should Learn To Record PowerPoint Presentations With Audio and Video
Work has changed. More than ever, you need ways to connect for meetings regardless of your team's location. Zoom is one of the most popular tools to do this.
Zoom is video-conferencing software used by millions. It’s popular because it's got a free tier, with options to upgrade to more robust plans. Zoom supports audio and video sharing, allowing you to virtually meet others face-to-face.
You can also share your screen, to show slide decks, text, video, and more. It’s a top option to share PowerPoint presentations with anyone. Learn how to record PowerPoint presentations with audio and video to pair it with Zoom.

With distributed teams, it's not always possible to coordinate a start time that everyone can agree on. Plus, it’s handy to review a meeting later. Perhaps attendees want to listen to what you said again. Luckily, there’s an easy solution! You need to know how to record a PowerPoint presentation in Zoom.
In moments, you've got an MP4 video file ready for sharing. To record PowerPoint with video in Zoom takes only a few quick steps. Let’s dive in.
Build the Perfect PowerPoint for Sharing
Before you learn how to record a PowerPoint presentation with video, you need a slide deck to share. Premium templates are your best option. These offer styling and features that you won’t get with a free option that you might find online.
Envato Elements is a great option for this. At Elements, you’ll find thousands of PPT templates that you can share on Zoom. As a member, you've got unlimited download access. That means that you’re able to download and use as many of those templates as you want.

For this tutorial, I’ll be using the beautiful Virtually PowerPoint template from Envato Elements. It’s a creative modern design with over 50 slides inside.
With your template open, you can start building a slide deck for sharing. As you work, know that PowerPoint slides meant for sharing online should be special. Keep the following design tips in mind to help ensure success:
- Don’t crowd slides. When you’re sharing to record PowerPoint with video, slides will look smaller to your audience.
- Use larger fonts. Fine print is hard to read on a screen, and even more so in a later video playback. Opt for large, readable text styles.
- Illustrate! Photos, charts, and infographics keep things interesting. You need your slide deck to be clear, concise, and engaging.
With these ideas in mind, you’re ready to learn how to record yourself presenting a PowerPoint on Zoom. Learn more about the art of narration in PPT below:
Prepare Your Zoom Meeting
To record PowerPoint presentations with audio and video slides, you need to open Zoom. You can use the Zoom desktop app, which is available for download. Or you can log into your Zoom account inside your favorite web browser.
If you already have a single meeting scheduled, you’ll see a thumbnail for it on the Home tab inside of Zoom. But if you've got many scheduled calls and invites, you’ll want to navigate to the Meetings tab. Here, you’ll find a complete list of Zoom meetings that you’re invited to.

As you can see above, I've got a meeting scheduled for today at 9:30 PM. The invite has been shared with others, and I'll be the host of the meeting. Imagine in this example that we want to share a PowerPoint deck and record it for others.
To make a good first impression with your audience, it’s helpful to prep your slide deck in advance. This helps you be ready to share when the time comes. You won’t have to scramble around for your files in front of viewers. I like to open my PowerPoint, then minimize it, before starting a meeting. This way, it’s ready to roll when it’s time to share.
To begin the meeting, click Start. You’ll see the Join Audio menu appear. This lets you choose the audio source that you want to use to capture your narration. In this case, choose Join with Computer Audio.

Optionally, you’ll have the option to test your speakers and microphone. If you’re working with a new setup, this is a great way to ensure that you’re capturing clear audio.
Now, you’re in your meeting. Watch as other participants appear. You’re ready to get started!
Learn more about PowerPoint Sharing on Zoom below:

Begin Recording
With your meeting underway, your next step is to begin recording it. Optionally, you can start sharing slides before you begin recording. But I prefer to start the recording first. It’s easy to forget to turn on the recording once you've got slides displayed. And there’s nothing worse than reaching the end of a meeting and realizing that you’ve forgotten to record!
To begin a recording of a PowerPoint presentation, move your cursor over the menu bar in Zoom. It’s the series of options and buttons at the bottom of the app’s screen. First, make sure that your microphone isn’t muted. This setting is controlled by the Mute button, found on the left side of the menu bar.

To record your PowerPoint in Zoom, click Record . From this point on, anything you share on-screen or say aloud will be captured in your recording.
This is also true of other attendees. If they speak or ask questions, their voices will be captured in the PPT meeting recording. You also have the option of sharing video from your webcam. This way, viewers can watch you speak as you share your PowerPoint. This can be captured in your recording too.
It's a good idea to mention to attendees if you're recording the meeting. This ensures they're able to consent to the recording. Plus, it lets them know that you'll have a copy available for review later. Do this at the beginning of your meeting so that all are aware of the recording process.
Share Slides on Zoom
With your recording underway, it’s time to share your PowerPoint slide deck in Zoom. Once again, return to the menu bar at the bottom of the screen. This time, you’ll want to choose Share Screen . It’s easy to find, highlighted in green in the center of the menu.
Click on Share Screen, and a settings window opens. On its Basic tab, you’ll see several thumbnail buttons. These control the source that you want to share from. Usually, there will be tabs for every app open on your computer. Plus, there are options for a whiteboard, to connect an iPad, and more.

To see how to video record yourself presenting a PowerPoint on Zoom, click on the Microsoft PowerPoint thumbnail. Then, click Share.
PowerPoint appears on your screen. You can navigate through your slides as usual. You’ll see that a green box has appeared around the border of the PowerPoint window. This signifies that this area of the screen is being actively recorded. Anything outside of the green boundary won't be captured in your recording.
As you can see, it’s easy to learn how to record a PowerPoint presentation in Zoom. It’s a useful way to share and preserve slide presentations for others in the future!
For best results, keep the following tips in mind:
- Narrate clearly and concisely. Remember, you’re being recorded! Speak clearly, at a cadence that’s easy to follow. Talk too fast and your words will be hard to understand.
- Control sources of audio. Try and eliminate background noise from your environment. This keeps extra sounds from appearing in your recording. And be sure to ask other attendees to mute their mics, unless they've got a question.
- Use a clean, readable template. Premium templates like the Virtually PowerPoint deck have neatly-arranged slide layouts. These are easy for your audience to read.
By embracing these ideas, you’re sure to make a winning impression. They help you build useful, enjoyable recordings for meeting participants to watch later.
Save and Share the Finished Recording
When you’re finished presenting, it’s time to end the meeting and ready your recording for sharing. This is easy to do, and only takes a moment.
You’ll first want to stop sharing your PowerPoint slides when you’re finished. To do so, click Stop Sharing . This is highlighted in red on the menu bar. (It’s only visible when you're actively sharing).
Then, end your meeting when you're ready. Click End , then End Meeting for All. Once you end a Zoom meeting, the app saves any recordings that you made during your meeting. For longer meetings, this may take a few moments. You can monitor the progress on the bar shown in the Conversion popup.
When the conversion process is complete, a Finder window opens. Inside it, you’ll see an MP4 video file. This is your converted meeting PowerPoint! You can watch it on your computer or mobile device. And it’s ready for sharing with others.

You’ve learned how to video record yourself presenting a PowerPoint on Zoom. As you can see, it’s amazingly easy to do! It’s the perfect way to ensure that everyone can hear and enjoy what you've got to share. It only takes a few clicks.
The Top Source for Shareable PowerPoint Templates in 2022 (With Unlimited Use)
As we’ve seen, premium templates are the best PowerPoint decks to share on Zoom. With expertly-built layouts and cool designs, they’re sure to help you succeed. The best source for these templates is Envato Elements .
Elements has a powerful offer: unlimited downloads. For a flat monthly rate, you can download and use as many PowerPoint templates as you want.

With a vast library of thousands of custom PPT templates , you’re sure to find one that’s just right for you.
Plus, Elements offers countless other creative assets. Among them, you’ll find custom fonts, stock photos, music, and more. As a PowerPoint presenter, you can make use of all of these. Together, they help you create stunning slide decks ready for sharing.
Explore PowerPoint Templates

Consider the top advantages of Envato Elements:
- Creative flexibility. Each template is fully editable by you. This lets you tailor each slide to your needs.
- Time savings. Instead of building layouts from scratch, you’re simply filling in blanks. This gives you more time to focus on refining your message and preparing to present it.
- Professional designs . Audiences will appreciate the stylish slides in your presentation. You’ll enjoy them as well, finding inspiring layouts in every template.
Envato Elements is the creative offer that you can’t afford to miss. Join today and start exploring the vast library!
Now You Know How to Record PowerPoint Presentations With Audio and Video
You just learned how to record PowerPoint with video. This is a crucial skill for successful online meetings.
Here's a challenge: before you schedule an in-person meeting, convert it to an online meeting instead. Now that you know how to record a PowerPoint presentation with audio and video, you can skip in-person meetings!

The Ultimate Guide to Giving Virtual Presentations on Zoom
Part 1: an introduction to giving virtual presentations on zoom.
PART I Introduction 1 – Cool Zoom Features 2 – Virtual Presentation Do’s 3 – Virtual Presentation Don’ts PART II 4 – Presentation Purpose 5 – Structure & Flow 6 – Slide Design PART III 7 – Connect with the audience 8 – Audience Participation 9 – Sharing Content PART IV 10 – Video & Audio Recordings 11 – Post-production 12 – Your Phone as a Webcam PART V 13 – When Things Go Wrong 14 – How to Ground Yourself PART VI 15 – Advanced Techniques 16 – Zoom Webinars vs Meetings 17 – 23 Essential Settings
There are three things I hate about Zoom…
#1 the super awkward must-click-two-buttons-to-leave-the-meeting debacle.
You say goodbye, search the bottom-right corner of the screen for the red button, click the red button, continue to stare awkwardly at the corner of the screen because the call is still open and you need to click a second red button.

Never fear, this can be turned off. In General Preferences simply uncheck the “Ask me to confirm when I leave a meeting” setting and poof! One-click exits. You’re welcome.

#2 Inviting someone and never knowing what the difference is between these two options: “Copy invite link” and “Copy invitation”.
I can sense you nodding along with me.

Just remember that it’s “invite link” you want 99% of the time vs “invitation”, and you can set an option that copies the link to your clipboard as soon as you start a meeting.
#3 The dropdown to change video settings is part of the “Stop Video” button. What the actual?!
Are you trying to make me screw up my presentation?

I also love Zoom.
Why? Because it works.
A year into our forced isolation, Zoom fatigue has set in. We’re avoiding calls and talking about concepts like Zoom holidays, just to get a break.
But the answer isn’t fewer Zoom calls, it’s better Zoom calls. Almost every Zoom presentation is boring, ugly, terribly structured, poorly executed, and designed to make you fall asleep.
In this guide I’ll show you
- How to create beautiful slides that communicate with clarity and class
- Unknown and awesome features of Zoom that you can use to your advantage
- How to overcome your nerves and survive technical problems
- And how to look like a total pro every time you give a presentation—or run a meeting—on the platform we all love to hate.
Note: for the sake of brevity, unless I’m talking about Zoom-specific functionality, these tips are applicable to any platform that offers meeting and presentation software such as GotoMeeting, Google Meet, Webinar Jam etc.
There are instructional videos throughout the guide to demonstrate the best parts in more depth. You can binge watch the videos on the “Presenting on Zoom” video channel here , or read on for the word and pictures.
If you want to stand out from your peers it’s good to understand the full power of the platform and know the features most people don’t know about.
#1 Set up your own configurable ‘personal meeting room’
It can be really distracting to hear a bunch of people talking over one another when you kick off a meeting. A good solution is to use what’s called a Personal Meeting ID (PID) which gives you control of the Zoom environment right from the start.

Features of your PID include:
- Using the same invite ID and URL whenever you start a meeting, bypassing the need to repeatedly check the settings. Note: because it’s a permanent URL,you should uncheck the “Allow participants to join anytime” setting to prevent randoms dropping in unannounced.
- Placing participants into a “waiting room” which lets them in when you are ready to begin– either individually or all at once.
- Automatically recording your meetings on your computer. Having a video of your presentation is always a good idea so you can re-use your content.
#2 Press the ‘spacebar to temporarily un-mute yourself’
You can help to ensure a quality audio recording by placing everyone on mute by default. And while this feature is more appropriate for meetings vs. presentations, it’s a great thing to know about – and to tell your audience about. It’s easy to use, hold down the spacebar to un-mute yourself and let it go to turn your audio off again. It prevents people from forgetting to re-mute when they walk off to do something else forcing you to listen to their snoring dog or screaming baby.

Even if it doesn’t get used during your presentation (unless it’s a workshop you won’t want people to randomly chime in), many of your audience will thank you for learning this tip.
Note: You may need to enable it in your Zoom Preferences.
#3 Record ‘separate audio files’ for each speaker, host, or panelist in the presentation
If you have a host or a co-presenter there will be content in the session that’s not yours. Having separate audio recordings lets you use only the audio that was from your part of the presentation.
You can enable this in Preferences > Recording.

#4 Enable the ‘non-verbal feedback’ feature to allow audience interactions
Cool zoom feature #4 – enable non-verbal feedback.
To make your presentations interactive you can enable the non-verbal feedback feature. This allows participants to express reactions to your presentation.
This is not to be confused with ‘meeting reaction emojis’ which are temporary reactions that disappear after 5 seconds. To be honest, it’s hard not to be confused when there are two sets of interactions with different names.
Non-verbal feedback is for direct feedback to the speaker or host that others can agree with by clicking the same icon. The result is that the speaker can see how many people are expressing the feedback.
The options for non-verbal feedback are shown in the image below:

An example of how this would be used in a presentation is to ask the speaker to speed up or slow down. This might seem like a weird thing to be told during your talk, and if it’s just one person asking you’d most likely ignore it. But if 50 people are saying to slow down, that’s a pretty good indication that your current presentation style isn’t working for them.
It provides a pretty amazing insight – something I wish I’d had that feedback during an on-stage talk.
You can also use it to ask binary questions to the audience that they can respond yes or no to – a great way to segment the audience so you can tailor your content based on their responses.
Combine this feature with a QTINTA audience participation question for a really engaging experience. You’ll have to watch the video to know what QTINTA means.
#5 Use the Zoom ‘beauty mode’ to soften your appearance
Zoom includes a “Touch up my appearance” filter in the “Preferences > Video” settings, which gives your skin a softer appearance. There’s a slider that lets you control how much it applies the effect. It can look weird if you crank it too much, but having just a little can really help – especially if you’re looking a big bedraggled.
Settings are maintained when you quit so you can expect to look the same way every time.
#6 Use Zoom ‘video filters’ to add a cinematic high-contrast appearance
We’re all familiar with Zoom backgrounds, but a more impressive feature in my mind are the video filters. You can access them via the “Stop Video” dropdown arrow. Yes, there are some silly ones which can be funny when in a meeting, but for presenting stick to the non-silly ones. They can help improve the quality of your on-camera look. I particularly like the first option “Boost” which kicks your contrast up a notch removing any bland washed out lighting, it also removed some warmer tones which I like as it reduces the redness I often have in my skin.

You can see that it increases the contrast but also cuts down on the redness in my face.
Unlike the “Touch up my appearance” feature, your video filter settings are not maintained between sessions, which is a frustrating extra step each time if you found a setting you like.
#7 Encourage attendees to use ‘side-by-side mode’ to view you and your slides
This can be a good setting if you want to make your talk feel more personal. It shows your camera video beside your slides, and viewers can resize the videos as they see fit.

It can be a good idea to point this out as not everyone will know.
E.g. “You should be viewing this presentation in side by side mode so you see me and the slides. If you want to make the slides bigger (or smaller) you can resize them by dragging the slider between my video and the slides.”
#8 Use Zoom ‘annotations’ to mark up your slides live, or a ‘whiteboard’ for a blank canvas
A really cool feature of Zoom is Annotations. This lets you write or draw on top of the screen you are sharing. Once the feature is activated , you can access it from the menu at the top when you are sharing your screen.

This is really helpful when you have a complex slide and you want to focus people’s attention on different areas of the screen as you talk. When presenting live on a stage you can gesture towards a particular area, but it’s not as easy in a virtual presentation which is why it’s handy.
There is also a Whiteboard feature that gives you, well, a whiteboard. This could be useful if you find that you need to dig into a point you’re making in a more detailed way or discover during your talk that you need a different way to explain it.
You might want to take a quick screenshot when you’re done if you happened to get some interesting ideas marked up.

Rock open a whiteboard and sketch a diagram. Having a tablet and pen would be very helpful for this, versus trying to draw with a mouse. It might be wise to use the non-verbal feedback feature to get folks to say “Yes” to a “Let me know if you’re ready to move on” question.
Note, this is a screen sharing feature, so in order to get to the whiteboard, you need to stop sharing your screen, then share once more but choose Whiteboard as the option. Then you’ll have to stop sharing and share your slides again. Make sure you’ve practiced this if you think you’ll be using it.
#9 Use ‘closed captions’ to increase the accessibility of your virtual presentation and video recording
Zoom has transcription features that let you add closed captions to your session. You can do it manually for free, but that means someone will have to type them live, which is a pretty specific skill to have, and requires someone to do it for you.
If you have a paid Zoom account (roughly $20/month) live transcriptions are included. An alternative is to integrate with a platform like Otter.ai, to add closed captions in real time. You can also use Otter for transcribing any other audio or video files you have which makes it a much better value.
There are several reasons why closed captions are a good thing to do.
- No headphones: if an attendee doesn’t have or forgot their headphones and they’re in an environment where they can’t have the volume on, closed captions are a life saver that could be the difference between them staying or leaving.
- Accessibility: Captions allow meetings to be accessible to all. For the deaf, hard of hearing, or non-native speakers, they are an absolute necessity to understand what’s going on.
- Attention and recall: closed captioning can increase the amount of your content that an attendee comprehends and remembers. This is because they are getting it using two senses, and you have to focus more intently when you are reading.
You can check out Otter here to set up live captions.
#10 Use Zoom ‘breakout rooms’ to split workshop participants into groups
Without question, one of the most popular Zoom features is Breakout Rooms. They are exactly as they sound, allowing you to break out attendees into separate rooms. This could be for hosting a multi-track event where there is a speaker in each breakout room, or more commonly it is to allow groups to work together away from the “Main Room” and then come back in to rejoin you as the speaker.
This is a wonderful feature if you are running workshops that require groups to work through some of your worksheets or tasks for example.
There’s a good demo of how to use Zoom breakout rooms here.
#11 Use a Zoom ‘waiting room’ to hold attendees before you let them in at the same time
Nobody shows up at the same time to a presentation, and you don’t always want to start until an acceptable threshold of attendees have arrived. Particularly if the beginning of your talk is fundamental to your big idea.
The waiting room is basically a holding area where attendees are listed as they show up. They get to see a simple welcome screen (annoyingly simple really – I’d much prefer to have the options to have a fully custom slide in there), and you can admit them one by one, or all at once, when you are ready to begin.
It also allows you to block people from entering, although for the most part there’s not much reason to do this when you are presenting to a large audience. Useful if someone becomes disruptive for any reason.
Caution: it’s very easy to forget about the waiting room and have people sitting around unable to get in after you’ve started. I recommend assigning this task to your co-host.
Cool Zoom Feature to Avoid – ‘Present with your PowerPoint or Keynote slides as a virtual background’.
This is an interesting feature that’s worth discussing both for why it’s cool and why it’s uncool.
What it does
Instead of a regular screen share, it takes your slide deck and sets it as the background much like any other Zoom background. As such it places a ‘mini you’ floating on top of the slides in cutout mode which is kinda fun. Kinda.
To access the feature (beta at time of writing) click the “Advanced” tab in the “Share Screen” popup, and select “Slides as Virtual Background”.
This is what it looks like from the attendee’s perspective. And yes, you appear twice on the screen. Once on top of your slides, and again beside them. Silly.

Note: you must download a local copy of your slide deck to your computer as it doesn’t connect to cloud-based slides.
If you have audio and video in your slides, checking the “Share Sound” option at the bottom-left of the share popup should make that transmit to the audience. However, it doesn’t. In fact I couldn’t get any video or audio to play at all.
There’s also a second “Split Video from Slides” option which kinda defeats the purpose. As you can see below, you are back with your regular background in a separate window, and you are only on the screen once.
With the split setting in place, it would be a fair to wonder why you’d use this feature as it looks just the same as the regular view.
There are however, a few key differences.
The major difference is that you don’t need to have your slides in fullscreen mode on your computer. In the screenshot below you’ll see that I’m looking at a Zoom window with my slides inside it. I can now move through my slides while having other windows open such as the chat and participant windows. This is actually pretty great as the audience doesn’t see your layout, they see what they would normally see.
A nice side effect of this setting is the audience won’t see the awkward moment at the start of your talk where your whole screen is visible until you start the slides.

Looking at the main window, you can clean up the view a bit by having attendee video off by un-checking “More > Allow Participants to Start Video” in the Participants panel, and then selecting “Hide non-video participants” from the “…” menu on one of the participant video boxes.
You can take it a step further if you select “Hide self view” from the … on your video thumbnail. This will give you a view of just your slides. As much as the layout annoys me (I’d rather pop the self view out to the side with the chat), it can be important to see yourself to make sure you’re not moving out of frame – particularly if you are speaking standing up.
However, at this point in the beta it’s just not usable enough to be a serious and professional solution because of a few technical failings:
- It’s buggy like most beta features are
- It doesn’t show any animations or slide transitions
- If you are recording the screen, the merge view while fun, is a little unprofessional looking
- Audio and video didn’t work at all for me, despite there being a setting to allow slide audio to work. I think this might be because the videos didn’t play.
- When you start the share it has to process the slides before it starts which causes a delay if you aren’t expecting it.
Overall, it’s a feature with some exciting elements, although to be perfectly honest, the good aspects are nothing to do with the feature itself, but are side effects. I’d prefer to see a new feature that allows you to avoid presenting in fullscreen to allow a much greater degree of presenter screen setup.
The chapter title says it all. Do these things and your virtual presentations will be better. If you don’t, your presentation won’t be better than the last one you did, missing an important opportunity grow your skills as a virtual presenter.
Seriously. Do these things.
#1 Test your slides from the ‘attendee perspective’ using another laptop or tablet
Your slides might look amazing on your retina laptop or 5K monitor, but not all screens are alike, and your super-detailed tiny-text “revolutionary new marketing method” process diagram might look more like a dot-matrix printout to someone with a lesser screen.
Viewing your slides on a smaller or alternative screen isn’t enough. You also need to view them on Zoom on that screen, because virtual presentation software tends to change things you wouldn’t expect.
The golden rule of presentation QA is to run through every slide on the platform you’re going to be delivering on (Zoom, GotoWebinar, etc.) watching out for the things below:
- Any virtual presentation platform will add small visual artifacts to the video stream—they’re imperfect degenerative medium where some quality will be lost in transmission. As a result, your slides will never be quite as sharp as directly viewing your slides.
- If you have audio in your slides, check that the audio levels are balanced and not too loud or quiet. Remember to also test it with headphones on as that’s a common listening scenario for your audience.
- If you have video in your slides it may not come across well when presenting virtually. There’s usually some lag or choppiness that makes it skip frames. This can make the audio look out of sync.
- If you have multiple slides with audio, set them at the exact same level so people don’t get deafened. A common problem in that scenario is that the attendees will turn down their audio if you blast them, and then the next time you have audio it’s too quiet to hear properly. Your presentation software will have a setting for the audio or video volume. The best way to make sure they are the same is to move your slides to be one after the other (you can reorder them afterwards), then step through them to gauge the balance.
- If you have complex animations or transitions, they may render more slowly or less smoothly when piped through Zoom and a wifi connection. If they don’t work the way you want them to, consider simplifying them (fewer animations) or removing them altogether – replacing them with static slides. You can still use a technique like the Progressive Reveal to create a pseudo animation effect.
To prevent an audio feedback loop when testing your audio and video slides, have your partner/friend/colleague be on the viewer/attendee side in another room.
Whatever your specific case is, there’s a good chance that on the viewer’s side it’s not as perfect. So double, triple, and quadruple check.
I guess you should also single check. Why does nobody say that?
“You should single check your work to make sure it’s awesome.”
The best way to QA is to record some video of it from the viewer’s perspective. Have your QA buddy record their screen (with audio). If you don’t have anyone to help you, just set up your extra laptop (hopefully you have one somewhere) in another room and record the screen from there. If you’re using a Mac, Quicktime is an easy way to get a recording. On a PC, you can use PowerPoint to do a screen recording (more on that later), or find some free screen recording software for a test.
If you do have a helper, you can also reverse roles where they present and you observe on their machine. This will give you the truest sense of what might need to be fixed. It’ll no doubt be quite hilarious to watch, unless they turn out to be better at it than you.
#2 Remove all hashtags from your slides
My typical advice regarding hashtags is to make sure you update them to use the current event’s hashtag if you’ve used this slide deck before. If you don’t it looks awful to the audience and makes them feel like you didn’t put in the effort to make a presentation just for them.
However, the main goal of this entire guide —primarily covered in chapters 10 and 11— is to ensure you create a professional-grade recording of your virtual presentation that you can repurpose over and over for multiple virtual events.
If you leave event hashtags in your slides they will be forever embedded in your recording, rendering it useless for re-use. And trust me, once you’ve created a high-resolution awesomely edited recording of your talk, you will feel amazing about it.
It may feel counterintuitive, but you should delete all the hashtags from your slides.
If the event mentions it and asks you why or asks you to include them, just politely let them know your rationale. I’ve found that many virtual events have interactive chat in the interface they use which tends to dilute the number of people hanging out on a Twitter hashtag anyway.
#3 Have a wired Internet connection
If attendees have a poor connection they can always leave and download the video and slides later on.
But the presenter is the one person who absolutely must have a great Internet connection, and the best way to do that is to have directly wired Ethernet.
A side benefit of this is that it will help you end the endless debate over who’s connection is causing the problem. I’m sure you’ve been in a meeting where someone suggests your Internet is slow, and you say yours is fine, and they say that theirs has been working brilliantly all week.
Just say “Yeah, but I have a hardwired Ethernet connection.” End of conversation.
If you don’t have a wired connection, work on getting one set up, and in the meantime tell your eager tech wannabe roommates NOT to reset the ******* wifi while you’re presenting.
#4 Have a backup audio input device
“Is this mic on? Can you hear me at the back?”
Sometimes your mic will stop working, and it’s one of the most uncomfortable panic-ridden things that can happen to a speaker (see When Things Go Wrong ). It could be a dead battery issue, or your headphone cable could be old and the internal wiring failed.

Whatever the cause, you need to have a way to deal with the problem.
If you are using a posh external mic that stops working, ditching it for the internal microphone of your laptop will likely degrade the audio quality significantly, but it’s better than nothing.
In a later chapter I do a deep dive comparison video about microphone options for virtual presenting .
Probably the simplest backup is another set of headphones. The classic Apple headphones are only $25 now. Make sure you get the ones with the 3.5mm jack, and not the lightning cable, (especially if you’re not an Apple person) as that’s only useful for your iPhone. And if you aren’t an Apple person, there are a million other options on Amazon.
However, be warned that these headphones are rife with audio problems such as noisy cables (you’ll need to sit still which sucks), and they should only be used on Zoom. When using them with any other audio recording software they have a horrific background hiss that destroys your audio, but Zoom’s noise removal feature (on by default) actually does a fantastic job of removing it, making them a viable last minute solution. Hopefully, you’ll never need to use them.
#5 Have a slide dedicated to encouraging non-verbal feedback
The non-verbal feedback feature of Zoom is a great way to make your talk more dynamic. But you don’t want to try and explain it in the middle of your talk as it’ll break the flow and screw up the fluidity of your recording.
Instead, consider which aspects of the feature you want to use, and have a slide at the start of your presentation (slide 2 for example) that focuses on this. You can quickly walk people through how it works, and tell them how you’ll be using it throughout.
#6 Have everyone muted by default
It goes without saying, but I’ll say it anyway. You don’t want attendees, whether it’s 5 or 500, to be chatting before or during your presentation. So this one is simple. Make sure you mute everyone. If you’re using your Personal Meeting ID you might have this already set up.
You can mute everyone in the Participants sidebar, or as a global default setting in the web portal administration settings “Settings > Schedule Meeting > Mute all participants when they join a meeting”.

#7 Wear confidence clothes
Just because you can present in your PJs it doesn’t mean you should present in your PJs. Treat it like an on-stage talk and get ready in your mojo outfit. You’ll gain confidence and look more professional.
Something I like to do when I’m on the road presenting, is lay out my clothes the night before. It helps me get in the right mindset and also saves time the next day when you might be stressing out.
#8 Close all of your other software to prevent your machine slowing down
Take a look at your computer right now and count A) how many different apps are running, and B) how many tabs you have open in your browser.
Here’s a screenshot of mine, for reference.

Tabs open in Chrome? 39. Apps open? 20
You need to be concerned about two things, the amount of memory and processing power being hogged by all the apps you have open, and the number of ways you might receive a notification during your talk.
For PCs running Windows 10, there’s a built-in function to silence notifications when presenting . But if you’re a Mac user the settings for this are horrendous (slightly better in Big Sur). Fortunately there’s a free app called Muzzle that silences all of your notifications as soon as you share your screen.

#9 Have two pre-made slides ready for Q&A at the end of your virtual presentation
It’s common for your host to ask questions that the audience has submitted in the chat window (or the Q&A window for Zoom Webinars) at the end of your session. The best way to utilize this opportunity—if you’re still in control of the screen—is to have two slides prepared.
The first slide should simply have Q&A written on it, really big.
The second slide should be a promo slide with a special offer you have.
I like to leave up the Q&A slide until the questions start, then flip it to the promo slide so it can sit there for the next 5-10 minutes. It’s a great way to have it visible for a long period of time without actually having to be salesy in your presentation.
It’s fairly common that an event organizer will ask you if you have something to promote, but if they don’t, ask them if it’s okay that you use a slide at the end like this.
#10 Build a background set to make your virtual presentations look professional
If you spend a lot of time on Zoom, instead of using a Zoom background, start thinking about how you can built a bit of a set where you do your presentations. Not only will it look more professional, but it will fill you with confidence and make you feel like you’re in presentation mode when you’re there.
I’m fortunate to have a space for my office/studio, and I’ve seen and felt the difference a well-designed environment makes when I show up to work. It took me months to get it right, so don’t think you have to suddenly have something perfect. Just chip away at it over time, turning on your webcam every day and giving a little thought as to how you can make the space more special. Small shelves with plants or books can work great, and Pinterest is definitely your friend for this type of thing.
Many folks won’t have a dedicated workspace to claim as your “stage”, but I’m pretty sure your significant other won’t complain if you make your home that little bit nicer.
Speaking of “stages”, I actually built a stage in my studio—almost burning down the house in the process —but that’s a story for another time. Like I said, it took months to get to this stage. I keep saying stage.

#11 Reboot your computer the night before your virtual presentation
Restarting your computer can help speed it up a bit, especially if you haven’t done it in ages. Any little performance advantage you can get is valuable for a live presentation. It will help clear out any processes that are stuck or hogging the CPU.
However, it’s best not to do this right before your talk, as you risk it doing some weird software updates that take hours to complete.
#12 Do a test Zoom meeting to check your camera angles and lighting
As Springsteen said in Dancing in the Dark—”I check my look in the mirror, I wanna change my clothes, my hair, my face.”—you should always check how you look on camera before the presentation starts. Adjust the angle of the camera for your most flattering look and the best view of your background, which of course is a well-decorated wall, and not a zoom background of a beach or mountaintop.
Make sure to turn on the lights you’ll be using to light your lovely face, wick away any sweat using blotting wipes, and apply some simple makeup to remove shiny reflections from your head. More details on those techniques in the lighting section .
Here’s the smart part, record your test meeting and play it back to make sure there are no weird things in the background, it’s often easier to analyze a recording as opposed to your webcam view.
#13 Double-check your audio for background noise
At the same time as your camera check, watch your test recording and listen very carefully for any noise in the background. You’ll be surprised at how oblivious you can be to background noise when you’re busy and/or nervous.
Sounds to watch out for:
- Laundry sounds: Depending on where your washer/dryer are it may not be an issue, but the low hum can travel far. Start a Zoom recording, making sure to use which ever audio (mic) input you plan on using, go turn on your washer or dryer or dishwasher, then come back and replay the recording to see if it’s discernible. Crank the volume to make sure. There is NOTHING worse than doing a badass presentation then finding out the recording is ruined by a persistent hum in the background, or the sound of someone’s hoody zip clattering round and round in the dryer.
- Tube lights: If you have any tube lights where you are recording, or even in a nearby room, turn them off. They can be soooo noisy. Then put in the effort to replace them with silent LED tube bulbs when you have time. It does require some rewiring, but it’s not that hard—I did it recently and I made sure to choose bulbs with the same colour temperature as the lights I’ll be using to light me up in the video–more on that in the A/V chapter .
- Ceiling fans: Another subtle and repetitive sound. Turn ’em off unless the resulting heat will make you sweat to the point of scaring the audience.
- Heating: Not all heating is noisy, but many houses in North America use what’s called forced air. It’s noisy. A low hum, yes, but it’s an audio killer.
- Noisy clothes: Your clothes can cause bad scratching sounds—even if you use a shotgun microphone that’s not attached to your clothes—which is an audio killer. What happens is that any loose clothing rubs against you when you gesticulate with your arms. Tighter clothes like a t-shirt are the solution to this. I go into more depth including a comparison video in What to do When Noisy Clothes Ruin Your Audio .
- Noisy shoes: if you’re wearing any kind of heels, they will cause irritating sounds if you shuffle your feet (while presenting standing up, which you should do). The simplest solution is to take them off and present in your socks (or bare feet).
- Analog watches: I’m kidding.
And make sure everyone in the house knows not to bother you while you’re presenting. If you are in a room with a door, hang a sign on it with the time of your event, and say not to disturb you until you take the sign off the door.
Guess what? Not every thing you can do as a virtual presenter is something you should be doing—I’m talking about you, speaker who likes to take a bathroom break while mic’d up, two minutes before the session starts.
Similarly, not every feature of Zoom has a positive impact on the audience or speaker experience. In this short and not-so-sweet chapter I’ll give you some tips about things to avoid so your talks go more smoothly.
#1 Don’t use a free Zoom account for your presentation
If you’re running the show yourself this is an important one. The free Zoom plan allows up to 100 attendees which is great, and more than enough for a small event, however there is also a 40-minute time limit, which would be very embarrassing if you didn’t know that and all of a sudden everyone gets kicked out of your virtual event.
#2 Try to avoid saying “Can you hear me?”
This is a classic intro statement that nervous presenters ask, but it makes you sound unprofessional. Instead, make a subtle change to how you position it, like this:
“Thanks {host name}, let’s get started, and let us know in the chat window if you have any issues hearing my audio.”
#3 Don’t use your laptop’s microphone if your webcam is sitting on an external monitor
When you do this, the laptop will be off to one side and your audio will be really quiet and sound like you’re in a different room.
#4 Don’t use stock photos in your slides
Just as you shouldn’t use a stock photo as the header background on your website, you shouldn’t use them in your presentations. To illustrate my point, it’s way too common for software companies to think it’s cool to use an overhead shot of a laptop and a coffee cup. It’s actually hilarious how prevalent it is. I recommend entering the URL of any image you’re considering using into tineye.com which will tell you how many times it’s been used.

If you absolutely have to use one, try hard to find one that’s not so widely used. Unsplash.com is a good resource for free photography that’s typically got less of a stock feel to it.
But all in all, the best way to avoid using stock photos is to develop an original content mindset (in chapter 6) .
#5 Don’t use a Zoom background. You heard me.
Zoom backgrounds can be fun in meetings, but when you’re presenting it can look unprofessional and can be really distracting. It can also make some of your head/hair disappear and speaking for myself, I need all the hair I can get.
#6 Don’t record the call without permission
This is a big no-no on certain types of call. For a presentation you can make a statement that it’s being recorded, as this is always helpful information for attendees to know (no permission needed) but if it’s a meeting with a client, customer, or coworker, you should be explicit that you are recording and why: “If it’s okay with you I’d like to record the call so I don’t miss any of the details.” This is important when you are a guest in an interview too. Asking for permission will add a level of trust and respect in the eyes of who you are asking – and in the very rare occasion that they say no, be graceful and say okay no worries. Then follow up with,”I may be taking notes throughout so bare with me if I’m scribbling”.
Also be aware, that if you are recording the session, everyone on the other side will see a blinking “recording” signal in the top-left corner, so there’s no creeping allowed.
To recap, remember these rules when it comes to recordings:
- Meetings: Ask for permission, and don’t record if your guest is uncomfortable with it.
- Presentations: Let people know that it’s being recorded and that you will be making it available after. Ideally after some post-production enhancements in chapter 11.
#7 Don’t be the host if you might leave early
This is a nightmare as the other participants are suddenly without a meeting and they might not know why. Then they have to re-coordinate to set up a new meeting, which is always a chore and often involves Slack or text messages or even worse, emails.
Intro Introduction to Virtual Presentations on Zoom
Chapter 1 18 Cool Zoom Features You Should Know About
Chapter 2 12 Things You Should Do in Your Zoom Presentation
Chapter 3 8 Things You Shouldn’t Do in Your Zoom Presentation
Chapter 4 Defining Your Presentation’s Purpose
Chapter 5 How to Define Your Talk’s Structure, Story, & Flow
Chapter 6 41 Slide Design Tips for Virtual Presentations
Chapter 7 6 Ways to Make Eye Contact With an Invisible Audience
Chapter 8 How to do Audience Participation in a Virtual Presentation
Chapter 9 How to Share Content during a Zoom Presentation
Chapter 10 How to Create a Stunning Video and Audio Recording
Chapter 11 Using Post-Production to Add Value to Your Zoom Recording
Chapter 12 How to Use Your Phone as a Beautiful Webcam
Chapter 13 What to Do When Things go Wrong in Your Presentation
Chapter 14 How to Ground Yourself and Get Ready to Present
Chapter 15 Advanced & Creative Zoom Presentation Techniques
Chapter 16 The Difference Between Zoom Meetings and Zoom Webinars
Chapter 17 23 Zoom Settings to Enable or Disable for a Smooth Presentation
Ready to get started?
How to share your screen on zoom with audio (mac, pc, ipad).

- 28 Sep 2021
Screen sharing is by far one of the most useful features of Zoom . But you’ve probably had the unfortunate experience of sharing your screen to show a video during a Zoom meeting, only to discover the other people on the call can’t hear the video’s audio stream.
Why does this happen, and how can you fix it?
The Zoom app defaults to play audio from your microphone. This makes sense, because most of the time you want to be able to talk during Zoom meetings. But it’s easy to change your settings so you can share your screen on Zoom with audio from music or a video instead.
You just have to know where to look and which buttons to click.
We’ll walk you through how to share a screen on Zoom with audio, along with a few bonus tips to make screen sharing with the Zoom app even better.
Pro tip : Need to make a video for your next Zoom meeting? Grab one of Biteable’s workplace-ready templates and make your video in no time.
Create videos that drive action
Activate your audience with impactful, on-brand videos. Create them simply and collaboratively with Biteable.
How to screen share on Zoom with standard audio
Before we show you how to share your screen with audio from a video or music, here’s how to screen share on Zoom with standard audio from your microphone (i.e. so participants can hear you talking).
Click the “Share Screen” button in the meeting toolbar > Choose the program you want to share
That’s it. It’s simple to share your screen on Zoom. Up next: screen sharing with a video playing.
How to share your screen on Zoom with audio from a video (PC, ioS)
To share your screen on Zoom with audio from a video:
- Open the Zoom app to start a Zoom meeting or join one.
- Click the green Share Screen icon in the lower meeting toolbar.
- Choose what you want to share.
- Click the Share Sound checkbox in the bottom toolbar.
- Click the blue Share button in the lower right corner.
Start a new Zoom meeting or join one in progress
The first step is to hop on the Zoom app and get that meeting going.

Click the green “Share Screen” icon
Once you’re in the Zoom meeting, click the green Share Screen icon in the middle of the meeting toolbar. This begins the process of sharing your screen in Zoom.
If you’re using an external microphone or speaker, make sure you’ve configured your Zoom audio device settings before sharing your screen.
Choose the window, program, or desktop you want to share
A window will pop up, prompting you to select what part of your screen you want to share on Zoom. This could be a particular program, window, or your entire desktop. Choose what you want to share with Zoom meeting participants.

Click the “Share Sound” checkbox
This is an important step needed to share not just your screen in Zoom, but also the sound from a video or music track. The Share Sound checkbox is located in the lower-left corner of the popup window.

Adjust your audio (optional)
If you want to adjust your audio settings, click the tiny down arrow next to the Share Sound label to open the audio quality settings. Choose your sound quality.
- Stereo (High-fidelity) works on most high speed internet connections.
- Mono is the best option if you’re on a slower connection or you’re already seeing delays and stutter in your Zoom meeting.

Click the blue “Share” button
This is located in the lower right corner. It’s the final step to sharing your screen on the Zoom app with audio.

That’s it. Now you’re sharing your screen for Zoom meeting participants with the audio from your computer playing. Everyone on the Zoom call will be able to hear your video.
This process simultaneously shares your screen and computer audio along with the audio from your mic. You can also choose to mute yourself while screen sharing. The computer audio will continue playing, but the Zoom meeting participants won’t be able to hear you if you speak.
Now you know how to screen share on the Zoom app with audio from your PC or iOS desktop or laptop. But what happens if you connect to a Zoom meeting from your phone? Screen sharing with audio from your iPhone or Android Zoom app is actually even easier.
Give your Zoom meeting a little something extra: Use one of Biteable’s Zoom backgrounds for a little extra something-something during your next Zoom meeting. We recommend:
- Zoom presentation background
- Organic shapes Zoom background
How to share your Zoom screen with sound from your phone (iPhone/Android)
To share your screen with audio during a Zoom meeting on your phone:
- Start or join a meeting.
- Tap the share content button.
- Select screen .
- Swipe up or press home (for broadcast control screen).
- Tap start broadcast .
- Toggle share device audio to on.
- Swipe up or press home button > open the app you want to share.
Start or join a Zoom meeting
You’ll need the Zoom app to share your screen with audio from your phone. Get this if you don’t already have it, then start or join your Zoom meeting.
If you haven’t shared a screen in Zoom from your phone before, keep in mind you won’t be able to select a desktop or window to share. Zoom just shares whatever is on your screen, so you may need to do a little prep work to make sure there’s nothing sensitive open.
It’s also wise to turn on Do Not Disturb while you’re screen sharing from your phone. That way, notifications won’t pop up during your screen share.

Tap the “share content” button.
Once you’re in the Zoom meeting, tap the green Share Content button on the meeting toolbar.

Select “screen”
In the content selection popup window, choose screen .

Swipe up or press home (for broadcast control screen)
Next, swipe up or press home on your phone. This brings up the Zoom broadcast screen. Zoom should be checked by default.
Tap the “start broadcast” button
Tap the start broadcast button to begin sharing your screen. Zoom gives you a three-second countdown before the broadcast starts. If you were muted when you tapped the Share Content button, you will get a notification that your microphone is off.

Toggle “share device audio” to on
The broadcast control screen includes an option to share your phone audio along with your screen during the Zoom meeting. In most cases it’s enabled by default. If it’s disabled, just tap the Share Device Audio button to toggle it to On.

Open the app you want to share
Once that’s done, just swipe up or press your home button to minimize the Zoom meeting and return to your home screen. Open the app you want to screen share in Zoom. Audio from the app will play for everyone in your Zoom meeting.
Once you’re finished, you can return to Zoom by tapping the Zoom app icon, then tap the Stop Share button in Zoom to stop screen sharing.
Or stop screen sharing by tapping the red timer icon at the top of your screen.
Once you stop sharing your screen, the icon at the top of your screen will turn green. You can tap it again to return to the Zoom meeting.
Playing music during a Zoom meeting
Playing music during a Zoom meeting might have limited application, but it’s handy for meetings where you have long periods of silence like Zoom classes or to spice up fun Zoom events like ice breaker games .
To play music during a Zoom meeting, begin with the same steps you used to share your screen with audio on the Zoom app. Choose to share your main desktop, then open your music player and play your music while sharing your screen with the computer audio enabled.

That’s all for sharing your screen in Zoom with sound. But there’s one more tweak you can make (and help your friends make) to give the best Zoom screen sharing experience possible.
Side-by-side screen sharing on the Zoom app
You won’t notice side-by-side screen sharing when you’re sharing your own screen. But if someone else in your Zoom meeting shares their screen, side-by-side mode can be a better layout for you.
With side-by-side screen sharing in Zoom, you’ll see the person’s screen next to their camera view. That way you can see who’s talking while they present what’s on their screen.
Just pop into the Zoom app settings, go to the Share Screen settings, and check the box to enable side-by-side sharing.

FAQs for sharing your screen on Zoom
Everything you need to know to share your screen on the Zoom app like a pro.
Why can’t I screen share on Zoom?
If you can’t screen share on Zoom, it’s probably because of one of these reasons:
- The meeting host has disabled participants’ ability to share their screen
- You’re using an old version of Zoom (to screen share, use version 5.0 or higher)
- You’ve prevented Zoom from accessing your microphone and camera. (Fix this in App Permissions)
How do I Share Screen and see participants in Zoom?
When you share your screen in Zoom, you can still see participants, but they’re moved to a small vertical strip at the side of your screen. Click on the 4×4 grid icon at the top of the strip to see participants in gallery view (grid) instead. You need a minimum of six Zoom meeting participants for gallery view to work.
How do I allow others to share their screen on Zoom?
To allow others to share their screen on Zoom while a meeting is in session:
- Click the ^ up arrow next to the screen share icon.
- Select advanced sharing options.
- Toggle all participants in the “who can share” section.
You can make participant screen sharing the default in your Zoom app settings.
How do I change the volume of screen shared audio on Zoom?
To change the volume of the screen shared audio on Zoom, you need to change the volume on the app that’s playing the sound. Eg: If you’re sharing your screen while playing a YouTube video, adjust the volume of the video directly in YouTube.
Make a video for your next Zoom meeting with Biteable
Sharing your screen on Zoom with audio opens up a whole new level of content sharing.
Want to create your own videos and video presentations to share during your next Zoom meeting? Biteable is the go-to online video maker.
Choose from hundreds of brandable video templates, workplace-ready scenes, and eye-catching animations. Put it all together in minutes with Biteable’s done-for-you editing tools. Biteable even fetches your brand colors from your website and automatically adds them to your video with the click of a button.
Add a voice over, record your screen, track your video analytics, and more. You’ll make your first video before they can ask, “When’s our next Zoom meeting?”
Make stunning videos with ease.
Take the struggle out of team communication.
Try Biteable now.
- No credit card required
- No complicated design decisions
- No experience necessary
- Presentations
- Most Recent
- Infographics
- Data Visualizations
- Forms and Surveys
- Video & Animation
- Case Studies
- Design for Business
- Digital Marketing
- Design Inspiration
- Visual Thinking
- Product Updates
- Visme Webinars
- Artificial Intelligence
13 Zoom Presentation Tips to Ace Your Next Online Meeting

Written by: Mahnoor Sheikh
Now that more people are working from home, online presentations using tools like Zoom have started to become the norm.
But giving a Zoom presentation is very different from presenting in person. The lack of physical presence and body language can make it difficult to engage and inspire your audience.
If you’re still getting used to presenting on Zoom, this article has some great tips to help you succeed and make an impact in your next meeting.
Preparing Your Zoom Presentation
Getting ready for your Zoom presentation is just as important as giving the actual presentation. There are tons of potential issues you can face, like a faulty microphone or your dog walking in right in the middle of an important slide.
By preparing well, you ensure your presentation is as smooth and error-free as possible. After all, you only get one chance to make a great first impression and get a great ROI .
Here are some tips to help you get ready to deliver a powerful Zoom presentation.
1 Design a Great Online Presentation
The first thing you need to do is make sure your presentation is designed to look its best on your audiences’ tiny computer screens.
Follow these three rules to create an effective Zoom presentation.

Keep it simple.
The best online presentations are simple and straightforward.
You don’t want your audience to be squinting at their screens trying to navigate through a tangled web of text, colors, graphs and other content.
You need them to look at a slide and get the point at a single glance.
Use a plain background for your slides, preferably white, and focus each slide on only one point or idea. Don’t stuff too many bullet points or text into your slides.
Also, make sure you center your text in case the edges of the slides are cut off for some of the participants.
Lastly, use a large and bold font that doesn’t require participants to strain their eyes, even if they’re viewing your slides on their phone.
Use relevant visuals.
Visuals make information much easier to digest and retain than plain text. And let’s face it—they keep things entertaining.
Here are some types of visuals you can use to make your Zoom presentation more engaging:
- Charts and graphs. Visualizing data can bring the most boring numbers and statistics to life. If you’re using research findings to show a trend or back up your point, consider presenting them in the form of a bar graph or pie chart. Not only will it add some color to your slides, it will make it easier for your audience to interpret the data.
- Maps. If you're presenting geographic data, you can easily visualize it in the form of maps. In Visme, you can add interactive maps for a single country or the world.
- Icons and illustrations. Adding creative graphics like icons and illustrations can break up walls of text, make your information look more visual and interesting, and help explain your point better.
- Videos. Adding videos into your slides is a great way to make your presentation more engaging. Videos can help you explain a point more clearly, show a product in action or give some background information on your subject. You can embed YouTube or Vimeo videos into your slides or upload them directly.
- Stock photos. If used intelligently, stock photos can add value to your slides by helping you set the tone, tell a story or visualize an idea. You can also use relevant stock photos in the background with text overlay to add some color to your slides.
- GIFs and Memes. Make your online presentations fun and engaging by adding relevant memes and GIFs into slides that would otherwise look quite dry. Be careful not to overdo it, and only use humor if appropriate. You don’t want to risk looking unprofessional.
Here's a presentation template from Visme with just the right balance of visuals and text to help you get started. Simply customize it to use for your next Zoom presentation.

Using visuals in your online presentation is great, but this doesn’t mean you should stuff all your slides with images. Make sure the visuals you’re using add value to your content and emphasize your point instead of taking attention away from it.
Make it interactive.
It can be tough to keep your audience engaged when you’re not interacting with them face-to-face.
So, why not do the next best thing? Make your slides interactive!
If you’re creating your presentation in Visme, you can access a bunch of interactivity tools to spice up your slides:
- Animation. Add beautiful slide transitions, or animate objects separately. A good tip is to animate bullet points to appear one at a time to draw focus to each one. You can also choose from pre-animated illustrations, icons and characters to make your Zoom presentation more engaging.
- Links. In Visme, you can link any text or graphic element to a web page, or a slide or object inside your presentation. Get creative with this tool to add interactive quizzes, slides and more to your Zoom presentation. For example, you can link two text boxes together so when you click on the question, the answer appears.
- Hover effects. If you’re linking one object in your slide to another, you can enable it to show up on either click or hover. If you’re creating a quiz, for example, you can link two text boxes together so when you hover on the question, the answer appears.
A healthy dose of interactivity can make your audience feel more involved with your Zoom presentation.
2 Tidy Up Your Background
If you want your audience to take you seriously, clean up any clutter behind you.
A messy background can make you look unprofessional and distract people from focusing on your presentation. Ideally, your background should be a plain wall.
If you can’t manage to find a clean, empty background, consider using a virtual Zoom background. There are tons of different styles out there, so make sure to pick one that looks realistic and professional.
3 Draw Attention to Your Face
An online presentation can quickly start to feel distant and impersonal, like watching a pre-recorded video.
To remind your audience that they’re interacting with a real human, you need to draw focus to your face and expressions as you present.
Make sure you’re presenting in a well-lit room, where the source of light is in front of you. If the light source is directly behind you, you might end up looking like a dark blob.
4 Check Your Equipment
Make sure you check all your technical equipment to see if everything is working properly. This will help minimize issues like awkward camera angles or a malfunctioning microphone.
Here are a few things you should take care of before your presentation:
- Check internet connection. No one wants to listen to a presenter with laggy audio and video. Use a reliable, high-speed internet connection to ensure a smooth Zoom presentation.
- Test audio and video. Check if your camera and microphone are working properly by joining a Zoom test meeting . You can also test out your equipment from inside the Zoom app by clicking on Settings → Audio or Settings → Video .
- Ensure your laptop is plugged in. Imagine if your laptop dies out in the middle of your presentation just because you didn’t plug it in properly. Don’t let that happen.
- Adjust your camera level. Make sure your audience is looking at your face instead of the top of your head. Decide whether you want to sit or stand during your presentation, and adjust the webcam so it’s at eye level.
Keep in mind that technical issues can arise unexpectedly, even if you do everything right. Doing tech prep beforehand, though, keeps the chances at a minimum.
5 Minimize Potential Interruptions
Whether you’re giving your Zoom presentation at home or in a nearby cafe, there are tons of potential interruptions that can disrupt your flow and make you look unprofessional.
During your prep, your goal should be to minimize these interruptions as much as possible.
Find a quiet area to begin with, and lock the door so no one comes in unexpectedly. It’s a good idea to inform your family members or roommates that you’re going to be busy prior to the presentation.
Another tip is to close all other open applications and windows on your computer. Notifications and sounds can interrupt your meeting and distract you. You can also use the “Do Not Disturb” mode on MacOS or “Focus Assist” on Windows 10 to mute notifications.
6 Stick Your Notes in the Right Place
Just like when you’re presenting in person, you’d likely want to keep notes or pointers nearby in case you forget something important.
During a Zoom presentation, though, you need to be careful about where you place your notes. It can look very unprofessional and awkward if your eyes keep moving away from the camera when everyone is staring at your face.
Avoid keeping a notepad next to you or pasting them on the side of your monitor. A better alternative is to stick a post-it right below or next to your webcam. So, even if you take a peek, you will still be looking somewhat directly at your audience.
If you’re using Visme to create your Zoom presentation, you can simply use the presenter notes feature and skip all the hassle of keeping physical notes.

While you’re presenting, your presenter notes will open up in another window, so you can look at them while presenting without even letting your audience know.
7 Ditch the Pajamas
We get it. Nobody wants to get dressed when they’re at home.
But really, if you’re giving a professional presentation, it’s a good idea to ditch your PJs and wear something presentable .
Even if everyone knows you’re at home, you don’t want to look sloppy while sharing important information. This can prevent your audience from taking you seriously.
Plus, dressing up can help you feel more confident and motivated. Wear something that not only looks smart, but also makes you feel good about yourself.
8 Rehearse Before the Presentation
Never walk into a presentation unprepared. This is especially important for Zoom presentations, as it can be even more difficult to wing it when you’re not interacting in person.
Plus, rehearsing is a good idea if you want to overcome the fear of being on camera. Do a demo Zoom meeting with a friend or family member, or just practice alone before the presentation.
Delivering Your Zoom Presentation
Now that you’re all prepped up to give your Zoom presentation, here are some tips to help you make the most of your time while you’re presenting.
9 Start With a Bang
Did you know that people take as little as five seconds to judge how charismatic a speaker is?
Figuring out how to start your presentation is one of the most important parts of your Zoom presentation. It can either get your audience to sit up in their seats or prepare to doze off.
Here's an infographic on some tried-and-true ways to start a presentation that keeps your audience hooked . Keep reading for an explanation of all seven points below.

- Reveal a shocking statistic. A relevant and powerful statistic can set the tone for your presentation and show your audience the importance of your message.
- Tell a relevant joke. Humor is a great way to break the ice and keep your audience engaged. A boring presentation can quickly cause the listener to zone out.
- Ask a question. Get your audience involved by asking them a question relevant to your presentation topic. The more you interact with them, the more likely they’ll be to listen to what you’re saying.
- Quote an influential person. A powerful quote can often motivate or inspire your audience to sit up and listen to what you have to say.
- Tell a short story. Stories are personal and can evoke emotions. Telling a relatable story that also gets the audience curious to know more is a great way to start your presentation.
- Use an interesting prop. Using a prop can break the monotony of your presentation. Using motion and a visual object can also help attract your audience’s gaze.
- Show a captivating visual. Pictures speak louder than words, which is why using a powerful image that tells a story or shows the importance of your topic is an effective way to start your presentation.
Along with starting impressively, you should also try to end your presentation in a way that it drives your audience to take action or think about your message. A good idea is to end with a powerful statement or a thought-provoking question.
10 Make Eye Contact With the Audience
While you’re speaking, it’s just as important to make eye contact with your audience as it is during a face-to-face presentation.
The problem with Zoom presentations, though, is that you often end up looking at your own video or at the video of your audience.
To make eye contact online, however, you need to look directly at your camera. To make things easier, you can place the video boxes of your audience at the top of your screen, directly under your webcam.
11 Regularly Pause to Engage
Online presentations can get monotonous really quickly, and it’s common for people to zone out in the middle of it.
If you want to ensure your message hits home, take regular breaks throughout your Zoom presentation and engage your audience in conversation.
You could pause to ask them questions, or simply ask what they think about a certain topic. You could also try switching up the pace of your presentation, show a short video clip or tell an interesting or humorous story that helps bring wandering minds back.

12 Use the Chat Feature to Your Benefit
Zoom’s chat feature is a great way to get your audience involved without disrupting the flow of your presentation.
You can use Zoom chat to your advantage in several different ways:
- Questions. Ask your audience questions and let them answer through chat, or get them to ask you questions in the chat.
- Feedback. Let your audience know beforehand that they can leave their feedback and comments related to your presentation or topic in the chat. For example, if someone comments that they can’t hear you properly you can try fixing your mic or raising your voice.
Get creative with your use of the chat feature to keep your audience engaged. Ask them to send a hand emoji if they can relate to something, or ask what they want to see first in your presentation.
13 Record Your Presentation
The best way to improve your Zoom presentation skills is to learn from your past mistakes. Thankfully, Zoom lets you record your presentations so you can revisit them later and analyze your performance.

Are you using too many hand gestures? Are you walking around too much? Are you speaking at a reasonable pace? Understanding how you did can help you do even better in the future.
You can also send your Zoom presentation recordings to a friend or family member so they can review it for you. It always helps to get the opinion of someone you trust.
How to Share Your Visme Presentation on Zoom
Thinking of creating your Zoom presentation in Visme? Great choice!
The best part is that you can easily share your Visme slides with your audience without needing to download the presentation on your computer.
Of course, you can still download your presentation in PowerPoint or PDF format if you need to.
Follow the steps below to share your Visme presentation on Zoom without downloading anything.
Step 1: Publish your presentation.
When you’re finished designing your presentation in Visme, navigate over to the top right corner of your screen, and click on “Share”.
Next, click on “Publish for Web” on your left, type in a title and description for your presentation, and click on “Publish and get my link”.
Step 2: Click on the Present button.
Once you’ve published your presentation, you can go back and click on the “Present” button at the top right of your screen. This will open up the Presenter view.
If you want to access your presenter notes, click on the video camera icon at the bottom right corner of your screen, and your notes will appear in a new window.
Step 3: Share your screen on Zoom.
From your Zoom meeting window, click on “Share Screen” and select the window with the Presenter view of your presentation.

That’s it! You’ll now be able to look at the presenter notes on your screen while your audience views the slide open in your Presenter view window.
Alternatively, you can also download your presentation as a PowerPoint or PDF file, and share your screen in Zoom to present your slides.
Ready to Give a Memorable Zoom Presentation?
If you’re still getting used to the idea of presenting on Zoom, this article will help you prepare well and deliver an impactful presentation that people won’t be able to forget any time soon.
Remember, while Zoom presentations are different from presenting in person, you still need to be just as confident, dress to impress and make eye contact.
The only difference is that you need to put more effort into engaging your audience and keep them from dozing off in front of their computers.
Design a beautiful Zoom presentation and present online using Visme’s presentation maker. Sign up now for free and take it for a test drive!
Create beautiful presentations faster with Visme.

Trusted by leading brands
Recommended content for you:

Create Stunning Content!
Design visual brand experiences for your business whether you are a seasoned designer or a total novice.
About the Author
Mahnoor Sheikh is the content marketing manager at Visme. She has years of experience in content strategy and execution, SEO copywriting and graphic design. She is also the founder of MASH Content and is passionate about tea, kittens and traveling with her husband. Get in touch with her on LinkedIn .
Productivity
How to share audio on Zoom
Here's how to play music on zoom—with or without sharing your screen..

Maybe you're hosting a virtual party that needs music. Or perhaps you want to play some lo-fi beats while your team discusses quarterly earnings. Whatever the case, sometimes you want to share music during a Zoom call.
You could just hit play and hope your microphone picks it up, but that's going to be low quality. Plus, every time someone speaks, the music will cut in and out.
Instead, you can share high-quality music during your call, without sharing your screen, thanks to a hidden setting. Here's how to play music on Zoom.
Table of contents :
How to play background music on Zoom without sharing your screen
Here's how to play music on Zoom without sharing your screen in two simple steps.
With your Zoom meeting window open, click Share in the Zoom control bar.

In the window that appears, click the Advanced tab, and then click Computer Audio .
Click Share .

Your Zoom window will now display a separate tab at the top of your window titled My computer sound to indicate you're sharing your computer audio. Go ahead and play some music in Spotify, Apple Music, or even YouTube—it doesn't matter. Everyone on the call will hear your music without seeing your screen.
To stop sharing, Zoom has made it unnecessarily complicated: click the My computer sound tab, and then click the X next to it.

How to share your screen and audio on Zoom
Need to play audio to accompany your virtual presentation? Here's how to share your screen and play background music on Zoom.
With your Zoom meeting window open, click Share from the Zoom control bar.
From the Screens tab, click the window you want to share.

Click Share .
Once you're done sharing, click Stop share in the floating Zoom toolbar.

Zoom audio not working? Here's how to prevent common errors when sharing audio on Zoom
Sharing audio only in Zoom is straightforward enough, but there can be some potential hiccups. Here are a few tips to make sure your musical meeting goes well.
Check your volume levels. Sometimes people will have trouble hearing the music or hearing each other over the music. It's hard to tell this is happening, as the host, so be intentional about it: ask someone else on the call if they can hear both you and the music. You can adjust the volume in your music app or your system volume until things are just right.
Automate Zoom
Upload new zoom recordings to google drive.
Add new Zoom meetings to Google Calendar
Add new Leadpages leads as Zoom registrants
Related reading:
This article was originally published in February 2021 by Justin Pot. The most recent update was in May 2024.
Get productivity tips delivered straight to your inbox
We’ll email you 1-3 times per week—and never share your information.

Jessica Lau
Jessica Lau is a senior content specialist at Zapier. Outside of writing, she likes to snuggle her dogs, and provide unsolicited podcast and book recommendations.
- Video conferencing
Related articles

How to quote a Slack message in a reply

What is Notion AI? And how to use it

How to use PowerPoint: A beginner's guide

Google AI Overviews: 4 early learnings from generative AI in Google Search
Google AI Overviews: 4 early learnings from...
Improve your productivity automatically. Use Zapier to get your apps working together.

How-To Geek
How to screen share a powerpoint presentation in zoom.

Your changes have been saved
Email is sent
Email has already been sent
Please verify your email address.
You’ve reached your account maximum for followed topics.
Spectrum Just Raised Its Prices Again
Why public wi-fi is a hacker’s playground (and how to protect yourself), chrome is top dog, but firefox is still my favorite browser, quick links, grant access to share screens in zoom, screen share a powerpoint presentation in zoom.
No matter where you work, meetings all have one thing in common: PowerPoint presentations. If you use Zoom, you can easily present your slideshow to the participants by sharing your screen . Here's how it's done.
If you're the host of the Zoom meeting , you'll be able to share your screen without issue. However, if you're joining a meeting that you aren't the host of, you may need to request permission from the host to be able to share your screen.
As a general rule, we recommend that hosts disable the screen-share feature for participants by default for security reasons . If you aren't the host of the meeting, be sure to reach out to the host in advance to request permission to share your screen during the Zoom call. Hosts can always enable the feature during the call, but it's always good to be a step ahead.
If you're the host of the meeting and someone is requesting permission to share their screen during the meeting, click the up arrow next to "Share Screen" at the bottom of the window.
In the menu that appears, click "Advanced Sharing Options."

The "Advanced Sharing Options" window will appear. In the "Who Can Share" section, click the bubble next to "All Participants."

All participants in the meeting can now share their screen.
To screen share your PowerPoint presentation, go ahead and open the PowerPoint presentation that you would like to present. However, before you put the presentation in Slide Show view, you'll want to share your screen. At the bottom of the Zoom meeting window, click "Share Screen."

If you're using a single monitor, you will immediately start sharing your screen. If you're using dual monitors , you'll need to click the screen that your presentation will be shared on. In our case, that will be "Screen 2."

To begin sharing that screen, click "Share" at the bottom-right corner of the screen select window.

You're now sharing your screen. Now, in Microsoft PowerPoint, select the "Slide Show View" icon in the bottom-right corner of the application.
From here, deliver your presentation as though you were standing in front of a live audience.
If you are giving a big presentation through Zoom, you're not going to just jump straight into it. You may need to speak to the audience a bit before sharing your screen. If so, here are a few tips on how to look better on your Zoom call .
At Home with Tech

How to Hear Zoom Audio when Screen Mirroring to your TV

If you use a MacBook laptop and Apple TV, there’s one important setting to change if you want to hear your Zoom audio on your HDTV.
The Zoom app is mostly designed to be used on smartphones and computer screens as an interactive experience. But with Zoom having grown as a performance/presentation platform, sometimes it’s preferable to watch Zoom as a one-way experience. Then, it’s more enjoyable if you can experience it on your big-screen TV.
So how exactly do you get your Zoom feed to show up there? There are multiple ways to do it, but the gateway to my older (non-smart) HDTV is via my little (but mighty) Apple TV box.
Once I’m screen sharing in the Apple ecosystem to my Apple TV, it’s immediately available on my HDTV.
Apple makes screen mirroring (AirPlay) to its devices a snap. But getting Zoom’s audio to stream to your HDTV can be more tricky. Here are the ways to do it.
Use an iPhone and Zoom App As long as you first activate screen mirroring from your iPhone to your Apple TV before joining your Zoom, you’ll be fine.
On your iPhone’s Control Center (open by swiping down from top-right corner of your screen), you’ll see the two layered rectangles icon for screen mirroring.
- Tap it and select your Apple TV
- Then join your Zoom presentation
Both video and audio will follow to your TV.
Use a MacBook’s Web Browser or Zoom App Turn on Screen Mirroring via the Control Center icon on your laptop’s Menu Bar. Then choose the Apple TV.
Or a faster way to share your screen is just click on the Screen Mirroring icon on the Menu Bar. But you’ve first got to make sure that icon shows up on the top right. Here’s how to activate it.
- Go to ‘System Preferences’
- Click on ‘Screen Mirroring’ on the left panel
- Click ‘Dock and Menu Bar’
- Click Show in Menu Bar… ‘always’ (as opposed to ‘when active’)

What Happened to the Audio? But I’ve found that one big problem can crop up when screen mirroring Zoom from my wife’s MacBook Air to our Apple TV…
The Zoom video projects fine onto the TV screen, but the audio doesn’t naturally follow. The Zoom audio remains tethered to the laptop’s speakers.
To fix that frustrating problem, there’s one additional step you’ve got to take.
Change your Zoom Audio Settings By default, the Zoom audio output is the laptop’s speakers, even if you’re mirroring your screen. (Zoom doesn’t know that you’re practicing screen-mirroring magic.)
You’ve got to go into your Zoom settings and manually change the audio output to your Apple TV. Only then will the Zoom audio follow from your computer to your Apple TV.
In the Zoom app:
- Click on ‘Home’
- Click the Settings gear icon on the right
- Click on ‘Audio’
- Click on ‘Speaker’ drop down
- Select ‘Apple TV’

Turn Up the Volume Zoom has proven to be a really powerful app over these past couple of years during the pandemic. But you’ve got to make sure the audio settings are right.
Once you do, you can finally sit back and enjoy the Zoom show on your TV!
Share this:
One comment to “how to hear zoom audio when screen mirroring to your tv”.
Thank you! I finally figured out my problem. I didn’t realize that screen mirroring had to be activated first prior to joining the meeting. This fixed my issues.
Leave a comment Cancel reply
This site uses Akismet to reduce spam. Learn how your comment data is processed .
Blog at WordPress.com.
- Already have a WordPress.com account? Log in now.
- Subscribe Subscribed
- Copy shortlink
- Report this content
- View post in Reader
- Manage subscriptions
- Collapse this bar
How to Share and Play a Video with Sound During a Zoom Meeting
Home » Support » How to Share and Play a Video with Sound During a Zoom Meeting
SKIP AHEAD TO
At a Glance
In this guide, you’ll learn how to share a video during a Zoom meeting .
Zoom screen sharing allows you to share the desktop, window, application, or audio/video. If audio is an important part of your shared content, you can also send the computer’s audio to the remote attendees directly when sharing. The high-quality audio will produce a more professional and immersive sharing experience.
How to Share a Video on Zoom
- Prepare the video by opening it in either a media player or your web browser. Note: You may want to do this before the meeting begins.

- Select the program or desktop you want to share (e.g. A media player app or a video open in a browser window).
- Select the Share Sound checkbox.
Related Resources
- FAQ: Zoom LTI Pro in Canvas
- How to Play a Name Pronunciation Recording in Canvas
- How to Invite a Guest or Guest Speaker to a Class Session…
- Privacy Statement
Live Trainings
- Canvas Essentials
- Digital Whiteboarding
- Simplify Attendance with aPlus+
- View All Live Trainings
Request Forms
- General Support Request
- Course Copy Request
- Consultation Request
- View All Request Forms
Self-Paced Courses
- Build a Gold Standard Canvas Course
- Create a Virtual Exam
- Flip Your Class
- View All Self-Paced Courses
Quick Start Guides
- aPlus+ Attendance
- End-of-Term Checklist
- Poll Everywhere
- Term Start Checklist
- Teaching Spaces
- Teaching Studio
- Reserve a Space
- Classroom Technologies
- Equipment Recommendations
Recent Blog Posts

- How-To Guides
- Software Tutorials

Choosing the Right Presentation Format
When it comes to presenting your PowerPoint on Zoom, choosing the right format is crucial to ensure that your audience can view and interact with your slides effectively. Whether you’re conducting a business meeting, delivering a training session, or giving a presentation, consider the following factors when deciding on the best format for your presentation:
- Full Screen: This format allows you to occupy the entire Zoom window with your slides. It’s ideal for presentations that heavily rely on visuals or require your audience to focus solely on the content.
- Presenter View: If you need to access your notes, manage your slides, or view upcoming slides while presenting, the Presenter View format is your best bet. It gives you a separate window with additional tools and features.
- Side-by-Side: This format enables you to display your PowerPoint slides alongside other applications or materials, such as a video conferencing window or a shared document. It’s useful if you need to refer to external resources during your presentation.
- Custom Layout: Zoom allows you to customize the layout of your presentation, allowing you to combine multiple formats or adjust the size and position of your slides and other elements on the screen.
Consider the nature of your presentation, your objectives, and the visual elements you plan to incorporate when selecting the presentation format. Additionally, take into account the size of your audience, the devices they’ll be using, and the level of interactivity you wish to achieve.
Remember, a well-chosen presentation format can enhance your delivery and engage your audience more effectively. Spend some time experimenting with different formats in Zoom’s settings before your presentation to determine the layout that works best for your needs.
Preparing Your PowerPoint Slides
Before presenting your PowerPoint on Zoom, it’s important to ensure that your slides are well-prepared and optimized for the virtual environment. Here are some essential tips to consider:
- Simplify Your Content: Keep your slides concise and focused. Use bullet points, short sentences, and key phrases to convey your message effectively. Avoid overcrowding slides with excessive text or complex images.
- Use High-Quality Visuals: Choose high-resolution images and graphics that align with your topic and enhance understanding. Avoid pixelated or distorted visuals that may hinder audience comprehension.
- Consider Font Size and Typeface: Use a clear and legible font size, typically around 24-32 points, to ensure readability on different screen sizes. Stick to standard fonts like Arial or Calibri to avoid technical issues.
- Contrast Colors: Opt for high contrast between the background and text colors to ensure visibility. Dark text on a light background or vice versa works best. Avoid using color combinations that strain the eyes or make text illegible.
- Include Engaging Multimedia: Incorporate videos, animations, or interactive elements to enhance audience engagement. However, ensure that the multimedia elements are relevant, purposeful, and do not distract from your main points.
- Consistent Design: Maintain a consistent design across your slides for a professional and cohesive look. Use the same font styles, colors, and layout throughout your presentation to create a visually appealing and easily navigable experience for your audience.
- Proofread and Edit: Check for spelling, grammar, and content errors in your slides. Ensure that all text is grammatically correct and appropriate for your target audience. Consider seeking feedback from colleagues or friends to validate the clarity and effectiveness of your slides.
By following these tips, you can create visually appealing and well-structured PowerPoint slides for your Zoom presentations. Investing time and effort in the preparation phase will translate into a more engaging and impactful virtual presentation experience.
Optimizing Your Zoom Settings
Before you start presenting your PowerPoint on Zoom, it’s essential to optimize your Zoom settings to ensure a smooth and hassle-free experience for both you and your audience. Consider the following settings to enhance the quality and functionality of your presentation:
- Audio Settings: Test your microphone and speakers to ensure clear audio. Adjust the microphone sensitivity and speaker volume as needed. Consider using an external microphone for better sound quality.
- Video Settings: Check your camera settings and ensure that you’re well-lit and in focus. Adjust the video resolution based on your internet connection to maintain a stable presentation stream.
- Screen Sharing: Familiarize yourself with the screen sharing options in Zoom. Choose the appropriate settings to optimize the display of your PowerPoint slides. Select the “Optimize for full screen video” option for a smoother playback experience.
- Virtual Background: If desired, experiment with Zoom’s virtual background feature to create a professional and distraction-free backdrop. Choose a background image that aligns with your presentation topic and enhances your visual presence.
- Chat and Q&A: Decide whether you want to enable the chat or Q&A feature during your presentation. This allows your audience to ask questions or provide feedback. Determine how you want to manage and address these interactions during your presentation.
- Recording: If you plan to record your presentation, ensure that you have sufficient storage space and that you’ve enabled the recording function in Zoom. Inform your audience in advance if you intend to record the session.
- Mute and Unmute: Familiarize yourself with the mute and unmute controls in Zoom. During your presentation, be mindful of muting yourself when not speaking to minimize background noise and distractions.
- Practice and Test: Before your actual presentation, conduct a practice session to test your Zoom settings. Ensure that everything is working as expected, including audio, video, screen sharing, and any interactive features you plan to use.
By optimizing your Zoom settings in advance, you can ensure a seamless and professional presentation experience. Paying attention to audio, video, screen sharing, and other essential settings will help you deliver a high-quality presentation that engages your audience effectively.
Sharing Your Screen on Zoom
One of the key features of Zoom is the ability to share your screen, allowing you to display your PowerPoint slides to your audience. Follow these steps to successfully share your screen during a Zoom presentation:
- Start a Zoom Meeting: Open Zoom and start a meeting. You can choose to start a new meeting or join an existing one.
- Open Your PowerPoint Presentation: Open the PowerPoint file that contains your presentation. Make sure it’s ready to be displayed.
- Click the “Share Screen” Button: In the Zoom meeting window, locate the green “Share Screen” button at the bottom of the screen and click on it.
- Select Your PowerPoint Window: A dialog box will appear with a list of available screens and windows to share. Choose the window that has your PowerPoint presentation open.
- Ensure “Share Computer Sound” is Checked: If your PowerPoint presentation includes audio or video, make sure to check the “Share computer sound” checkbox in the dialog box. This will transmit the audio along with your slides.
- Click “Share”: Once you have selected the appropriate window, click on the “Share” button in the bottom right corner of the dialog box.
- Start Presenting: Your PowerPoint presentation will now be visible to your audience in the Zoom meeting. Begin presenting your slides as you normally would.
- Stop Sharing: To stop sharing your screen, locate the “Stop Share” button at the top of your screen or in the Zoom meeting controls and click on it.
Remember to ensure that your PowerPoint slides are visible and legible to your audience. Check the Zoom meeting preview window to verify the quality of your shared screen. Adjust the size and position of your slides if necessary to optimize visibility.
Sharing your screen on Zoom allows your audience to view your PowerPoint presentation in real-time, enhancing their engagement and understanding of your content. Practice this process before your actual presentation to become familiar with the steps and ensure a smooth screen sharing experience.
Using Presenter View
Presenter View is a powerful feature in PowerPoint that allows you to view your speaker notes, manage your slides, and have better control over your presentation while presenting on Zoom. Follow these steps to use Presenter View effectively:
- Enable Presenter View: Before you start your presentation, click on the “Slide Show” tab in PowerPoint and check the “Use Presenter View” box. This will activate Presenter View on your screen.
- Start the Slide Show: Begin your presentation by selecting the “From Beginning” or “From Current Slide” option under the “Slide Show” tab, depending on where you want to start.
- Access Presenter View: Once your presentation starts, you’ll see two different windows. The main window displays the current slide that your audience sees, while the Presenter View window contains your speaker notes, thumbnails of upcoming slides, and slide navigation controls.
- View Speaker Notes: In the Presenter View window, you can see your speaker notes for each slide, allowing you to stay on track with your talking points and key information.
- Preview Upcoming Slides: Take advantage of the thumbnail view in Presenter View to preview the next few slides. This helps you anticipate and smoothly transition to the next topic without losing your flow.
- Annotate Slides: Use the annotation tools available in Presenter View to highlight important points or draw attention to specific areas of your slides. This can enhance your audience’s understanding and engagement during your presentation.
- Manage Slides: In Presenter View, you can easily navigate between slides using the arrow keys or the slide navigation controls. This allows you to jump back and forth between slides or quickly go to a specific slide as needed.
- End the Presentation: Once you’ve completed your presentation, press the Esc key or click on the “End Slide Show” button in the Presenter View window to exit the presentation mode.
Presenter View in PowerPoint and Zoom provides you with the tools and flexibility to deliver a seamless and professional presentation. Take advantage of its features to stay organized, deliver your content effectively, and engage your audience during your Zoom presentation.
Navigating Slide Show Controls
When presenting your PowerPoint on Zoom, it’s important to familiarize yourself with the slide show controls to navigate through your slides smoothly and deliver an engaging presentation. Here are the key controls you can use while in slide show mode:
- Advance to Next Slide: To proceed to the next slide, simply press the right arrow key on your keyboard, click the mouse, or use a presenter remote if available. This allows you to progress through your presentation at your desired pace.
- Go Back to Previous Slide: If you need to revisit a previous slide, press the left arrow key on your keyboard or click the mouse’s left button. This enables you to go back and address questions or clarify information for your audience.
- Jump to a Specific Slide: If you want to navigate to a specific slide in your presentation, press the slide number on your keyboard followed by the Enter key. Alternatively, you can right-click on the slide and choose the desired slide from the context menu.
- Access Slide Thumbnails: In PowerPoint’s slide show mode, you can access a thumbnail view of your slides by pressing the Ctrl key and clicking on any slide. This enables you to quickly navigate to a specific slide without disrupting the flow of your presentation.
- Zoom In and Out: If you need to highlight specific details or make text more readable to your audience, use the Ctrl key and the plus (+) or minus (-) keys to zoom in and out, respectively. This feature is especially useful when showing complex diagrams or small texts.
- End the Slide Show: To exit the slide show mode, press the Esc key on your keyboard or right-click anywhere on the screen and select “End Show” from the context menu. This will bring you back to the normal editing view in PowerPoint.
- Use Presenter View: If you have enabled Presenter View, you can access additional controls and features to manage your presentation more effectively. Refer to the “Using Presenter View” section for more details on how to utilize this feature.
By familiarizing yourself with these slide show controls, you can navigate through your PowerPoint presentation confidently and deliver a more dynamic and interactive experience for your audience on Zoom.
Engaging Your Audience in a Zoom Presentation
Engaging your audience is crucial when presenting on Zoom to maintain their attention and ensure the effectiveness of your message. Here are some strategies to actively involve your audience and make your Zoom presentation interactive:
- Ask Questions: Pose questions to your audience throughout your presentation to encourage participation. You can use the chat feature in Zoom or ask attendees to unmute themselves and speak up.
- Use Polls: Take advantage of Zoom’s polling feature to gather instant feedback or opinions from your audience. Create engaging poll questions related to your presentation topic to encourage active participation.
- Encourage Chat Participation: Remind your audience to use the chat feature to ask questions, share insights, or provide feedback. Monitor the chat regularly and respond to messages to make attendees feel heard and valued.
- Incorporate Interactive Activities: Break up your presentation with interactive activities to keep your audience engaged. This could include case studies, brainstorming sessions, group discussions, or virtual simulations.
- Share Relevant Resources: Provide links to additional resources related to your topic in the chat or through screen sharing. This encourages further exploration and engagement even after the presentation ends.
- Use Visual Aid: Utilize visual aids such as charts, graphs, and images to enhance understanding and engagement. Visuals can help convey complex information in a more digestible and memorable way.
- Tell Stories: Incorporate relevant stories or anecdotes to make your content more relatable and captivating. Personal experiences are powerful tools for capturing your audience’s attention and keeping them engaged.
- Interact with Body Language: Use appropriate facial expressions, gestures, and body language to convey enthusiasm and connect with your audience. Non-verbal cues can enhance engagement and create a more memorable experience.
- Pause for Questions: Give your audience regular opportunities to ask questions or seek clarification. Pause after key points or at designated breaks to allow for interaction and address any queries.
- Display Empathy: Be attentive and empathetic towards your audience’s needs and emotions. Show genuine interest in their thoughts and perspectives, and create a safe and inclusive environment for discussion and interaction.
By incorporating these strategies, you can create a more interactive and engaging Zoom presentation that captivates your audience’s attention and encourages their active participation throughout the session.
Troubleshooting Audio and Video Issues
Technical difficulties with audio and video can disrupt the flow of your Zoom presentation. To ensure a smooth experience, it’s important to be familiar with troubleshooting common issues that may arise. Here are some troubleshooting tips for audio and video problems during your Zoom presentation:
- Check Your Internet Connection: A stable and reliable internet connection is crucial for smooth audio and video. Ensure that you have a strong connection and consider connecting via an Ethernet cable for a more stable connection.
- Test Your Audio and Video Devices: Before your presentation, test your microphone and camera to ensure they are functioning properly. Use the Zoom audio and video settings to select the correct devices and adjust their settings if needed.
- Adjust Your Audio Settings: If your audio is distorted, low, or inconsistent, check the audio settings in Zoom. Increase the volume, adjust the microphone sensitivity, and ensure that the correct audio device is selected.
- Restart Your Devices: If you experience audio or video issues during your presentation, try restarting your computer and reopening the Zoom application. This can resolve any temporary glitches that may be affecting your devices.
- Close Unnecessary Applications: Close any unnecessary applications or software running in the background during your presentation. This can free up system resources and prevent audio or video lag or interference.
- Use Headphones or External Microphones: If you are experiencing audio issues, consider using headphones or an external microphone. This can help eliminate background noise, improve audio quality, and minimize the chance of audio feedback.
- Optimize Camera Placement: Ensure that your camera is positioned correctly and at eye level. Avoid backlighting or excessive lighting that may affect the quality of your video. Adjust the camera angle and lighting as needed for the best visual appearance.
- Update Your Software: Keep your Zoom application and other relevant software up to date. Updates often include bug fixes and performance enhancements that can solve audio and video issues.
- Seek Technical Support: If you encounter persistent audio or video issues that you cannot resolve, consider contacting Zoom technical support or consulting with a technical expert for assistance.
By following these troubleshooting tips, you can minimize audio and video issues during your Zoom presentation and deliver a seamless and professional experience for your audience.
Tips for a Successful PowerPoint Presentation on Zoom
When delivering a PowerPoint presentation on Zoom, it’s essential to adapt your approach to the virtual environment. Here are some valuable tips to help you create a successful and impactful presentation:
- Practice and Rehearse: Familiarize yourself with your presentation and practice it multiple times before your actual Zoom presentation. This will boost your confidence, help you refine your delivery, and ensure a smoother flow.
- Create a Engaging Opening: Capture your audience’s attention with a strong opening that introduces the topic and highlights its relevance. Use a compelling anecdote, surprising statistic, or thought-provoking question to hook your audience from the start.
- Use Visuals Wisely: Leverage the power of visuals to support your message. Incorporate impactful images, charts, and graphs that enhance understanding and engagement. Avoid overwhelming your slides with excessive text or cluttered visuals.
- Speak Clearly and Slowly: Pay attention to your diction and pace of speech. Enunciate your words clearly and speak slowly and deliberately to ensure that every participant can follow along easily.
- Engage with Eye Contact: Look directly into the camera to establish eye contact with your virtual audience. This creates a stronger connection and helps maintain engagement throughout your presentation.
- Use Gestures and Body Language: Incorporate appropriate gestures and body language to enhance your presentation. It adds dynamism and visual interest, making your delivery more engaging and authentic.
- Encourage Interaction: Foster audience engagement by inviting questions, encouraging comments, or conducting interactive activities. This promotes a two-way communication and keeps participants actively involved.
- Time Management: Keep track of time and pace yourself accordingly. Avoid rushing through slides or going over time. Practice beforehand to ensure your presentation fits within the allocated timeframe.
- Use Breaks Strategically: Incorporate short breaks throughout your presentation to give your audience a chance to process information, ask questions, or engage in discussions. This helps maintain energy and prevents Zoom fatigue.
- Be Mindful of Your Background: Choose a clean and uncluttered background for your video. Consider using a virtual background or a well-organized physical setting that is visually appealing and free from distractions.
- Technical Backup: Have a backup plan in case of technical issues. Keep a secondary device ready, ensure you have a stable internet connection, and have a contact person to help troubleshoot any unforeseen problems.
By implementing these tips, you can maximize the impact of your PowerPoint presentation on Zoom. Remember to adapt to the virtual medium while maintaining your confidence, engaging your audience, and delivering a compelling presentation.
Leave a Reply Cancel reply
Your email address will not be published. Required fields are marked *
Save my name, email, and website in this browser for the next time I comment.
- Crowdfunding
- Cryptocurrency
- Digital Banking
- Digital Payments
- Investments
- Console Gaming
- Mobile Gaming
- VR/AR Gaming
- Gadget Usage
- Gaming Tips
- Online Safety
- Tech Setup & Troubleshooting
- Buyer’s Guides
- Comparative Analysis
- Gadget Reviews
- Service Reviews
- Software Reviews
- Mobile Devices
- PCs & Laptops
- Smart Home Gadgets
- Content Creation Tools
- Digital Photography
- Video & Music Streaming
- Online Security
- Online Services
- Web Hosting
- WiFi & Ethernet
- Browsers & Extensions
- Communication Platforms
- Operating Systems
- Productivity Tools
- AI & Machine Learning
- Cybersecurity
- Emerging Tech
- IoT & Smart Devices
- Virtual & Augmented Reality
- Latest News
- AI Developments
- Fintech Updates
- Gaming News
- New Product Launches
OpenStack Backup and Recovery Software
- Apple Wallet Availability in the PocketGuard App Sync your Apple Card Apple Cash and Savings from Apple Card Accounts
Related Post
Ai writing: how it’s changing the way we create content, how to find the best midjourney alternative in 2024: a guide to ai anime generators, unleashing young geniuses: how lingokids makes learning a blast, 10 best ai math solvers for instant homework solutions, 10 best ai homework helper tools to get instant homework help, related posts.

How To Make A Zoom Background

How To Make A Powerpoint On A Tablet

How To Download Images From Powerpoint

How To Share A Document On Zoom

How To Zoom Out On A PC

How To Zoom In With Keyboard

How To Connect Powerpoint To Projector

How To Zoom Out On Dell Laptop
Recent stories.

Apple Wallet Availability in the PocketGuard App: Sync your Apple Card, Apple Cash, and Savings from Apple Card Accounts

5 Ways to Improve IT Automation

What is Building Information Modelling?

How to Use Email Blasts Marketing To Take Control of Your Market

Learn To Convert Scanned Documents Into Editable Text With OCR

Top Mini Split Air Conditioner For Summer

Comfortable and Luxurious Family Life | Zero Gravity Massage Chair
- Privacy Overview
- Strictly Necessary Cookies
This website uses cookies so that we can provide you with the best user experience possible. Cookie information is stored in your browser and performs functions such as recognising you when you return to our website and helping our team to understand which sections of the website you find most interesting and useful.
Strictly Necessary Cookie should be enabled at all times so that we can save your preferences for cookie settings.
If you disable this cookie, we will not be able to save your preferences. This means that every time you visit this website you will need to enable or disable cookies again.
Teaching with Technology
Recording a video lecture of yourself with zoom and powerpoint slidedeck.
There are two different ways to record a video lecture of yourself and your PowerPoint slidedeck using Zoom.

Picture-in-picture View instructions

Video overlay View instructions
If you want to record your screen and PowerPoint without your video image (similar to an audio podcast, but with a visual component of your slides), follow these instructions .
Note: Before doing any recording, make sure to prepare your slidedeck to make room for the video image of yourself, so that your video image won't be overlaid on top of any text or images. Sometimes drawing a rectangular box on each slide helps to "save" a space for your video to go.
- Open the Zoom app and your PowerPoint file. Close all other files and applications.
- In Zoom, click “New Meeting” (orange icon); make sure your microphone and camera are on.

- Go to PowerPoint and launch your slideshow.
- At the bottom Zoom toolbar, choose Record, then choose “Record on this Computer” from the menu that pops up. Your lecture is now recording. Note: if you don't see the Record button, you may need to click on the "More" button in the Zoom toolbar, and then choose the "Record on this Computer" option.
- Start your lecture. Advance your slides with the right arrow key; return to a previous slide with the left arrow key.
- When you are finished, click on the "Stop Recording" button in the bottom Zoom toolbar. Note: if you don't see the Stop Recording button, you may need to click on the "More" button in the Zoom toolbar, and choose the "Stop Recording" option there.

- Trim the beginning and ending of your video (if needed) using QuickTime or another video editing tool, then upload your video to Ensemble, Reed’s media server.
Want to do more? Read how to annotate your PowerPoint slides with Zoom .
Watch CBS News
The 7 best microphones for Zoom meetings, content creators and more
By Jason R. Rich
Edited By Leslie Gornstein
Updated on: August 26, 2024 / 2:53 PM EDT / Essentials
CBS Essentials is created independently of the CBS News editorial staff. We may receive commissions from some links to products on this page. Promotions are subject to availability and retailer terms.

Nowadays, virtual meetings and video calls are as common as texts. So clear audio is essential. Since the microphones built into your computer , camera, or mobile devices don't always cut it, we suggest taking advantage of a specialty microphone.
- Best microphone : Shure SM7B
Best budget microphone : Blue Yeti Professional
- Best microphone for video calls and virtual meetings : Rode NT-USB Mini
Best microphone for streaming : HyperX QuadCast S
Best microphone for content creation : rode videomic pro+, best microphone for podcasters : rode podmic usb, best wireless microphone : dji mic .
Some mics designed to pick up just one voice, while others do a better job capturing all audio, including ambient sounds. You can also find wired and wireless microphone options that work with your mobile device, computer or camera.
Pro Tip : You can spend less for a microphone used just for video calls, but content creators, podcasters and live streamers should choose the highest quality microphone that fits into their budget.
What is the best microphone for meetings and content creators?
The trick to sounding your absolute best is to use a high-end microphone.
Our team of tech experts has curated this roundup of the best microphones for Zoom meetings, video calls, vloggers, streamers, podcasters, content creators and others who need a high-end microphone to ensure they always sound their absolute best.
Best microphone overall : Shure SM7B dynamic vocal microphone

Whether you're a streamer, podcaster, or content creator that requires superb sounding vocals, the Shure SM7B is one of the very best microphone options out there. In fact, out of more than 11,000 customer reviews on Amazon, this mic has earned a 4.8-star (out of five) rating.
The SM7B delivers smooth, warm vocals. It nicely captures and then enhances the finer details of the human voice while blocking out all distracting sounds. People love this microphone because it uses a dynamic cartridge with smooth, flat and wide-range frequency response. This allows it to produce exceptionally clean and natural reproduction of music and speech.
The SM7B's air suspension shock isolation and integrated pop filter eliminates mechanical noise and breathiness. So words get through, but the rest stays out of the mix. Even better, the SM7B's cardioid pattern rejects off-axis audio. This means you can speak or sing into the microphone at a comfortable angle and it will capture the sound exactly how you want it.
Keep in mind, the SM7B is an analog microphone that does not communicate directly with devices digitally. You need an audio interface to use this microphone with a computer, tablet or smartphone. The microphone uses a standard XLR cable connection. It comes with a fixed mount that's compatible with many mic stands and boom arms that are sold separately.

This microphone can easily connect to your computer using a standard USB cable. It's ideal for video calls, virtual meetings or live streaming without spending a fortune. The microphone has an adjustable setting that allows you to switch between a unidirectional, bidirectional, or omnidirectional mode, so it offers versatile performance.
The Blue Yeti Professional comes with a pop filter. It uses a unique, tri-capsule design to capture audio in up to 16-bit, 48 kHz resolution. This studio-quality microphone has an integrated headphone amp that's backed by an independent gain control for latency-free monitoring.
This Yeti mic was designed with a convenient, no-hassle workflow in mind. It sets up in seconds with the included desktop stand. However, you can also use it with almost any standard mic stand. You can easily adjust microphone gain, pick up pattern and headphone volume, plus use a mute/unmute button -- all with easy-to-reach controls.
Best microphone for video calls and virtual meetings : Rode NT-USB+ Mini

The Rode NT-USB+ Mini is a USB condenser microphone that works well with all of the popular video calling and meeting services. The mic also does a great job recording studio-quality vocals and audio that podcasters, streamers and content creators alike will appreciate.
This mic comes with a tabletop stand and pop filter, along with a three-meter USB Type-C to USB Type-C cable for connecting the mic to your computer or mobile device. The NT-USB+ Mini uses a studio-grade condenser capsule and other premium-quality components to capture high-quality audio. You also get an ultra-low-noise, high-gain revolution preamp, so the mic can capture pristine hi-res audio (48kHz / 24-bit) sound.
We like this plug-and-play microphone because it offers plenty of versatility, captures clear audio, and comes at an affordable price. Using the free Rode Central software, you can take full advantage of the powerful on-board processing and effects offered by this unidirectional popular microphone.

For live streamers who appear on camera, the HyperX QuadCast S not only makes you sound excellent, it also looks great on camera thanks to its professional looking design and integrated RGB lighting.
This microphone plugs into the USB port of your computer, PlatyStation game console, or mobile device. It offers a cardioid, bidirectional, omnidirectional and stereo mode.
The QuadCast S comes with a built-in, anti-vibration shock mount. This means it can suppress the sound of unintentional rumbles and bumps with its elastic rope suspension. You also get a convenient tap-to-mute feature for preventing an audio accident. This feature works with the mic's LED status indicator. So, if the light is on, the mic is active. When the light is off, the mic is muted.
Using the included HyperX Ngenuity software, you can personalize the mic's RGB lighting and effects. Meanwhile, the gain control adjustment makes it easy to adjust the mic's sensitivity, simply by turning a dial. The mic comes with a mount adapter, pop filter, and headphone jack. The adapter fits 3/8-inch and 5/8-inch threaded setups, so it's compatible with most mic stands or boom arms. The internal pop filter helps block unwanted sounds cause by hitting the mic. And you can monitor the mic via the headphone jack and your own corded headphones.
Out of more than 18,000 reviews on Amazon, the HyperX QuadCast S has earned a 4.7-star (out of five) rating, so you know it's a microphone a lot of live streamers and social media content creators rely on.

The Rode VideoMic Pro+ is the perfect shotgun microphone to attach to a camera. It's a professional-quality, omnidirectional microphone that offers USB connectivity to a camera or computer.
This microphone's automatic power function (with plug-in power availability) is perfect for the run-and-gun shooter. When it comes to powering the mic, you have three options -- two AA batteries, Rode's LB-1 lithium-ion rechargeable battery, or a micro USB cable that can connect to your camera or computer for continuous power.
We like the Rode VideoMic Pro+ because it works nicely with most camcorders, DSLR cameras and portable audio recorders. You get features that deliver truly professional results. The VideoMic Pro+ uses a three-stage, high-pass filter, a three-stage gain control, a +20dB boost function, a pre-sense lift, and an innovative safety channel. So you can be assured that your audio will always sound exactly as you need it to.
The VideoMic Pro+ is lightweight (just 4.3 ounces) and ideal for recording dialogue and interviews, as well as for run-and-gun shooting, filmmaking, videography and content creation.

As its name suggestions, this microphone is designed for podcasters, live streamers and content creators. However, it can also be used to make yourself sound fantastic when participating in a video call or virtual meeting.
We like this mic because it can connect to your equipment using a standard XLR or USB connection. So it works with pro-level recording gear, Windows and Mac computers, and even iOS and Android mobile devices. The mic's internal shock mount reduces the sound of knocks and vibration, while a built-in pop filter and external pop filter work in tandem to tame plosives, allowing for natural and clear voice reproduction.
The microphone comes with a mount compatible with most stands. The PodMic USB is a broadcast-quality, dynamic microphone that offers a rugged design along with a classic aesthetic. One standout feature is the mic's high-power neodymium dynamic capsule that delivers warm, highly detailed audio with incredible clarity. Meanwhile, its tight cardioid polar pattern rejects room noise, keyboard taps and mouse clicks, which makes it ideal for podcasting, streaming and content creation.

If you move around a lot while you talk, or if you need wireless audio capture capabilities while you're out and about, the DJI Mic is a relatively low-cost, but high-quality, wireless solution. It works seamlessly with computers, mobile devices and many cameras.
The DJI Mic has an 820-foot wireless range and uses a battery that lasts for up to 14 hours of continuous use. The microphone itself features a convenient clip-on design. Meanwhile, the 1.06 ounce receiver has a built-in, 0.95-inch OLED touchscreen and provides intuitive controls. It also uses a USB Type-C, Lightning, or 3.5mm TSR port, so you have plenty of options when connecting it to your equipment.
One nice feature is that the microphone has 8GB of internal storage. This means it can record and store 48kHz 24-bit audio without compression and then output audio files quickly to a computer using a data cable. We like this wireless mic because it comes with everything needed to use it with a wide range of devices and computers.
Whenever you're shopping for the latest tech , we're here to help by providing the information, product comparisons and reviews you need to make the best buying decisions. And we can help you save money on all of your tech purchases, too.
Jason R. Rich ( www.JasonRich.com ) is an internationally recognized consumer technology expert with more than 30 years' writing experience. He's also an accomplished author and photographer. One of his most recently published books, The Remote Worker's Handbook: How to Effectively Work From Anywhere ($24.99, Entrepreneur Books) is now available from Amazon and wherever books are sold.
More Essentials

The Best Apple iPad Pro cases for your tablet are diligent defenders
Keep your Apple iPad Pro from harm with a case that'll keep it pristine for years after purchase.

Save 40% on glasses with the GlassesUSA Labor Day sale
GlassesUSA's pre-Labor Day sale offers extra-lower prices on prescription eyeglasses and sunglasses.

Best Labor Day luggage deals: Save on Samsonite, Monos, Tumi and more
Save big on carry-ons, backpacks, checked bags and more for your Labor Day 2024 travels.

Best Labor Day tire deals you can shop now
Stay safe throughout the seasons by steering toward huge Labor Day savings on brand name tires for your vehicle.

The 6 best Android tablets for 2024
These powerful Android tablets can help you work and keep you entertained, no matter where you go.

The 7 best mics for Zoom meetings, content creators and more
No matter whether you're on a video call or creating content, these pro-level mics make you sound great.

The Best Apple iPad Air cases protect against anything
Protect your new iPad Air from accidental drops, scuffs and scratches with some of the best cases available.

Brooklinen Labor Day sale: Get up to 50% off bedding and more
Score new fall bedding for 50% off at Brooklinen's Labor Day sale. Here are out top bedding deals picks.

Best Labor Day tool deals at Amazon's sale
Finishing your home improvement projects will be easier than ever with these Labor Day 2024 tool deals.

Rice University student found fatally shot in dorm room on first day of class
Two people are dead in an apparent murder-suicide at Rice University in Houston.

Judge blocks Biden administration from granting legal status to spouses of U.S. citizens
A federal judge temporarily blocked the Biden administration from granting legal status to undocumented immigrants married to U.S. citizens under a new program.
- updated 12M ago

Travis King, soldier who crossed into North Korea, expected to plead guilty
Travis King, the American soldier who crossed into North Korea, is expected to plead guilty to five offenses the U.S. Army charged him with.

Texas AG raids Latino Democrats' homes, including those of LULAC members
In a letter first obtained by CBS News, LULAC requested that the Justice Department investigate Paxton's office for Voting Rights Act violations.
- updated 32M ago

Company failed to protect workers who now need lung transplants, feds say
Chicago manufacturer's employees labored in a haze of dust and were exposed to dangerous levels of silica, according to OSHA.

Bronfman withdraws bid for Paramount, clearing path for Skydance merger
The merger between entertainment giant Paramount and media company Skydance is set to go ahead after Edgar Bronfman Jr. withdrew a competing offer.
- updated 28M ago

Zuckerberg vows to resist federal efforts to influence Meta's content
Meta CEO Mark Zuckerberg says federal pressure on his social media platforms to take down certain COVID-19 content in 2021 was "wrong," and he'd resist similar attempts in the future.

Here are the top zip codes for home sales, according to Realtor.com
Metros in the Midwest and Northeast stole the top slots on this year's list.

Chipotle illegally denied raises to unionized workers, watchdog says
Chipotle accused of violating federal laws by telling unionized employees that the restaurant chain could not give them raises

Dems sue over Georgia rules they say could block election certifications
The state and national Democratic parties have to try to block two recent rules adopted by Georgia's State Election Board they say could be used by county officials to refuse to certify elections.

More than 200 former Bush, McCain and Romney staffers endorse Harris
The alternative to Harris, the letter from more than 200 Republicans said, "is simply untenable."

Giuliani did nothing illegal in Arizona fake elector case, his lawyer argues
Rudy Giuliani's lawyer says the charges against him in Arizona's fake elector case should be thrown out.
HealthWatch

Here's how to check for forever chemicals in your personal care products, experts say
Want to know if your personal care products contain harmful forever chemicals? Here are some steps you can take.

Heat-related deaths are on the rise, according to new study
From 1999-2023, the Journal of American Medical Association recorded 21,518 deaths where heat was either the underlying cause or the contributing cause of death, likely an underestimation, they say.

What to know about West Nile virus symptoms after Fauci's diagnosis
As Dr. Anthony Fauci recovers from West Nile virus, here's what to know about the illness, including how it's contracted, its symptoms and how to avoid getting it.

Fauci recovers from West Nile virus
Dr. Anthony Fauci is recovering at home after spending nearly a week in the hospital with West Nile virus. CBS News chief medical correspondent Dr. Jon LaPook spoke with him over the weekend and shares how he is doing.

18 beachgoers in Japan bitten by "usually calm" dolphins this year
One expert says a rash of dolphin bites could be down to one animal "seeking to interact with humans the way it does with fellow dolphins."

U.S. open to escorting Philippine ships amid clashes with China
American warships could escort Philippine vessels in the disputed South China Sea amid increasing confrontations with China, U.S. commander says.

7 community guards killed by cartel, 7 others kidnapped in Mexico
Seven guards were killed just days after seven members of a community police force were kidnapped, apparently by cartel gunmen.

Matching dinosaur footprints found more than 3,700 miles apart
Footprints dating back 120 million years show where dinosaurs were able to cross between land that's now part of two different continents.

Killer whales attack another sailboat off the coast of Spain
Orcas attacked a sailboat off the coast of Spain on Sunday, in the latest account of killer whales targeting vessels in that region.
Entertainment

Oasis reuniting, at least for one tour, as speculation proves true
The speculation has proven true: the Britpop band Oasis is reuniting, at least for one tour after a 15 year hiatus.

Mariah Carey reveals her mom, sister died on the same day
Singer Mariah Carey said in a statement that both her mother and sister died on the same day this past weekend.

Liam and Noel Gallagher tease fans with hints of an Oasis reunion
Britpop icons Liam and Noel Gallagher are teasing Oasis fans with strong hints of a possible reunion after 30 years of bitter separation.

Macklemore says he canceled Dubai show over UAE's role in Sudan war
Macklemore said he canceled a concert in Dubai over the United Arab Emirates' role "in the ongoing genocide and humanitarian crisis" in Sudan.

The Rolling Stones on life, music, and loss
The Rolling Stones' "Hackney Diamonds" was the band's first album of original music in 18 years – and their first since the death, in 2021, of drummer Charlie Watts. Correspondent Anthony Mason sat down with Keith Richards, Mick Jagger and Ronnie Wood to discuss their unique chemistry; reuniting with the Stones' original bassist Bill Wyman; and what becoming octogenarians meant to Jagger and Richards. (This story was originally broadcast on October 15, 2023.)

Apple set to announce its new iPhone. Here's when and what to expect.
Apple's annual tech showcase this year is also expected to highlight a suite of new artificial intelligence services.

French leader says arrest of Telegram boss "not a political decision"
Pavel Durov, the founder and CEO of the Telegram messaging app, has been detained in France, reportedly over the failure to moderate criminal activity.

How AI powered robots are helping small farms
From labor shortages to environmental impacts, farmers are looking to AI to help revolutionize the agriculture industry. One California startup, Farm-ng, is tapping into the power of AI and robotics to perform a wide range of tasks, including seeding, weeding and harvesting.

Netherlands hits Uber with huge fine over transfer of drivers' data
Uber says it will appeal a $324 million fine imposed by the Dutch Data Protection Authority over the company's handling of drivers' personal information.

"Siri, what the heck?" David Sedaris on talking to one's devices
Commanding your device to do things you could just as well do yourself is a mark of technological progress that humorist David Sedaris finds peculiar, when your voice-activated app is not up to the job.

The Climate Election: Grocery inflation explained
$15 for a pound of coffee? Groceries have been particularly expensive lately with inflation helping drive up the cost of nutritional staples 25% since 2019. But there's a root problem with the surge in grocery costs that's attacking food right at the source. CBS Los Angeles meteorologist Marina Jurica explains what to know about the rising costs of groceries as we get closer to Election Day and what Vice President Kamala Harris and former President Donald Trump have planned to address it.

Funeral for glaciers lost to climate change
This week there was a funeral for 15 glaciers that have disappeared or are in critical danger as the planet heats up. CBS News national correspondent Dave Malkoff has more.

Dramatic images show lava spew from huge volcanic fissure in Iceland
Dramatic images from Iceland show lava spewing from a fissure almost two-and-a-half miles long as the Reykjanes peninsula sees its 6th eruption since December.

The Climate Election: The problem with power, explained
Before Ernesto was a hurricane, it was a tropical storm. But that's all it took to wipe out electricity for nearly all of the U.S. Virgin Islands and half of Puerto Rico. And it's not just an island problem. Extreme weather across the entire U.S. is taking a toll on infrastructure that is being used long past its life expectancy. As we get closer to Election Day, CBS Los Angeles' Marina Jurica tells us what to know about the intersection of climate and energy.

Trump assassination attempt House task force
A task force made out of House of Representatives lawmakers toured the site of the Butler, Pennsylvania, rally where a man shot at former President Donald Trump. CBS News congressional correspondent Scott MacFarlane has more on the investigation.

Anesthesiologist admits to drugging, sexually abusing family nanny
Video clips recorded by the hidden camera showed Paul Giacopelli assaulting the victim, prosecutors said.

Closing arguments in Robert Telles trial
Closing arguments are set to begin Monday in a high-profile murder case in Las Vegas. Former local politician Robert Telles is accused of killing investigative reporter Jeff German, who wrote critical articles about Telles. Telles says he's unequivocally innocent. Former prosecutor Steve Baric joined CBS News to discuss the case.

SpaceX will bring back stuck crew
NASA announced it will wait until 2025 to bring back the Boeing Starliner capsule crew that remains at the International Space Station. This comes as concerns remain over technical difficulties with Boeing's capsule. CBS News space consultant Bill Harwood has the latest.

Crew to make history with all-civilian spacewalk
Four civilian astronauts are preparing for a historic mission to new heights above Earth. SpaceX is launching Polaris Dawn, which will also feature the first commercial spacewalk. Mark Strassman has details.

NASA astronauts stranded until February
NASA astronauts Sunny Williams and Butch Wilmore were supposed to spend 8 days in space, but now they will remain there until February due to issues with the Boeing Starliner. With their return delayed, they must wait for a SpaceX craft to bring them back.

What's kept Starliner astronauts from return?
NASA has a plan to bring back Butch Wilmore and Suni Williams, the two astronauts who took the troubled Boeing Starliner to the International Space Station, but it means they'll need to stay in space another six months. Wilmore and Williams are now slated to return on a SpaceX capsule in February, extending what was supposed to be a week-long mission to more than eight months. CBS News space consultant Bill Harwood has more on what issues are keeping Wilmore and Williams from returning.

Billionaire to launch on SpaceX flight featuring first commercial spacewalk
Along with the first private-sector spacewalk, the SpaceX Polaris Dawn crew also will set a new Earth-orbit altitude record.
Latest Galleries

Notable Deaths in 2024
A look back at the esteemed personalities who've left us this year, who'd touched us with their innovation, creativity and humanity.

Summer music 2024
Live performances are in full swing this summer. Scroll through our concert gallery, featuring pictures by CBS News photojournalist Jake Barlow and photographers Ed Spinelli and Kirstine Walton.

Evidence in "The Dexter Killer" case
A look at the evidence in "The Dexter Killer" case; plus, newly revealed letters from the man police say wanted to be like fictional serial killer Dexter Morgan.

Clues and evidence in the John McCabe case
A teenager's murder in Lowell, Massachusetts, goes unsolved for more than 40 years -- were the clues there all along?

Donald Sutherland
The actor, recipient of a lifetime achievement Academy Award, was renowned for such films as "MASH," "Klute," "Don't Look Now," "Ordinary People," and "The Hunger Games."
Latest CBS News Videos
RFK Jr. says he'd be on Trump transition team
Robert F. Kennedy Jr. told Tucker Carlson in an interview that aired Monday he was asked to join former President Donald Trump's potential transition team if Trump wins the presidential election. CBS News campaign reporter Jake Rosen has more on that and the rest of the news from Trump's campaign.

What to know about Harris-Trump mic dispute
Former President Donald Trump is once again stoking doubts about whether he'll show up for a scheduled debate with Vice President Kamala Harris in September as the two sides offer conflicting terms and conditions about how the debate would work. At the center of that discussion is whether a candidate's mic should be muted when the other is speaking. That was the arrangement during the only debate between Trump and President Biden in late June, but the Harris campaign says they want mics to stay on through the full event. CBS News chief White House correspondent Nancy Cordes has more.

Inside the role of a ransomware negotiator
When companies and other large organizations fall victim to ransomware attacks, outside companies are sometimes brought in to help resolve the situation. Ash-har Quraishi speaks with Mark Lance, vice president of incident response and intelligence at Guidepoint Security, about ransomware negotiations.

Teaching kids to be cyber safe
As it becomes more common for young children to have access to internet-connected devices, the risk of them being targeted by scams is increasing. One program outside Chicago is teaching kids from a young age how to stay safe on the internet. Ash-har Quraishi reports.

Remembering CBS News correspondent Phil Jones
CBS News is remembering one of our own. Legendary correspondent Phil Jones died over the weekend at the age of 87. Here's a look back at his decades-long career.
Get work done more efficiently with Zoom AI Companion. The AI Companion Onboarding Center is now live!
Empowering you to increase productivity, improve team effectiveness, and enhance skills.
Communication
Productivity, apps & integration, employee engagement, business services, customer care, developer tools.
- Financial Services
- Manufacturing
- Small and Midsize businesses
- IT Professionals
- Customer Experience
- Sales and Revenue
- Marketing and Events
- Meeting SDK
- App Marketplace
- Developer Solutions
- Partner Solutions
- Find a Partner
- Become a Partner
- Partner Portal
- Partner Learning Center
- Resource Library
- Webinars & Events
- Customer Stories
- Zoom Trust Center
- Zoom Community
- Learning Center
- How-to Videos
- Global services
- Hardware options
- Customer Managed Key
- Customer Support
- Premier Support
- Developer Support
- Premier Developer Support
Download the Zoom app
Keep your Zoom app up to date to access the latest features.
Zoom Virtual Backgrounds
Download hi-res images and animations to elevate your next Zoom meeting.
- Plans & Pricing
- Join by Meeting ID
- Public Event List
- Screen Share Only
- With Video On
- With Video Off
AI Companion
- Phone System
- Mail & Calendar
- Marketplace
- Rooms and Workspaces
- Workspace Reservation
- Contact Center
- Virtual Agent
- Revenue Accelerator
- Events and Webinars
- Work Transformation Summit
- Customer Success Events
- Customer Success Forum
- OnDemand Learning
- Zoom Status
- Submit Feedback
- Community Terms and Guidelines
- Getting Started
- Community Center
- Happy Rewards
- Social Corner
- Community Champion Program
- Billing & Account Management
- Zoom Meetings
audio not working for all meeting apps
- Subscribe to RSS Feed
- Mark Topic as New
- Mark Topic as Read
- Float this Topic for Current User
- Printer Friendly Page
- audio disabling in Zoom Meetings 2024-08-27
- Darshan Hiranandani : Zoom Not Switching Audio to Bluetooth Speaker - Need Help in Zoom Meetings 2024-08-27
- Control panel disappearing when sharing a screen and... in Zoom Meetings 2024-08-26
- Hybrid Meeting Audio in Zoom Meetings 2024-08-26
- Mark as New
- Report Inappropriate Content
2024-08-26 06:41 AM
- All forum topics
- Previous Topic
IMAGES
COMMENTS
How to share your screen with background music/audio. Start or join a Zoom meeting. On the meeting toolbar, click Share Screen . The share selection window will appear. Select the program or desktop you wish to share. In the share selection window, select Share Sound . (Optional) Select the down arrow just to the right of the Share Sound option ...
Switch back to Powerpoint and click the Slide Show tab. Begin the presentation by selecting the Play from Start or Play from Current Slide options. PowerPoint will display the slide show in a window. In Zoom, start or join a meeting. Click Share Screen in the meeting controls. Select the PowerPoint window and then click Share.
Here is how you can do that-. Step 1: First, start or join a Zoom meeting. Step 2: Click on " Share Screen " and select the " Advanced " option. From there, select " PowerPoint as Virtual Background " and select the file you want for your presentation. Then click on " Share ".
This setting is controlled by the Mute button, found on the left side of the menu bar. Press Record to begin audio and video recording of your PowerPoint deck in Zoom. To record your PowerPoint in Zoom, click Record. From this point on, anything you share on-screen or say aloud will be captured in your recording.
17 Chapters. 29,584 words. 84 Screenshots. 10+ Videos. Roughly speaking—and by that I mean super specific—the Ultimate Guide to Giving Virtual Presentations on Zoom contains six thematic parts, seventeen chapters, 29,584 words, eighty four precision-crafted interface screenshots to show you how to do cool things, high-production ...
2021-08-26 12:41 PM. Prepping for my first ZOOM meting. As host, I will use ppt slides as well a running short ppt deck, video from youtube and sound. Any tips, hints as I a looking for a 100% smooth experience for me as host and most importantly for a small to medium large participant pool. THANKS! 2021-08-26 12:52 PM.
In this step-by-step tutorial, learn how to best present Microsoft PowerPoint slides in Zoom Video Conferencing.⌚ Timestamps0:00 Introduction1:19 Share entir...
Kinda. To access the feature (beta at time of writing) click the "Advanced" tab in the "Share Screen" popup, and select "Slides as Virtual Background". This is what it looks like from the attendee's perspective. And yes, you appear twice on the screen. Once on top of your slides, and again beside them.
To share your screen on Zoom with audio from a video: Open the Zoom app to start a Zoom meeting or join one. Click the green Share Screen icon in the lower meeting toolbar. Choose what you want to share. Click the Share Sound checkbox in the bottom toolbar. Click the blue Share button in the lower right corner.
In this article I am using the Zoom app in Windows 10. The six options are: Share your entire screen/desktop. Share the Slide Show window. Share the editing window with a clean look. Run the Slide Show in a window and share that window. Use Presenter View to show the audience your slides while you see Presenter View.
Step 1: Publish your presentation. When you're finished designing your presentation in Visme, navigate over to the top right corner of your screen, and click on "Share". Next, click on "Publish for Web" on your left, type in a title and description for your presentation, and click on "Publish and get my link".
Here's how to share your screen and play background music on Zoom. With your Zoom meeting window open, click Share from the Zoom control bar. From the Screens tab, click the window you want to share. Under Options in the Layouts panel, check Share sound. You can also click the down caret ( ∨) next to it and switch between Mono and Stereo ...
At the bottom of the Zoom meeting window, click "Share Screen." If you're using a single monitor, you will immediately start sharing your screen. If you're using dual monitors, you'll need to click the screen that your presentation will be shared on. In our case, that will be "Screen 2." To begin sharing that screen, click "Share" at the bottom ...
Video files can be opened within Zoom's built-in video player and shared, without other participants viewing the playback controls. Sharing your video with the built-in player, instead of as part of a shared screen or application, improves the quality of shared videos, providing a smoother and more stable viewing experience for your viewers.
In the Zoom app: Click on 'Home'. Click the Settings gear icon on the right. Click on 'Audio'. Click on 'Speaker' drop down. Select 'Apple TV'. And to be sure you've got it right, click on 'Test Speaker' and you should hear a happy melody coming from your TV's speakers. And voilà!
To turn on Original Sound, click on the "Turn on Original Sound" button in the upper left corner of the Zoom window. Update your software: Make sure that you have the latest version of Zoom and PowerPoint installed on your computer. Outdated software can sometimes cause audio issues. Check your computer's hardware: If none of the above ...
Zoom includes HD quality audio features and settings to optimize your Zoom experience. Use these support articles to join audio using a phone, configure speaker and microphone settings, or start a Personal Audio Conference.
GETTING READY IN ZOOM . 1. Open the Zoom app 2. Click New Meeting. Zoom will begin a video conference session. If asked to choose an audio conference option, click Join with Computer Audio. 3. Click the ^ next to the Mute button in the lower-left corner of the Zoom window to open audio options. At the top of the menu that appears, select your ...
Zoom screen sharing allows you to share the desktop, window, application, or audio/video. If audio is an important part of your shared content, you can also send the computer's audio to the remote attendees directly when sharing. The high-quality audio will produce a more professional and immersive sharing experience. How to Share a Video on Zoom
2023-01-18 08:23 AM. Hello Nancy, I suggest selecting the advanced tab as highlighted in the screen capture when you are sharing these videos during your Zoom Meetings. This will optimize the playback for both video and sound. Also, please ensure you check the share sound box, located bottom left.
The audio sounds from the Powerpoint presentation do not work in the Zoom presentation. My workaround was to just use Google Slides. You can simply import Powerpoint slides into Google which automatically convert. ... ZOOM always transmits the audio it picks up through its default microphone or the microphone you plug in to your audience, If ...
Click the "Share Screen" Button: In the Zoom meeting window, locate the green "Share Screen" button at the bottom of the screen and click on it. Select Your PowerPoint Window: A dialog box will appear with a list of available screens and windows to share. Choose the window that has your PowerPoint presentation open.
Note: if you don't see the Stop Recording button, you may need to click on the "More" button in the Zoom toolbar, and choose the "Stop Recording" option there. Click "End Meeting" on the bottom right of the meeting screen. Then click "End Meeting for All." A box will pop up telling you that Zoom is converting your meeting recording.
The Blue Yeti Professional comes with a pop filter. It uses a unique, tri-capsule design to capture audio in up to 16-bit, 48 kHz resolution. This studio-quality microphone has an integrated ...
Straight to Voicemail playing two audio clips in Zoom Phone System 2024-08-25; Disable Video for Attendees at join option for meeting manager, just like audio in Zoom Meetings 2024-08-24; Zoom Crashing Immediately on Windows 11, but video and audio still working in Zoom Meetings 2024-08-22; New Participant Notification in Chat in Zoom Meetings ...