| — Follow us on .
Video Project Rubric
Examples of Other Rubrics  LX / Video assessment criteria categories  Video assessment criteria categoriesThis resource provides comprehensive information on setting out criteria for video assessments. On this page:Schwartz and hartman’s model, criteria topics, criteria building tool, rubric example. This resource should be read alongside the Rubric decisions before you start your video assessment resource . You can employ a model like Schwartz and Hartman’s to determine the type or genre of video you want student’s to produce and the appropriate way to assess it in line with your desired outcomes. 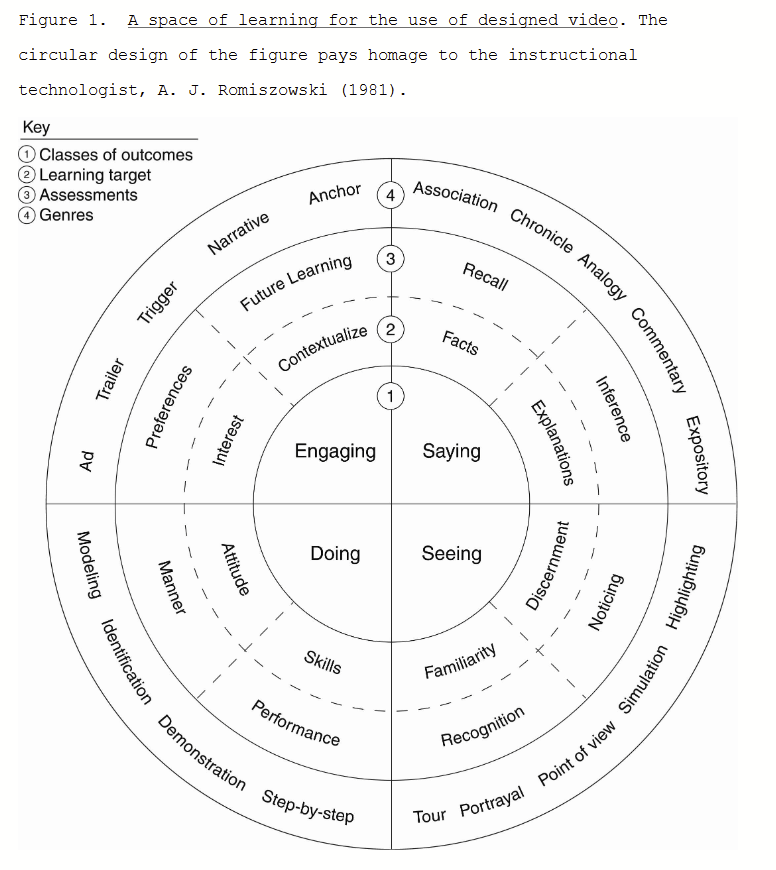 Using this model and formula can be a great way to make it clear to yourself and your students what you want them to achieve. Example of a formula to help utilise the wheel (I want students to demonstrate 1 by means of 4 in order to learn 2 and be assessed in terms of 3). The criteria topics are based on the UTS Graduate Attributes which have been contextualised by some key categories for video assessment. The example criteria are based upon a mix of Course Intended Learning Outcomes, Subject Learning Objectives and specific areas of communication in video assessment. They have also been refined by feedback from academics who offer video assessments in their subjects. The Outcome categories and Example criteria, competencies and evidence are not prescriptive. Consider them a kind of shopping list that you may want to select from or add to based upon the needs of your assessment . These criteria can be adapted for use in either an analytical or holistic rubric . Four high level attributes – Audiovisual language and communication, Ethics, Discipline knowledge and professional readiness and Interpersonal communication – make up the base level for video assessment criteria. The tabs below each high level attribute denote Outcome categories. Click on the tabs to see example criteria, competencies and evidence, example genres, and learning targets and classes of outcomes. Audiovisual language and communicationThis high-level attribute relates to the Graduate Attributes of Communication and Critical thinking and creativity. It covers anything from visual and audio design and aesthetics to planning and organisation. Example criteria, competencies and evidence:
Example genres: Video pitch, project summary, report, case study, news report, historical presentation, podcast, all genres are possible. Learning targets and classes of outcomes: Seeing, Engaging, Doing, Saying
Example genres: Location/environmental mapping in DAB, software demonstrations/screencasts in FEIT, training videos, trend reports, Tour, Portrayal, Point of view. Seeing – familiarity and recognition, Discernment and Noticing, Doing – Skills and Performance
Topic report, pitch, storyboarding, script writing, news report, – all genres are possible. Seeing, Engaging, Doing, Saying.
Video CV/Portfolio, short film in FASS, science communications on social media – all genres are possible. Evidence of process – treatment, script, storyboard or transcript, reflection etc. Investigative report, stakeholder brief, video diaries, storyboards – all genres are possible. Ethics is one of the Graduate Attributes involved in video assessment. Ethics in video assessment refers to social responsibility and representation along with digital accessibility and academic integrity .
Investigative report, creating teaching materials, stakeholder interviews, point of view, ad, trailer, trigger, narrative, anchor, association, chronicle, analogy, commentary, expository. Seeing: Discernment & Noticing Saying: Inference and Explanation Engaging: Contextualise and Future Learning
Discipline knowledge & professional readinessThis Graduate Attribute area covers critical thinking and creativity, discipline knowledge, professional readiness, and the Indigenous Graduate Attribute. The categories are designed to help students consider the audience and conventions specific to the genre of video.
Self-evaluations, reflective practice, video pitch, project report – all genres are possible.
Public service announcement in Health, ad, trailer, trigger, association, chronicle, narrative, anchor, analogy. Saying: Facts and Recall, Inference and Explanations Engaging: Interest & Preferences
Consultation summary, client report, all genres are possible.
Multimodal campaign project in BUS, narrative, anchor, trigger, trailer, ad. Engaging: Contextualise & Future Learning Interpersonal communicationThis includes communication that relates to collaboration and teamwork but also the actual personal presentation appropriate for a given video genre.
Video pitch/presentation, commentary, expository, modelling, identification, demonstration, step-by-step. Doing: Manner and Attitude When writing criteria, simply asking questions like “Can I provide examples of what success looks like based upon the goal of the video task?” will help clarify what needs to go into criteria. Download the attached spreadsheet to help you start building your criteria. Instructions on how to use the spreadsheet:
Access the criteria building file. Want to see an example of a video rubric design based upon our criteria? Take a look at the Sample Rubric for a Video Assessment . Keep in mind that this rubric is just a sample and is not ready for your specific discipline and context. To get help building your rubric, get in touch with the Teaching and Curriculum Team (TACT). Kilgour, P., Northcote, M., Williams, A. & Kilgour, A., (2020) A plan for the co-construction and collaborative use of rubrics for student learning , Assessment & Evaluation in Higher Education , 45:1, 140-153. Schwartz, D. L., & Hartman, K. (2007). It is not television anymore: Designing digital video for learning and assessment. Video research in the learning sciences , 335-348. Still need help?Get in touch with the LX.lab team by logging a ticket via ServiceConnect. We'll be in touch shortly. Want to provide feedback on this resource? Please log in first via the top nav menu. Student led Climate Fresk | 9 September
Inclusive practices: Tips for accessible colour | 28 August
Animoto Blog
How to Create a Rubric to Assess Student VideosJul 25, 2022 Using video in the classroom helps to keep students engaged and add make your lessons more memorable. Students can even make their own videos to share what they've learned in a way that is exciting and fun . But what do you do when it comes to grading students’ video projects? One of the easiest ways to show students what’s expected of them is to create a rubric breaking down the different elements of a video project. You may have already created rubrics for other class projects — ones that involved posters, labs, or group work. Rubrics for video projects are similar. The medium may be different, but the learning and thinking students do are still there for you to assess. Ways to assess a video:You can use video projects at many different levels. Some of the elements in your rubric are going to be the same, whether you’re assigning a video to a high school physics class or using Animoto for a fourth grade vocabulary project. Here are some things to include when developing a video project rubric: Content: Clearly state what information and how much of it students should include. For example, in a biography project, students might be expected to include five interesting facts about their person in order to get the highest number of points on the rubric. Images: Make sure your rubric states how many images you expect in an excellent, good, average, and poor project. You might want to add that those images should be relevant to the topic (e.g. no skateboards in a butterfly video) and appropriate. If you want to emphasize research skills, you could also require they use public domain images or cite their image sources. Sources While this may not be necessary for very young students, middle and high school student videos can and should include a text slide with their bibliography or an accompanying paper bibliography. Length: Just as you would set a page limit for an essay, you should set limits on video length, especially if you want to share the videos with the class. That length depends on your project — a simple “About Me” video project can be a minute long, while a more involved science or English assignment could be two to three minutes. The style and flair of the video itself should really take second place to the student’s process — how a student researched the project, chose images, and organized their information. When your rubric reflects that, you’re truly assessing what a student learned. Video project ideasCreating Animoto accounts for you and your students is completely free! Once you have your free account set up, there are endless ways to strengthen your lessons using video. Here are some of our favorites. Digital scavenger huntTake your lessons outside of the classroom with a digital scavanger hunt ! Have your students find specific plants and animals, architectural landmarks, historical features, and even shapes in their real-world environments and photograph them as they go. Then, they can add them to an exciting video that can be shared with the class using our Educational Presentation template. Video autobiography or biographyHave your students research important figures throughout history or even share their own life stories with a video ! The Self-Introduction template makes it easy to share the most important moments of one's life in a fun and engaging way. Vocabulary videosPut new vocabulary into action with a video! You can teach students new vocabulary words and then have students find real-world examples of them in real life. Or, let students share all the new words they've learned over summer break using the Vocabulary Lesson template. Book trailersBook trailers are a great way to get the story across in just a few short minutes. Whether starting from scratch on a brand new book or creating a summary of a favorite book, the Book Trailer template makes it simple. Video presentationsVideo presentations are a great way to showcase your learnings without the anxiety of a traditional presentation. They can be used in virtual classrooms or shared "IRL" to supplement student presentations. The Educational Presentation template is versatile, engaging, and easy to customize and share. Sports recapExtracurricular activities are part of a well-rounded education. Celebrate wins or even analyze your game with the Sports Recap template! It's a great way to increase school spirit and show students that you care. Book reportsHit your reading goals for the semester and make sure the lessons hit home with a book report! Rather than an extensive essay, the Book Report template hits on all the high-notes and most important elements of a particular book. How are you grading your students’ Animoto videos? Let us know in our Facebook group, the Animoto Social Video Marketing Community .
© 2024 Animoto Inc. All Rights Reserved. From ideas to screen: How to make presentation videos that shine What type of content do you primarily create? Visuals can mean the difference between a killer presentation and a lost opportunity. For salespeople, it’s difficult to close a deal without business presentations to back up your pitches. For marketers and business owners, video presentations help communicate ideas and share results from projects to ensure future success. Customers also love high-quality visuals, like branded explainer videos and product tours. They’re the fuel that drives eight in 10 people to make online purchases. But what makes a good presentation? And how can you engage viewers throughout your video? This guide covers what you need to know about creating video presentations, no matter the purpose. What is a video presentation ?A video presentation refers to a sequence of visuals combined with audio to convey information, arguments, ideas, or narratives. It can be about a product, service, internal business reports, or even a topic of interest. Video presentations can range from simple slideshow-style videos with voiceovers to more complex productions involving animations, live-action footage, music, sound effects , and more. A good video presentation provides information clearly and concisely. But the best video presentations engage your target audience with professional video quality: a good camera and mic, skilled editing, and a confident presenter. There are a ton of different types of video presentation formats you can choose from, including:
Benefits of a video presentationThese are great reasons to put in the effort to produce this type of video content. Enhanced engagementVideo recordings—whether on social media or hosted on your website—are great for engagement and getting your audience’s attention. Wyzowl found that 95% of marketers have said video marketing has helped them increase brand awareness, 90% say it has helped generate leads, and 87% said it has helped them increase sales. Visual clarityThere's a reason many people suggest something like "If you can learn it, you'll find it on YouTube." The presentation video format is unique in its ability to teach and demonstrate, similar to the in-person experience you'd get with a tutor or salesperson. The same Wyzowl report found that 96% of marketers say videos have helped increase user understanding of products and services. In short: video helps customers retain your information. Global reach and accessibilityVideo presentations are a great way to reach a global audience. More than half of people say they’re more likely to share a video with others than any other type of content. A video presentation is also better for accessibility than other content types. With video editing software , you can:
Personal connectionBuilding a personal connection with your audience is critical for overall brand engagement. A video presentation, especially one with a person in the video, helps you do that. Research shows that students have positive feelings for videos presented by an instructor, for example. How to create a video presentationStep 1. plan and prepare. Proper planning and preparation can help the rest of your presentation creation process run smoothly. Think about what you’ll say, and use a storyboard to build out a visual plan of your presentation ideas. Storyboarding your presentation, instead of making it on the fly, will help you stay focused when you fire up your presentation software. (You don’t need to be an artist; just set out the scenes in a way that makes sense to you.) At this point, start writing the video script for your presentation. You’ll know what to say and when to say it, and won’t fill your presentation up with filler words like “um” and pauses when trying to think about what to say next. Step 2. Gather resourcesAfter you’ve completed your paper storyboard and script, it’s time to go digital. With Descript, you can build your slideshows into the video editor just like any slideshow tool . To create a presentation video in Descript:
When you've set up all your slides, you can get fancier and add transitions, extra media, and special effects later. But maybe you’d prefer to create the presentation using more familiar software, like Prezi, PowerPoint slides, or Google Slides. In that case, you can import the presentation into Descript later or use its screen recording functionality. (If you upgrade your Descript plan, you can create your own video presentation templates to use over and over again, if that’s your style.) Step 3. Record your presentation videoWith your slides all set up, it’s time to turn them into a video. This step is pretty straightforward if you’ve used Descript to make the presentation slides. All you’ll need to do is go to the beginning of the presentation and hit the Record button at the top of the screen: If, like in the image example above, you’ve written your script into the scenes, change the default setting Record into script to Record new layer . This preserves your script so you can read from it whil recording your presentation video. Decide if you want to record a voiceover only (leaving the record option as Audio only ), or add a floating head video with your webcam to show yourself as the speaker by clicking the Screen option. Either way, go through your script as the slides move along. If you created your presentation in another software like Google Slides, there may be no built-in option to record your presentation over the slides. In that case, use Descript’s screen recorder to film your screen with audio. The video file will be ready and waiting for you in the video editor when you finish recording. Step 4. Edit and enhanceAt this point, you’ve got the basic presentation down. It’s time to bring out your inner filmmaker and turn the slideshow into something special. With Descript’s free video editor, you can:
Descript’s video editing is different (and easy) since you can edit the video using the script instead of a traditional timeline editor. This makes the process super efficient since you can quickly identify what needs cutting. Simply delete the part of the script you don’t want, and the accompanying video will disappear. Step 5. Review and fine-tune your videoWhat makes Descript extra special is the ability to edit your audio by taking out filler words you might have accidentally recorded. Remove “ums,” “uhs,” and awkward pauses in a single click with filler word removal . If, like me, you also have a habit of forgetting to say something important, you can use Descript's Overdub feature to add those few missed words without re-recording the whole scene. The software will create an AI clone of your voice to fix audio mistakes. With your video presentation fine-tuned, you’re ready to save and share it with the world. Click the Publish button in the top right corner and download the MP4 file, or export it directly to a platform like YouTube or Wistia. 6 key elements for crafting a great video presentationNow you know the practical how-tos of making a presentation video, let’s look at some key elements that turn a good video presentation into a great one. Clear and engaging contentVisual appeal, narration and voice quality, engagement techniques, structure and flow.
No one likes feeling confused. If your presentation isn’t clear, you’ll end up frustrating your audience. A nice trick for clarity is to imagine you’re explaining your presentation to a child; don’t use big words to sound smart. Presentations that are clear from the start are naturally more engaging. Gone are the days of 360p Nokia footage. Even if you don’t have a professional camera setup, you can still record a video on a PC, phone, or webcam with high quality. But don’t forget about the images and text overlays. No one wants to try deciphering pixelated visuals—use the highest quality video resolution you can. Even the best-quality video presentation can be ruined by bad audio. Poor-quality narration is hugely frustrating to viewers. Prioritize your audio quality, especially for information-rich videos like presentations, and use Studio Sound to remove distracting background noise from your presentation video. When it comes to video presentations, you should think like a salesperson. You can't expect your audience to believe the information you give them if they don't trust you. Engage your audience by telling a personal story, describing relatable scenes, or emphasizing important points throughout your video. Treat your presentation like a story with a beginning, middle, and end. Information should flow nicely from one point to the next. Do a test run through your slides before you start recording to ensure any questions don't crop up prematurely because the viewer thinks you haven't covered it (when you do a few slides later). Learn: Narrative structure: How to compose the best story for your footage Audience-centric approachIt's pretty much always to the audience's benefit when you make a presentation video, so you shouldn't focus too much on yourself. Address your audience's needs and go above and beyond to answer any questions they may have. Otherwise, why would they listen to you? 5 tips to help you craft remarkable video presentationsNow we know what makes a great presentation video, here are five bonus presentation tips to create yours. 1. Practice and rehearseYou won’t always get it right the first time, and that’s okay. But the more you practice before hitting record, the better your presentation video will be—and the less legwork you’ll need to do throughout the video editing process. 2. Invest in good equipmentTop-notch equipment makes your life easier throughout the video creation process. Replace your webcam with your iPhone to improve picture quality, and invest in editing tools that allow you to record and edit in the same dashboard. 3. Optimize lightingAnother area where you can improve the quality of your video is the lighting technique . If you have the budget, you can use a simple ring light, but if you don’t have the cash to invest in video equipment, use natural light (such as a window) behind your camera. 4. Engage with eye contactIf someone was talking to you and they weren’t looking at you, you’d probably be a little confused or uncomfortable, right? It’s the same with video. Look into the camera when making video presentations to simulate real eye contact with your audience. If you forget, use Descript’s Eye Contact AI effect to fix it. 5. Keep it conciseIf you waffle on with unnecessary information or get sidetracked on a story, you’ll lose your audience’s attention, and they’ll click away or switch off. Stick to your video script and keep your presentation concise. Elevate your video presentations with DescriptCreating an informative and engaging video presentation isn’t the easiest task in the world. You’ve got to know your audience and what they want, present the information confidently, and do it with visually appealing content. With Descript, you can take your presentation video to the next level with an editing experience that allows you to:
Take a free tour of Descript and see why thousands of creators love its video editing platform. How to make presentation videos FAQHow do i make a presentation video for free.
How do I video myself when presenting a PowerPoint?Use PowerPoint’s built-in recording feature and choose the “Cameo” option to record yourself when presenting. Or, use Descript’s screen recording feature and have the presentation ready for editing when you finish recording. How do I make an audio-video presentation?If you don’t want to record yourself on video, use a screen recorder to film your presentation slides. Video presentation makers like Descript allow you to record a voiceover. Related articles Featured articles: Articles you might find interestingHow to extract audio from video: The ultimate guideDescript provides all-in-one audio-and-video editing software, along with automatic transcription, and a bunch of magical features.  How to write podcast show notes that attract new listenersPodcast show notes are a great way to engage listeners and monetize your show. Here’s how to write them—and save time doing it.  Top 10 best slow motion apps for compelling videoExplore the best slow motion apps for stunning videos. Compare costs, features, and pros and cons in this guide.  The best AI YouTube description generators, reviewedCan AI tools actually write good YouTube descriptions? I put six popular AI YouTube description generators to the test.  AI for Creators The rules around using AI content on YouTube, Spotify & AudibleYouTube, Spotify, and Audible all have different rules about whether AI generated content is allowed on the platform. Learn their guidelines.  Episodes Newsletter Video podcasting: a workflow that won't kill youHow to make a video podcast even if you don't think you have the time or resources  Join millions of creators who already have a head start.Get free recording and editing tips, and resources delivered to your inbox. Related articles: Share this articleHome Blog Presentation Ideas Video Presentations: A Guide for Engaging Content Video Presentations: A Guide for Engaging Content In a time when the Millennials’ attention span can be measured as little as 12 seconds, how can we create genuinely engaging presentations? Is continuously changing slides the answer these days?A skilled presenter has to master different techniques; therefore, we will examine the potential for video presentations. Join us to discover what video presentations are, the reasons why you should use them amongst your presentation tools, and exciting tips on how to drive engagement from them. Table of Contents What video presentations areVideo presentation stats to consider, different types of video presentations, why should you use video presentations, what are the components of a winning video presentation, the role of accessibility: advanced research on video presentations, 5 tips on how to make your video presentations engaging.
Do you need special software to create video presentations?Closing thoughts. Presentations are a crucial part of business and academic environments. Thousands of presentations are delivered each day in different environments; still, many are doomed to fail. Although we can blame this on a lack of proper presentation skills , reality tells us there’s a change in how people prefer to see the content. As a general rule, consider 10 minutes the Goldilocks Zone for traditional presentations in what comes to audience engagement . Inspirational presentations like the ones we see on TEDx don’t follow this rule, as the objective here is to share a compelling story as detailed as possible so the audience can relate. In some cases, academic presentations of the thesis defense style remain loyal to a specific format. Still, trends are also changing, and video presentations have much to offer in terms of exposing complex concepts more plainly. A video presentation can be represented in multiple formats: as a compendium of animated slides in video format, video files and audio sources packed on a single video file, a video recording made in interview format, a video documentary, etc. Although this definition may sound redundant, the concept behind a video presentation is that they don’t require a presenter to change between slides or windows to browse different assets . Hence, the importance to create a story behind the video presentation, so the various elements don’t feel segregated without logic. We can say people use the video format to convey information in courses, job training, edutainment, conferences, and any kind of message-sharing purpose that requires connecting with the audience for engagement. Before dwelling on the specifics of building a video presentation, here we share some video presentation stats that speak about the importance of video presentations these days from a marketing perspective.
As you can see, the effort of building a video presentation is well-paid in terms of consumption and content information retention from the audience. Depending on the requirements of the presentation itself, we can classify video presentations as follows: In-Company Video PresentationsThese video presentations belong to the business and corporate world, but their purpose is to distribute information among coworkers or to coach the personnel for a specific requirement. In-company video presentations are used in workspace training, as part of internal recruitment processes, or other kinds of internal presentations. In-company video presentations usually carry the company branding; they have restricted access for people outside the organization, so their distribution methods happen in meeting rooms dedicated to these purposes. Business Video PresentationsBusiness video presentations are used for a variety of business purposes: business pitches, workspace training, advertisement, product releases, recruitment, and more. Business video presentations also include the ones dedicated to B2B or B2C relationships. Like In-Company Video Presentations, they carry branding to identify the video presentation’s author quickly. They are shared through official mediums for the company (like a brand’s social media channels and website), during corporate meetings with investors or potential business partners, and through 3rd. party channels.  Examples of these kinds of videos are product launch sessions, much like what tech giants like Xiaomi do. Another kind of business video presentation is the explainer video. Explainer videos can be defined as short online marketing videos that are used to explain the company’s product or service. Explainer videos are commonly used for sales, marketing, and training purposes. Here is a real example of a 1-minute video presentation introducing SlideModel.com. Another application of business video presentations is when sponsorship deals are involved, as brands can present their value to influencers through short reels. Resume Video PresentationsThis is a relatively recent but incredible turn of resume presentations. In resume video presentations , the candidate offers a detailed introduction of their capabilities, skills, interests, and potential value to the employer in a visually engaging format. Unlike traditional CV presentations, the video format gives little room for anxiety, answering most of the interviewer’s questions or even driving admiration for the effort and dedication to this job-hunting adventure. We recommend the usage of resume presentation templates for this purpose, as they save tons of time in crafting a high-quality resume video presentation. Educational Video PresentationsThis category can be divided into three different sub-categories: Academic Video PresentationsIntended for University-level presentations or post-Doctorate work, these presentations follow strict format guidelines. They are mainly designed to distribute data comprehensively, with proper documentation backup. Animations usually don’t take part in these video presentations. Despite being commonly associated with business events, conferences also belong to the academic video presentations category, as the live sessions are recorded to spread the message about important research discoveries. Teaching & Training Video PresentationsTeachers introduce the presentations to their students on various topics to understand abstract issues better. Chemistry, Physics, and Geography are typical examples of subjects that use video presentations. However, subjects like History and Philosophy can save countless hours of whiteboard sessions by using educational video presentations. Webinars fall under this category, either being released to the public or in-company webinars, as they share common aspects in their structure. Do keep in mind that educational content recorded as video presentations is not the same as a webinar, as the latter requires the presence of a live audience, a moderator, and usually a Q&A session at the end of it. If we talk about educational content being recorded and released as a course platform, then we can say it is a workshop. According to recent studies, visualizations through video presentations and video-based learning can enhance understanding. It is demonstrated that students who watched learning videos on Statistics, influenced engagement and motivation positively . Student Video PresentationsFinally, students also make video presentations as requested by their teachers to present a lesson or project exhibition. These presentations vary as the students grow older, becoming less dependent on animated effects, setting the bases for future work or academic presentation formats. Informal Video PresentationsIf you remember seeing videos in situations like 50th birthday parties, baptisms, wedding anniversaries, etc., then you have already experienced informal video presentations. These informal presentations are free from any format restriction. As the term implies, they are used for any kind of meetup, making it simpler to share a story rather than to tell a lengthy story. Inspirational & Motivational Video PresentationsThe final category belongs to the video presentations with a strong emotional component. They are built to connect, to empathize with the audience in specific situations or problems. Examples of this are TEDx , Evan Carmichael, or similar influencing platforms. In general lines, motivational video presentations are recordings of live events shared with the purpose of getting the message to the biggest audience possible (internet consumers). Another possible format for these presentations is recorded interviews or testimonials intended to speak about a person’s contributions to society. An example of this, from an organization’s point of view, are the videos produced by the UK’s NHS to highlight and thank their medical personnel for their efforts during the COVID-19 pandemic. Inspirational video presentations share common aspects with motivational speeches. A list of requirements for these video presentations would be:
Compared with traditional presentation methods, such as presentation slides or speaking in front of an audience, video presentations can offer a series of advantages. For starters, as you write the “ story ,” you are also rehearsing the points to be covered. In that way, anxiety or shyness won’t trigger you to forget about essential points or lose track of time. The length of the presentation can be predetermined, depending on the external requirements of the organization party, or how comprehensive or concise you need it to be. In the case of people struggling with camera shyness , an animated video presentation with voiceover is the answer to deliver quality work. Since psychologists and doctors agree the common point on fear of public speaking is the delivery of the presentation itself, video presentations shall reduce work-induced anxiety to a great degree. Since psychologists and doctors agree the common point on fear of public speaking is the delivery of the presentation itself, video presentations shall reduce work-induced anxiety to a great degree. You can also convert images to video online using video editor platforms to easily create video from images and voiceover on video. Video presentations can be persuasive thanks to the usage of graphics and audio. It is far easier to convey emotions through video presentations than to put them in the presentation design. Also, research by Dr. James McQuivey proved that a minute of video is worth 1.8 million words in terms of information retention. Regarding engagement, the popularity that both TikTok and YouTube gained among the younger generations reflects the behavioral changes in content consumption . It has come to the point that even professionals use TikTok to demystify health hoaxes and help users worldwide. Therefore, using video format for presentations can help to boost your presentation performance, making it attractive for your audience and less effort-demanding. The most significant factor in delivering a successful video presentation is keeping the audience engaged. To ensure this, make sure the presentation doesn’t feel robotic-like but that it conveys a personal message. Don’t get this point wrong if we talk strictly about business or academic scenarios; making video presentations to deliver your personal touch can become as simple as selecting the proper color combination to enforce your message . Other solutions come from watching your voice tone not to make it too monotonous. Structure your presentation accordingly. In business or academic video presentations is a good idea to introduce a slide in the fashion of a table of contents . It is an extra touch that brings the audience closer to the topics due to be discussed. Consider the audience’s perspective as a vital element in video presentations. Check relevant examples of the topic discussed on platforms such as YouTube or DailyMotion. Compare their approach to yours and assert if you would watch your presentation as a spectator or not. This simple test gives insights into which aspects you should work on. Winning video presentations never miss the usage of CTAs. It’s a good method to direct the audience’s interest to a specific goal. Video presentations can become an incredible tool for driving engagement, yet there is a problem that not so many presenters address: accessibility. Think about how many times a presenter ends a phrase like “over here,” assuming the audience is watching the item being shown. But what if members of the target audience have visual impairments? Much like we consider the importance of adding Closed Captioning (CC) to our videos, accessibility in terms of the narrative is a must. On this behalf, we want to introduce an interesting research that led to the production of a tool named Slidecho . Using state-of-the-art technology like video scene detection, AI, and OCR, Slideshow follows these very steps:
Therefore, Slidecho uses an algorithmic methodology to extract the visual elements from the slides, converting them to an audio reading format whilst aligning it with the original speaker’s narration. Moreover, its interface instantiates new interactions that augment the plain video interface with synchronized slide information and audio notifications to alert users to undescribed elements. This technological advance helps the audience better understand what is being presented, regardless of the context of the presentation. Imagine an award ceremony where many references apply to visual cues. People with visual impairments get half of the message, with luck, when presenters fall into colloquial language usage, not understanding the context or having to ask for clarification. If instead, the synced narration is available, we then talk about making presentations available for everyone. This is an accurate definition of enriching an event experience. If we talk about attending to the needs of people with hearing impairments, we have to consider the social factor as a motivator in presentations. It is a common mistake to leave slides filled with text and voiceover narration in the background providing detailed information. A study made by Stanford University speaks about the value of having the presenter’s face available through these slides, as it delivers both social cues plus helps users through lip reading. The human factor also reduces distractions since the audience must check the presenter’s input on written slides.  Tip #1 – Be mindful of the presentation topicIt’s not the same to create a presentation for a business audience as an inspirational presentation. The category of the presentation shall determine items like
Tip #2 – Limit the number of words to includeThe whole idea behind the video presentation is to make a dynamic presentation, not having to pause every 5 seconds to allow the spectator to read. Instead, use words to transmit powerful messages, such as quotes relevant to the presented topic, key information, or CTAs. Use the 7×7 rule: no slide should have more than 7 lines of text, and no sentence should have more than 7 words. Tip #3 – Voiceovers can become your best friendsThe whole point behind a video presentation is not to create a boring one-person video speaking in front of the camera. Use voiceovers effectively to introduce charts, data feedback, etc., with your voice connecting the points of the entire presentation. Be mindful of the tone. A monotonous or flat tone can divert attention and induce people to ignore your work. Your voice skills should articulate the importance of the point being discussed as well as your interest in it. Tip #4 – The power of transitionsAdding suitable transitions and animations makes the presentation more engaging . However, this isn’t equal to adding countless effects. Less is more. Ask a professional for guidance if you don’t have experience with animation effects. The transition can be part of the conversation, being subtle if the presentation is flowing between data sets or similar topics, or contrasting and powerful to deliver a persuasive message. You may also want to insert a transition when you’ve used a video cutter to remove an unwanted part to smooth out the video flow. Don’t abuse any of the two extremes, or the audience may find it uncomfortable. Tip #5 – Make video presentations accessibleAs we mentioned before, quite often presenters assume the audience can understand every part of a video presentation. Reality tells us to attend to the needs of people with visual and auditory impairments by making audio and video media accessible . Subtitles or translator screen-over using sign language is a perfect opportunity to help people with auditory impairments feel part of the presentation, making the message available to them as well. For people with visual impairments, be mindful about how you create the narrative for your presentation, in particular, avoiding visual cues like: “over here,” “this,” and “there” and gesticulating over an object or person, assuming everyone can get the same reference information. Instead, opt to be descriptive in your speech; software solutions can help a great deal, but you can also use native PowerPoint or Google Slides tools such as voiceovers . How to create a video presentation & recommended video presentation templatesYou can create your own video presentations as easily as using Microsoft PowerPoint, Apple Keynotes, or Google Slides. Check these links for relevant information on how to create a video presentation:
In case you feel stuck about which content to input or how to make your video presentation outstanding, a brainstorming technique can do wonders for interactive presentations and creative thinking. It is known as the SCAMPER technique . Since video presentation templates make our life easier, we also recommend you check the following product categories to access extremely visually appealing designs created by professionals to help you deliver your message in style:
Additionally, here you can preview some of our presentation templates that you can use to create a video presentation in PowerPoint. 1. Animated PowerPoint Charts Collection Template Present data in a visually appealing format by using this collection of animated charts in PowerPoint. Fully customizable, this template brings ease to speak about data-driven presentations; hence becoming a vital asset for any presenter in the corporate world. Use This Template 2. Animated Network Diagram PowerPoint Template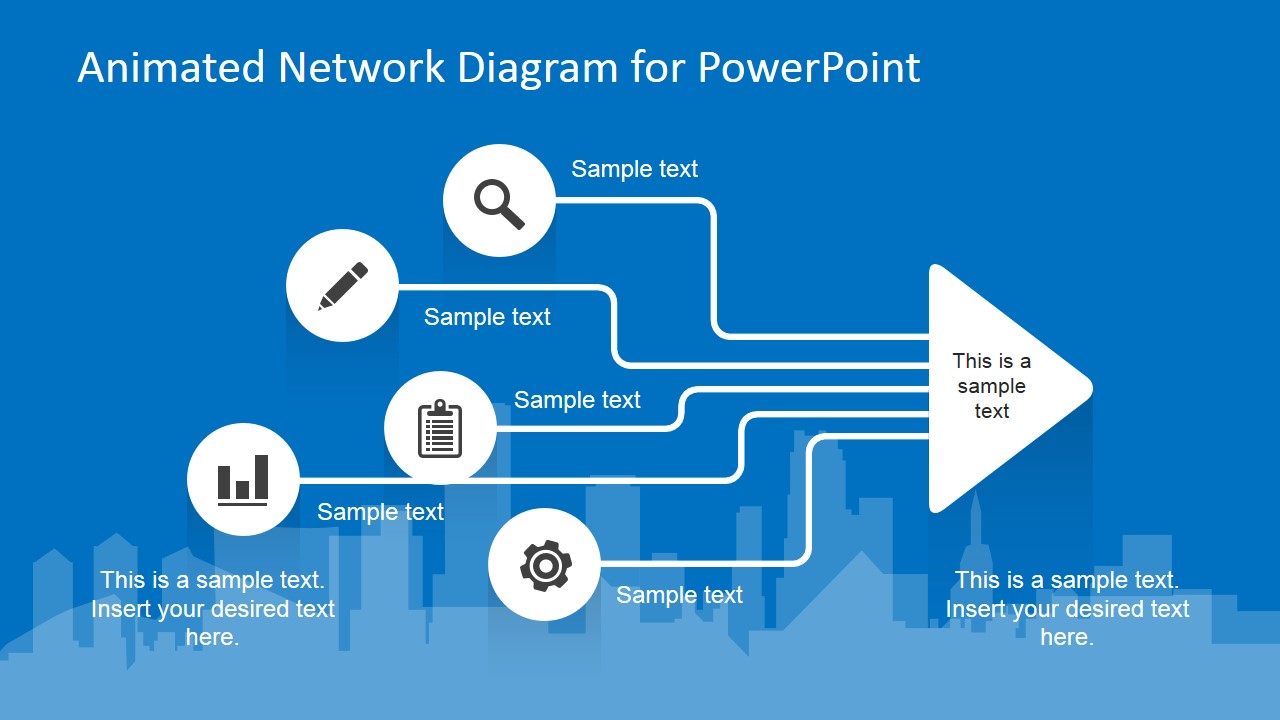 Simplify the different streams that take part in your project or product release with the help of this animated template design. This Animated Network Diagram template can help you expose the processes that, with integrated effort, evolve into a successful outcome. It has animations applied to the objects, plus transitions to make the presentation more fluid. Fully editable with any version of PowerPoint. 3. Free Animated Editable Professional Infographics PowerPoint Template Infographics are a powerful tool that every presenter must consider for their work. This Free Animated Infographics template allows presenters to communicate complex data pieces, build marketing strategies, or prepare professional-looking reports. You can find a broad variety of charts and graphs. These are fully editable by using the chart filter option to edit on a spreadsheet. 4. Free Animated Editable Infographic PowerPoint Slides If you intend to present financial data or KPIs for your marketing projects, look no further: this Free Animated Editable Infographic Template for PowerPoint has it all. Arranged in an 8-slide deck, we find a compendium of graphic elements to represent complex data in a visually compelling manner. Fully editable in all versions of PowerPoint 5. Free Animated Business PowerPoint Template This versatile free presentation template for PowerPoint makes the perfect tool for more than business presentations: it works perfectly for educational video presentations and even inspirational video presentations. With 9 fully editable slides, you can build your video presentation by using a unique combination of graphic elements, animations, and transitions. The graphics elements on this template are oriented to highlight leadership concepts. 6. Free Animated Business Infographics PowerPoint Template Use this free template to create powerful statements backed by data in your video presentations. With a broad selection of graphs, diagrams, and charts, this fully editable template can help presenters to discuss topics ranging from demographics, economy, marketing indicators, or other relevant research results in an easy-to-understand format. Compatible with all versions of PowerPoint, Google Slides, and Keynote. You also need to consider the output format of your video presentations. For maximum compatibility, you can use MP4 or MOV. Other alternatives include:
The answer to this question entirely depends on your aim for creating video presentations. For most presenters, PowerPoint and Google Slides will do a good job, allowing them to use features such as voiceovers, transitions, animations, and high-quality graphics. If instead, you desire to make advanced effects, screen recordings, or toon-like animations with voiceovers, then you should check the following list of solutions:
As we have seen in this article, video presentations are far from obsolete. It is a truly engaging method to divulge our ideas, especially if we target a younger audience. Take your time to write a compelling story to tell rather than spilling animations and transitions along the way. Professional-made video presentations always care about details and the takeaway message for the spectator. Alternatively, check our article about how to insert a video into PowerPoint . Like this article? Please share Presentation Videos, Video Filed under Presentation Ideas Related Articles Filed under PowerPoint Tutorials • September 6th, 2023 How to Embed a Youtube Video in PowerPointGive your presentations a dynamic performance thanks to embedding YouTube videos to them. In this article, we will explain 5 different methods to perform this task.  Filed under Business • April 24th, 2023 How to Ace Your Zoom Presentation: Tips for Successful Virtual PresentingMaster the art of delivering Zoom presentations by checking this quick guide. We list suggestions, how to share a PPT presentation and more.  Filed under PowerPoint Tutorials • October 22nd, 2022 How To Convert a PowerPoint Presentation to a HD Video in 3 StepsLearn how to convert a PowerPoint presentation to video and prepare video presentations in minutes. Leave a Reply
How to Make a Video Presentation With Audio in 8 Steps Written by: Orana Velarde Wondering how to make a video presentation with audio? You're in the right place. In this guide, we’ll cover the 8 steps to creating video presentations with voiceovers, pictures and music. We've also included tips for powerful presentations to help you get maximum results. Here’s a short selection of 8 interactive presentation templates you can edit, share and download with Visme. View more templates below:  Jump to your desired section in the table of contents below. 8 Steps to Creating a Video PresentationWhat is a video presentation, what makes a good video presentation, step #1: plan and strategize, step #2: organize your content, step #3: log in to visme and choose a template, step #4: input your content into the slides, step #5: add animations and transitions, step #6: add audio to your presentation, step #7: review and edit, step #8: download and share. A video presentation is a presentation that can be shared and viewed as a video. Technically, for a presentation to be a video presentation, it must be an MP4 or MOV file type. A video presentation can be shared online on YouTube, Vimeo and other social media platforms . The best part of a video presentation with audio is that you can share it widely without the need of being there to present the information in person. Even a live presentation can be improved with a video slideshow. Simply give a live introduction during your webinar or summit, and then play your video presentation to the audience. A video presentation becomes even more valuable and high-quality when you add audio to it. For example, adding a music clip or a narrated voiceover can do wonders to help you get your message across and leave a lasting impact. Check out this "2021 Year in Review" video presentation we created at Visme. Made with Visme Presentation Maker Make your own video presentation in Visme! Create Now A good video presentation will capture your audience’s attention until the very end. When it comes to creating a video presentation, there is no definite checklist as to what constitutes a good video presentation. But there are some things you can do to make sure that yours is good enough to keep the viewer engaged. For example:
Using the tips above, you’re well on your way to creating a video presentation that is sure to make an impact. Ready? Let’s get started with a step-by-step tutorial! If you prefer watching over reading, here's a short video tutorial on how to create engaging presentations in Visme.  For any successful project to be a success, including your new video presentation, you must plan and strategize. You and your team need to know the purpose of the video presentation before you even start putting together content or visuals. Because you need to know the reason, the why, behind the project. That way, the creation process will reflect those goals and take you in the right direction faster. For example, if you want to create an explainer video about your new product line, do you want the goal to be brand awareness or sales, or both? If it’s sales, then the messaging and visuals must be created for that purpose. If it’s awareness, then you can take a different approach at how to portray the new product line. If you want both, then you can do a bit of both and tell a story about the product that explains how it’s made and how it will improve your customers' lives. Hey marketers! Need to create scroll-stopping visual content fast?
Sign up. It’s free.  Questions to ask before you create a video presentation.Here are the most important questions to ask yourself and your team before you create a video presentation:
Write down a list of goals for your video presentation and make sure they are on-hand during every step of the process. Use these goal-setting worksheets and templates to get started. Every person involved in the creation of the video needs to know about the purpose, goal and plan at all times — from stakeholders and designers to content creators, marketers and social media managers. Here's a sample plan template you can use to keep up with your project goals, target audience, tactics and more. Share it with your team to help everyone stay on the same page.  Customize this template and make it your own! Edit and Download Now that your team is on board and you know the purpose of your video presentation, it’s time to get organized. This is a step with more value than you can imagine. In fact, it should be an un-skippable step to every visual project you create, along with the first step of planning and strategizing. Start by organizing all the content for the presentation into a folder on your desktop. Include all the graphics, photos, video clips, audio bites and any brand assets. Create a document with all the written content and make notes on what the audio will be.
With the written content, draft a simple outline or storyboard. For a video presentation, in particular, you should try a storyboard. This step is especially important if you have stakeholders invested in seeing the final product and want to see the process. How to create a storyboard in Visme.It's easy! Use one of the Visme storyboard templates to put one together. Remember, storyboards don’t need to be too detailed. The purpose of making one is to give an idea of what will be created. Don’t invest too much time in trying to perfect it. Here are some templates to get you started.  Thrift Shop Storyboard Tree Plantation Program Storyboard Web Development Storyboard Art Therapy Storyboard Air Pollution Storyboard Funding Organization Marketing StoryboardCreate your storyboard View more templates It’ll be easier to create a storyboard once you’ve already created the outline. The slide layout for a video presentation is much like the layout of a regular presentation. For example, here is a broad outline for a regular presentation with sections:
If your presentation doesn’t have defined sections to separate the content in, choose a good flow from one slide to another . For example:
 Browse presentation templates in Visme! Create Now Now that you have a good idea of the purpose of your video, an outline or even a storyboard, it’s time to put it all together. Log in to your Visme account and select a starting point for your video presentation. This could be:
Use your outline or storyboard to set up your slide order in the editor. Make sure you have all the slides you need to fit your content.  Now, it’s time to add the content to your slides. If you are starting with a blank canvas, you can use content blocks to help you layout the content in balanced compositions. When adding the content to your slides, remember that people don’t want to read slides on videos. Keep the text to a minimum and use more visuals instead. If you’ll be using a voice over for the online video presentation, then you’ll need hardly any text on the slides apart from titles and section titles. For complementary visuals like images and backgrounds, look through the library on the left side menu of your editor. It’s also likely that you have a selection of images from your company that you want to use in your slides. Upload them to your library. Add some uniqueness to your images by placing them inside frames or cropping them to fit next to colored shapes and sections. For backgrounds, you have lots of choices — from full colors to gradients to animated and video backgrounds. Try photographs with filters for a subtle background that doesn’t compete with the foreground elements. You can also add videos inside your video presentation, either uploaded or with a link to YouTube, Vimeo or Wistia. We suggest you use short videos in this case so that your final project isn’t excessively long. Do you know how to make a video presentation that is impactful and fun to watch? Just add animations and moving elements! Visme comes with built-in with the following animated assets:
It’s time to bring it all to life and go from regular static presentation to video presentation. At this point, you might already have some animated elements in your slides, maybe some animated icons or animated characters. Before you go ahead and animate anything else, review all the transitions between slides. It’s important to understand that the animated elements, embedded or background videos, and audio you use must all match the transition between slides. This is the magic sauce for transforming a normal presentation into a video presentation. Let’s look at all the animation and transition options in your Visme dashboard and how you can use them to your advantage. Animated characters, icons, illustrations and special effects.All these elements have options to select the number of repetitions of their action and the speed. The higher number of repetitions you choose, the longer it will take to finish its action. The speed will make the action faster or slower. You can toggle both to find the perfect combination. The completed action of any of these animated elements will override a timed transition. The transition will wait until the animation is finished to go ahead and start. You can adjust the final length of your animated elements by previewing your slide and taking note of its length. Additionally, you can customize the poses that the characters portray and also the color of their clothes and skin. These deep customization options will help you stay on brand when creating your video presentations. Stock videos and video backgrounds. Videos you add from the editor or import from your computer have the option to trim to a desired length, loop or autoplay. Alternatively, use video as a background. Stretch it to fit the entire slide and position it behind all the other content. The edit settings are the same as a regular video. Visme offers a large selection of quality video clips to use as backgrounds or as complementary visuals. it's also easy to upload your own video to the library. Animated backgrounds.These loop on their own and are ruled by the transition settings. Animated backgrounds stand out so make sure you are keeping a balance with the elements in the foreground. Manual animations.Animations can be added to everything on your slide, including the videos and animated icons. You can tweak the settings to control when elements enter and exit the slide. There are lots of options for these animations and you can time them using the animation settings. Try to keep animations on the same slide to a minimum so they're not distracting. Smooth transitions.Transitions can be added slide by slide or to the entire presentation at once. If you don’t go into the transitions menu at all, Visme will apply a staggered enter from the side that already looks great for presentations that you have to click on to continue to the next slide. For video presentations, you’ll need to edit your transitions to happen automatically according to what is going on in your slide. In general, you can make the transition happen after a specific number of seconds but if you have an animated element or audio clip that lasts longer, the transition won’t happen until the longest one has finished its action. For slides with added video, make the transition happen either when the video ends or at a calculated time after the video has ended. Both are available options in the transition settings. Transitions can be set in different styles, slide from the side top or bottom, or a simple fade or zoom. For a balanced composition, use the same style of transition throughout. But if you want to get creative, use different transitions to design a more creative flow. Just make sure you don’t go overboard.  In the section above, we already talked a little about how audio works together with the transitions for a seamless video experience. Now, let’s take a look at how to add audio inside Visme. As you work on your video presentation, you might feel the need to work on animations, transitions and audio at the same time so that it all fits together in the best way possible. To add audio to your presentation in Visme, you have several options: Adding audio in the background.Adding audio to each slide., tweaking the audio inside video clips., adding a voice over or narration..  To add a background sound clip, click on the top-left hamburger menu and select “Publish Settings”. This is where you can tweak your project's main settings. Click on the third tab "Sound." Toggle background music on to release a dropdown that shows the options inside the editor or any .mp3 file you’ve added to your library. Adjust the volume of this clip and choose if it will loop, fade in or fade out. You can also choose if the background audio will play at a specific point in time. Any background audio will play under all other audio or video you add to the presentation. So make sure these are balanced and make sense together. Inside the editor, you have the option of adding individual audio clips to each slide. Choose from any inside the editor or upload your own. You’ll have the option to trim the length of the audio, its volume and if it loops or fades in and out. Similar to the background audio, you can choose to start at a specific time during that slide’s progression. When you add a video file that has audio in it, you can choose to keep the audio or turn it off. The option is inside the video settings in the “muted” tab. You can add voiceovers to your video presentation in three different ways;
Whichever you choose, remember to calculate all the play lengths along with the transitions so that everything flows well.  Now it’s time to review everything and make sure it’s perfect. First up, do some proofreading of your text to fix any typos or grammatical issues. Make sure all the text is in the correct font and size to stay on brand and maintain a visual hierarchy. Use the Present button and watch the entire video presentation from start to finish. Take notes along the way of things you notice that need a fix or edit. If you want to see what the final project will look like to your audience, download a video version and watch it on your video player. Once again, take note of any necessary edits.  You’re done! That was easy, wasn’t it? It’s time to share your video presentation with its intended audience. Click on the download button and select the MP4 file option. If your video is especially long or full of features, it will take a bit longer to download. We’ll send you an email when it’s ready so you don’t have to watch the progress bar. Go get a coffee or take a break for a job well done! Once downloaded, upload your video to YouTube, Facebook or any of your favorite social media platforms. If you created the video as part of a larger Visme project, upload it back into your editor. Use your video as part of an interactive report, or for your website, landing pages or email campaigns. Ready to Create Your Video Presentation with Audio?Are you ready to create your video presentation with audio? Visme offers all you need to create professional-looking video presentations with audio for any purpose and industry. With plenty of ready-made presentation templates , you don't need video editing experience. And, since Visme is a web-based app, it doesn't matter if you use a Mac or PC computer. Video presentations with audio are great for projects like:
If you’re still doubting if you know how to make a video presentation, just remember to follow the steps in this guide and use the tips in the first section to guide you through the process. Don’t forget that the ultimate goal for your video presentation with audio is to leave a powerful, lasting impact on your audience. Sign up for our presentation software and get started right away. Make simple video presentations or rich, interactive and memorable video presentations with audio, animations, characters, links, embedded content and other exclusive features. Create beautiful presentations faster with Visme. Trusted by leading brands Recommended content for you: Create Stunning Content!Design visual brand experiences for your business whether you are a seasoned designer or a total novice. About the AuthorOrana is a multi-faceted creative. She is a content writer, artist, and designer. She travels the world with her family and is currently in Istanbul. Find out more about her work at oranavelarde.com  How to Make an Eye-catching Video Presentation in Minutes | InVideo
 Video is now the undisputed king of mediums in business communication. HubSpot reports that 85% of companies use videos in their marketing efforts. From webinars to demos, from sales presentations to investor pitches, and from welcome videos to online tutorials, videos are the go-to channel. Clearly, video marketing is on the surge. And video presentations are among the most widely used formats for video marketing. But how exactly can you create winning video presentations, to begin with? Simply by signing up to InVideo for business where you get tailor-made template and video editing services on demand so you can spend your time running your business. Sign up for a free demo here. Video Presentations Q&ABefore we get into the meat of our guide, let’s quickly answer a few commonly asked questions. 1. What is a Video Presentation?A video presentation is a form of communicating with an audience with the aid of a video or completely using a video. The video could be made of PowerPoint slides , still images, animation, or actual video footage. 2. Why Should I use Video Presentations?Common reasons for using videos as presentation aids include: - Overcoming space/time limitations - Using video as a visual aide to drive your point home - Video enables you to compress a lot of information into a digestible size 3. How do I make a Video Presentation?Thanks to the advancements in technology, making video presentations has become very easy. It has also become more affordable than it was a couple of years ago. While different video makers have different steps to take when making a video , here are the basic steps to follow: - Come up with a concept for your presentation. - Craft an engaging script . - Decide on the visual assets (and format) you’ll use. - Use a professional video editing app to bring it all together. - Promote the video. Pro tip: To make things even easier, you could sign up to InVideo for business and get presentations made for your brand using the editing-on-demand services. Sign up for a free demo here . 4. How do you begin a Presentation?You can open your presentation in 7 ways: 1. Share an anecdote or short personal story. 2. Kick-off with a provocative statement. 3. Present a startling statistic or data. 4. Tell a good clean joke that suits the audience. 5. Ask a loaded rhetorical question. 6. Show the audience a compelling visual. 7. Hook people with a fascinating quotation. 5. How do you Make a Video Presentation with PowerPoint?Turning a PowerPoint presentation into a video is easy. Just follow these steps: Step 1: On the File menu, select Save to make sure you have saved all your recent work in PowerPoint presentation format (.pptx). Step 2: On the File menu, select Save As . Step 3: Select the folder location where you want to store your PowerPoint Show file. Step 4: In the Save as type box, choose PowerPoint Show (*.ppsx) .  Step 5: Select Save . That’s it. Now that we’ve answered a few basic questions, let’s dig deeper into why videos are so powerful. What Makes Video Presentations so Effective?Why do they increase the impact of your message? Well, it’s simple, really – people are visual creatures. This means we take in more information by watching than by reading. Remember the saying, “a picture is worth a thousand words”? Besides that, here are 4 other reasons video is so effective: 1. Conveys emotions betterNo other communication channel conveys emotions better than video. That’s because video caters to the brain’s visual and auditory systems, helping the viewer pick up on cues like body language, facial expressions, imagery, and music. 2. Cements information betterAccording to research , people remember 10% of what they hear and 20% of what they read. However, they remember a staggering 80% of what they experienced. In short, visuals are easier to remember than text or audio because they help your audience “experience” your message. It makes video an essential part of creating presentations your audience will remember for a long time. 3. Makes it easier to digest informationEspecially when explaining complicated concepts, video is a great way to present information in an easy-to-understand way. Not only is the format easy to take in, but it also makes breaking down concepts easier. 4. Builds relationships fastI’m sure you know the marketing mantra: people buy from people they know, like, and trust. Nothing beats video in making prospects or your audience know, like, and trust you… fast. Video is an instant relationship builder. It’s the next best thing to live face-to-face communication. A video is a great tool that has made it easier to communicate thoughts and ideas with people – not just in a room, but even across the globe. 6 Types of Video Presentations You Need to KnowVideo presentations come in different flavors, depending on their purpose.  1. Educational PresentationsThese are mainly used in teaching and learning sets online or in a classroom setting. These make it easier for the teacher to convey information and the students to grasp the concepts. Use this template 2. Sales PresentationsThe field of sales has evolved tremendously in the past decade. With customers being savvier, sales reps must play the game well if they’re to bag sales. One way they can do that is by creating story-based sales video presentations. Sell more with pro video presentations Use 5000+ InVideo templates to get started  3. Investor PitchesNeed to woo an investor? One of the best ways to do that is by using a video pitch. This will help you present your business plan in a visually appealing way so they can easily grasp your business concept. 4. Promotional VideosWhether you’re promoting an existing product or a new one, video is your best bet for getting eyeballs on your product (or cause). People relate better to what they can see, making video the best medium for presenting your promotions (like product reviews, for example). 5. Employee Training and OnboardingVideo presentations are great for conducting employee training and onboarding. One of the main reasons for this is that video helps reduce the resources spent on these 2 important aspects of employee relationship management. 6. Informational VideosAs the name suggests, the informational/how-to type of presentation serves to pass on important information. Why video in this case? Because it’s more engaging and can pack a lot of information in a short clip. Pro tip: You can get tailor-made templates to create any kind of presentation for your brand or business using InVideo for business . Sign up for a free demo here . How to create killer Video Presentations – 4 TipsNow you know why video presentations are important and which scenarios to use them in. Now to the fun part – tips on creating killer video presentations. Let’s get to it, shall we? Tip #1 - Know your Audience The most important aspect of creating a stellar presentation is to know and understand your audience. Even if you use the best video presentation maker , if you don’t target a specific, clearly defined audience, your presentation will flop. Understanding your audience will help you: A. Communicate effectivelyEffective communication involves knowing the language and examples that resonate with your audience. B. Choose the right visualsCertain visuals are more impactful when used on a particular audience. Study those that your audience will easily understand and relate to. C. Connect on an emotional levelNo matter the type of presentation, it’s crucial to connect with your audience on an emotional level. And to do that, you need to understand the emotional triggers to push in your video presentation. Invest in adequate audience research. While it may be time-consuming (and a bit costly), it will pay off in the end. Idea #2 - Brainstorm video content ideas Now that you have gathered enough audience data, it’s time to brainstorm some content ideas. Whether you’re creating your talk solo or as a team, 3 crucial questions will lay the foundation of your brainstorming session: 1. What do you want the video to achieve? 2. Which emotions do you want the video to evoke? 3. What will visual elements help your video achieve its goal? The answers to these questions will help guide your ideas. They are key to creating a killer video that your audience will love. Tip #3 - Craft engaging scripts Audience research? Check. Great idea? Check. Now we get to another interesting stage of creating great video presentations – crafting an engaging script. Whether it’s a live presentation, a webinar, or even a product review, you’ll need a great script to ensure you keep your audience engaged. Even if you love creating impromptu videos, having a script for your video presentations is important. And no, you need not be Quentin Tarantino to produce a great video script (although it won’t hurt to learn how to become a good copywriter). Here are 3 reasons a good video script is a must: 1) Helps structure your videoTo ensure your video has a smooth and progressive flow, you’ll need a good script. 2) Eliminates “dead spots”Dead spots, or moments of inactivity, are a great turn-off in a video. They reek of unprofessionalism and can lead to your audience disengaging. The best way to eliminate dead spots is to craft a solid video script . 3) Keeps you on trackIt’s very easy to get sidetracked when creating a video . However, with a script, you minimize the instances of going off-topic. Creating scripts for your videos is a best practice that shouldn’t be overlooked. If anything, invest more in your script than the visuals as a good script can save a video with poor visuals. Pro-tip: Once you’re confident about your script, it is time to make things even more clear. A storyboard will allow you to break down your video visually, scene by scene, describing what is happening in it. Tip #4 - Invest in the Right Tools With video, one thing you should never skimp on is the tools you use, particularly your video editing software. While there is a gazillion free video editing software on the market, it’s highly recommended that you use a professional video editor . And that means going the paid route. Why should you spend on a video editor when there are countless free options available? Here’s why: A. Get more (professional) featuresCreating professional-looking videos requires a lot of resources and features. Most free video editors lack the features that will enable you to create professional videos. B. Avoid branding and adsWith video editing software, free is never free. That’s because you pay through being forced to include the video editors brand in your work. In other words, you pay by advertising for them. Besides branding, some free video editors may subject you to irritating in-app ads. If there’s one thing that’s inevitable when it comes to software, it’s that one time or another you’ll encounter glitches. This is where paid video editors have a great advantage over their free counterparts – you’ll have access to customer support. From hardware (like cameras) to software (like video editing software), the tools you use will determine the quality of your videos. Invest in professional tools, and your presentations will sweep your audience off their feet because they’ll be more polished. Pro tip: If you don't have the time or bandwidth to find your way around an editing tool, simply sign up to InVideo for business and get presentations created using tailor-made templates and on-demand editing services. Sign up for a free demo here . Tip #5 - Adopt Video Presentation Best PracticesThere’s no need to reinvent the wheel when creating presentations . Most winning video presentations are based on common fundamental principles that work. Here are some you need to know: 1) Create impactful intros (and outros)Your intro is the most important part of your presentation as it sets the tone for the rest of the talk. If you can’t engage your audience with your intro, you probably won’t get another chance to engage them. 2) Keep it short, sharp, and sweetNo matter how engaging your video is, always remember it’s not a movie. The point is to keep your audience engaged enough to pass on your information, no more no less. 3) Be professionalDon’t throw out your professional etiquette just because you’re on (or using) video. Maintain professionalism in your video presentations by, for example, using clean language and maintaining a good posture. 4) Use quality soundSound plays an integral part in presentations. Whether it’s music or speech, make sure it’s crisp, clear, and audible. By following these (and other) video presentation best practices, success is inevitable. Remember, the presentation is not about you; it’s about your audience. So, ensure that your presentations provide a good user experience for your audience. Make video presentations in minutes With customizable InVideo templates  Looking for a great Video Presentation Template? Here’s what you should consider Templates are lifesavers. They help you create a decent presentation in a snap, even if you are a newbie. Here are 3 simple questions to help you determine if a template is good: 1) Is it editable? – Are you able to change things like playback speed, effects, or text, so you produce something you like? Stay away from rigid templates that don’t give you the freedom to create with ease. 2) Is it customizable? – Can you design brand-specific clips using your company’s colors, fonts, and styling? Good templates give you wiggle room to include your brand’s specific needs. 3) Is it campaign-specific? – Different videos fit different scenarios. Ideally, you want templates tailored to your current campaign. That way, you have less tweaking to do because the templates are close to what you want. Pro Tip: Get more tailor-made templates for your video presentations by signing up to InVideo for business . Sign up for a free demo here . 5 Awesome Video Presentation ideas to bring The House DownPresentation is both an art and science. Get the balance right, and you have the audience eating out of the palm of your hand. Here are some ideas to help you do just that. Idea #1 - Tickle them with humorHumor is a powerful learning tool. According to studies by Physiology Org humor leads to learning because of it: - Attracts and sustains attention. - Relieves tension and produces a relaxed atmosphere. - Enhances participation. - Increases retention and motivation. - Bonds the student and the teacher. However, to reap all these benefits, the humor must be appropriate and on-topic. So spice up your presentation with a joke or two. The result? Your audience will laugh and learn. Idea #2 - Use Relevant ExamplesEffective presenters use timely, powerful illustrations. The word illustration comes from the Latin term ‘illustration,’ which means illumination. So practical examples are like windows of your presentation. They let light in. They help people see or understand the material better. Here are 5 questions to ask about your illustrations: 1. Are they relevant to the topic? 2. Are they suited to the audience? 3. Are they suited to the time limit? 4. Are they enlightening? 5. Are they well told? Grab compelling examples from books, movies, TV shows, history, children, current events, and captivating real-life incidents. Use good illustrations ram your points home. Idea #3 - Wield Questions like a NinjaQuestions are an integral part of learning. Sharp questions aid learning. Plus, they keep listeners highly engaged. Ask questions: - At the beginning of your presentation to draw your audience in. - In the middle of the presentation to revive waning audience interest. - At the end of the talk, so the audience reflects on the material. Also, allow the audience to ask questions. When your audience asks questions, they switch from passive spectators to active participants. Idea #4 - Be MinimalHave you ever sat through a presentation and felt: - Dazed? - Confused? - Strained? More than likely, the reason is the presenter drowned you in a blaze of inessential stuff. There was too much going on you couldn’t cope with. Minimalism is removing all unnecessary material, leaving only the bare minimum needed to put your points across. It means using just enough text, visuals, scenes, or slides to make the point and no more. A minimal presentation is clean and uncluttered. Simple yet intriguing. Plain but profound. Basic but punchy. Most importantly, it makes learning easy and enjoyable. Idea #5 - Connect emotionally with a storyStories are speakers’ most powerful weapons. That’s because stories play a dual purpose – - Engage intellectually - Connect Emotionally And an emotional connection is key to bringing the house down with your presentation. Why? An emotional connection: - Endears you to your audience - Makes your presentation memorable - Inspires your audience to take action By using a relevant story in your video presentation, you’ll ensure that your audience walks the entire journey with you from intro to outro. 6 PowerPoint Presentation tips to wow your audience No business video guide is complete without PowerPoint, the staple software for business presentations. Here are 6 golden rules to help you nail your next PowerPoint presentation and leave your audience crying for more: 1. Keep Things SimpleLegendary artist Leonardo da Vinci once said something profound: "Simplicity is the ultimate sophistication". With the plethora of apps and templates at your disposal, you will be tempted to complicate things. Don’t. Keep things simple. Simple design. Simple colors. Simple story. People get swamped and confused by complicated stuff but easily absorb and appreciate straightforward material. 2. Good visual contrastWhat use is your blockbuster presentation if the audience can’t see it? You want people to enjoy your presentation, not endure it. If you use dark fonts on dark backgrounds or light fonts on light backgrounds, you’ll strain your audience’s eyes. They’ll struggle to see your lovely slides. Classic black-on-white color contrast does just fine. You can use colors like red, blue, or yellow for headings and images. If you don’t like black and white, you can use other colors you prefer as long as the contrast of your combination is bold and strong. 3. Use a few words and animationsIt’s easy to go overboard with fancy animations and a gushing stream of words. Only use as many words as it takes to get your point across and no more. Too many words cause the audience to read rather than listen. Remember, your slides are there to compliment your talk, not substitute it. Also, a lot of words will fill up many slides that wear your audience down. Ruthlessly cut out senseless animations that don’t add value to your talk. 4. Use excellent imagesImages are to a presentation, what water is to fish. Without them, your presentation becomes bland. It lacks the needed fizz to keep your audience hooked. But only include relevant images. Not only that. Above all, make sure all pictures are of high quality. Amateur-looking clip art causes the audience not to take you seriously. Pro-tip: Get access to millions of stock assets and tailor-made templates with InVideo for business . Sign up for a free demo here . 5. Smooth and fast transitionsWhile PowerPoint transitions can make your presentation engaging, don’t overdo them, especially the advanced ones. Not only do they quickly drain power on weaker machines, but they also distract the audience. Stick to simpler and faster transitions like wipe or slide. 6. Avoid overloading your slidesIn presentations, less is more. Having a lot going on your screen confuses and overwhelms listeners. Cramming too much info into your slides is a big no-no. Clutter is your enemy. Strip your slides down to essential words and images. Your audience will love you for it and leave you with many takeaways. Pro looking Video Presentations – No longer an optionWith Industry 4.0 fast coming into its own, going digital is no longer an option for businesses and speakers. And one of the most important communication mediums in the digital age is video. That’s why you can’t afford to ignore video any more. Whether you’re speaking before a live audience or seeking to disseminate information to a global audience, video presentations are the way to go. Need a great tool to create stunning video presentations? Then make sure to schedule a demo and see just how much you can do with InVideo for business. Let’s create superb videos
Here’s How to Give the Best Video Presentation of Your LifeYour video presentation doesn’t need to bore your attendees to tears. Here are seven strategies to keep participants engaged and awake. You’ve been asked to give a video presentation at a virtual conference. You’re excited about the opportunity to share your expertise, but you’re also worried about how you’ll manage to hold interest. Let’s face it: It’s notoriously tough to keep people focused during virtual presentations. In fact, 67% of workers say they find it easier to be distracted during virtual meetings compared to in-person ones. Even worse? 55% of respondents admit that they’ve checked their emails during those virtual sessions.  7 tips for video presentations that don’t make eyes glaze overSo, are you doomed to spend an hour talking to a bunch of people who’d rather be elsewhere? Will all of your time spent preparing be wasted as you watch attendees turn off their cameras and do who knows what as you ramble on? Not quite. Rest assured, there are some tips you can put into play to deliver a compelling video presentation that keeps your virtual event participants on the hook. 1. Curate the right environmentIf you want other people to be totally tuned into the topic you’re presenting, you need to start by creating a non-distracting environment – both for your benefit and your participants’. There are a number of different ways to ensure you have the right setting for your virtual presentation, including: Finding a quiet space where you’ll be free from interruptions (like barking dogs or kids who choose the most inopportune time to come in and ask for fruit snacks). Cleaning up your background so that you’re the main focus. Taking a few minutes to tidy up is better than turning on a virtual background, as the majority of people prefer to see the actual room behind the speaker. Ensuring you have appropriate lighting so that attendees can see your face without shadows and glares. Think about it this way: Would you want to deliver an in-person presentation in a dimly-lit room with laundry baskets in the background? We didn’t think so. While getting your space ready for a virtual or hybrid event will take a little more work than simply showing up to a well-prepped conference center, it’s well worth the effort to curate an environment that shows you’re ready to get down to business. 2. Check your technologyCan you see my screen? Hold on a second, I just need to click over to my slides. Is my audio echoing for anybody else? Nothing derails your presentation faster than frustrating technology glitches. They’re annoying for both you and your participants, and unfortunately those delays can mean that you lose the attention and trust of your attendees before you even get to the content of your presentation. Plus, they immediately slow you down and shake your confidence. They’re tough to bounce back from, especially when you feel frazzled and like you need to rush through certain aspects of your talk in order to make up for that lost time. For that reason, it’s crucial that you triple-check all of your technology during your presentation rehearsals. And, it’s smart to use a video meeting platform that’s simple and intuitive. Whereby Embedded makes it easy to embed your video meeting directly within the website or app for your virtual conference, so everybody can navigate right to your session without annoying passcodes, waiting rooms, or technology hiccups. 3. Switch up your formatWhile there’s a lot of debate over what our actual attention span is (you’ll hear the range of five to 10 minutes cited a lot), there’s no denying that whatever it is, it’s short. You could present a surefire method to win the lottery, and people are probably still going to start to zone out after a few minutes of you droning on and on. And we don’t blame them – it’s tough to stay focused, particularly in a virtual environment. That’s why it’s so helpful to keep switching up the format of your presentation by mixing in various elements like: Breakout sessions (more on these a little later) Exercises and games Questions and open discussions Videos or demonstrations This array of formats keeps your content fresh and your attendees on their toes. And it’s far preferable to spending an hour reading from your slides. 4. Leverage storytellingImagine that you’re attending a presentation about the importance of accurate record keeping. Do you want to hear a bunch of statistics about why it matters? Or do you want to hear about the time a single spreadsheet error led to a synchronized swimming event being oversold by 10,000 tickets at the 2012 London Olympics? The latter is far more compelling, isn’t it? And it speaks to the power of incorporating storytelling into your presentations. In fact, researchers have found that stories can cause oxytocin synthesis in our brains. That not only gets us more engaged, but also inspires us to take action. So, look for places where you can incorporate anecdotes or real-world examples. Those will hit home with your attendees far more than endless facts and figures. 5. Remember that your visual aids should be visualWe’ve all sat through presentations where the presenter’s slides were filled with walls of text or bullet points of what they wanted to cover. Of course, you can (and should) have your own notes to guide you through all of the important points of your presentation – but that doesn’t mean your audience needs to read along with you. Not only is it boring, but one study found that showing audiences the exact same words that were being spoken reduces audience comprehension. Your visual aids should be, well, visual . Rather than filling your PowerPoint, Keynote, Prezi, or Google Slides with meaningless text, keep your slide deck interesting with: Bite-sized statistics or facts Graphs and charts Relevant images Even the occasional funny GIF or meme can keep your audience more engaged with your presentation (not to mention lighten the mood and inspire a little chuckle). 6. Use breakout sessions to boost engagementIf you have a particularly large group of attendees or a longer time slot for your virtual presentation, you’ll likely notice more participation and engagement if you break people into small groups – at least for a portion of your session. There are a number of reasons for that, but much of it is owed to the fact that tighter groups reduce the potential for social loafing – a psychological concept that states that people put in less effort when they’re in groups than they do when they’re on their own, because they assume that other group members will help shoulder the burden. Whereby makes it easy to start breakout sessions and groups , so you can give people the chance to connect more personally without interrupting the flow of your presentation. 7. Invite active participationBreakout groups certainly help people feel like they’re part of the discussion – rather than being preached to for an hour or so. But, there are a few other things you can do to fuel the feeling that virtual attendees are active participants: Encourage emoji reactions: Even if your attendees don’t have their own cameras on, emoji reactions give them the opportunity to share how they feel. Believe it or not, the same part of our brain that processes facial expressions also processes emojis. Whereby has live emoji reactions, by the way. Periodically stop for questions: While you don’t want tangents to throw your presentation off track, skipping any questions until the end of your talk can make attendees feel unheard and disconnected. Plus, stopping regularly to give people a chance to ask questions as they come up almost always leads to more productive, engaging, and insightful conversations. Involve attendees in examples and demonstrations: This is tougher to do during a virtual event than an in-person one, but find ways to involve your audience members whenever you can. Have them act out an example scenario or ask them to share something with the group. The more you can work them into your presentation, the more alert they’ll be. Is everybody still awake out there?When one in three people admit they’ve felt drowsy or even dozed off during a work meeting, the last thing you want is for the presentation you worked so hard on to quite literally lull people to sleep. While virtual conferences have their benefits, it can admittedly feel more challenging to keep the energy up. Fortunately, you can do more than accept the fact that some people will catch a much-needed snooze during your session. Use these strategies, and you’ll create a video presentation that keeps your participants engaged (and, you know, awake). Ready to give the best video presentation of your life? Learn how Whereby can help make it happen .Other articles you might like.  8 mins read | 19 July 2021 5 Science-Backed Tips to Maintain Your Productivity When Working Remotely 5 mins read | 26 May 2021 Follow These Rules for Effective Virtual Meetings Every Time 2 mins read | 16 July 2021 How I Host Better, More Productive Meetings with Picture in Picture
NEW FEATURE The AI Assistant is HereMeet your new teaching ally.  Developed with coaching as a priority.  CONTENT TYPE
 Meet your new allyThe AI Assistant in GoReact is here.
Higher Education How to (Effectively) Use a Presentation Grading Rubric Almost all higher education courses these days require students to give a presentation, which can be a beast to grade. But there’s a simple tool to keep your evaluations on track. Enter: The presentation grading rubric. With a presentation grading rubric, giving feedback is simple. Rubrics help instructors standardize criteria and provide consistent scoring and feedback for each presenter. How can presentation grading rubrics be used effectively? Here are 5 ways to make the most of your rubrics. 1. Find a Good Customizable RubricThere’s practically no limit to how rubrics are used, and there are oodles of presentation rubrics on Pinterest and Google Images. But not all rubrics are created equal. Professors need to be picky when choosing a presentation rubric for their courses. Rubrics should clearly define the target that students are aiming for and describe performance. 2. Fine-Tune Your RubricMake sure your rubric accurately reflects the expectations you have for your students. It may be helpful to ask a colleague or peer to review your rubric before putting it to use. After using it for an assignment, you could take notes on the rubric’s efficiency as you grade. You may need to tweak your rubric to correct common misunderstandings or meet the criteria for a specific assignment. Make adjustments as needed and frequently review your rubric to maximize its effectiveness. 3. Discuss the Rubric BeforehandOn her blog Write-Out-Loud , Susan Dugdale advises to not keep rubrics a secret. Rubrics should be openly discussed before a presentation is given. Make sure reviewing your rubric with students is listed on your lesson plan. Set aside time to discuss the criteria with students ahead of presentation day so they know where to focus their efforts. To help students better understand the rubric, play a clip of a presentation and have students use the rubric to grade the video. Go over what grade students gave the presentation and why, based on the rubric’s standards. Then explain how you would grade the presentation as an instructor. This will help your students internalize the rubric as they prepare for their presentations. 4. Use the Rubric ConsistentlyRubrics help maintain fairness in grading. When presentation time arrives, use a consistent set of grading criteria across all speakers to keep grading unbiased. An effective application for rubrics is to apply a quantitative value to students across a cohort and over multiple presentations. These values show which students made the most progress and where they started out (relative to the rest of their class). Taken together, this data tells the story of how effective or ineffective the feedback has been. 5. Share Your FeedbackIf you’re using an electronic system, sharing feedback might be automatic. If you’re using paper, try to give copies to presenters as soon as possible. This will help them incorporate your feedback while everything is still fresh in their minds. If you’re looking to use rubrics electronically, check out GoReact, the #1 video platform for skill development. GoReact allows you to capture student presentations on video for feedback, grading, and critique. The software includes a rubric builder that you can apply to recordings of any kind of presentation. Presenters can receive real-time feedback by live recording directly to GoReact with a webcam or smartphone. Instructors and peers submit feedback during the presentation. Students improve astronomically. A presentation grading rubric is a simple way to keep your evaluations on track. Remember to use a customizable rubric, discuss the criteria beforehand, follow a consistent set of grading criteria, make necessary adjustments, and quickly share your feedback. By following these five steps, both you and your students can reap the benefits that great rubrics have to offer. Personalize Your GoReact Experience
Other Sites & ToolsTechnical groups, follow aiche, you are here.
Best Practices for Video Presentations Virtual presentations, such as webinars or video conferences, can pose unique challenges. Give a successful presentation no matter the distance between you and your audience with help from this guide. Technical presentations can be difficult to master, as the speaker must present complex information in a limited amount of time. Many presentations now occur using video conferencing tools, such as webinars or virtual meetings. Webinars are usually formatted to show a series of graphics or slides accompanied by your voice. Video conferences that take place using tools like Skype may only show your talking head on the screen, with no opportunity for graphics (unless you provide supplementary material via email). If the presentation takes place virtually, the audience is often required to view technical graphics without being able to see the presenter at the same time. In such cases, the audience misses out on the presenter’s nonverbal cues. Therefore, presenters must add all of the necessary information into the presentation itself or the accompanying verbal description. In cases where the presenter is visible onscreen, poor display resolution or Internet connectivity may muddle or eliminate nonverbal cues. The combination of verbal and nonverbal cues is critical for clear and complete communication. Adding to the challenge are conference room screens that are inadequately sized for virtual group learning or discussions. Presenters can overcome these challenges and give great technical presentations by focusing on the graphics and voice-over. The four rules of technical graphicsTechnical graphics can either clarify or confuse. Follow these four rules to ensure your graphics do the former:
Consider the graphic in Figure 1a , which at first appears attractive, but violates Rule 1. It leaves out important information, contains extraneous material, and is misleading. The chart is missing critical information, such as the units of the vertical axis ( e.g., dollars, units sold) and the year of sales the chart represents. The chart uses a distinct perspective and colors, but the design does not add any necessary information. Without an expositive caption in addition to the title, the point of the graph is unclear. Furthermore, the figure is misleading, depicting a stable rate of expanding sales, which is not the case.  ▲ Figure 1. These bar graphs are intended to show the 2018 sales revenue to illustrate the fact that sales growth is declining. Although a and b present the same data in similar formats, b provides more information. Figure 1b contains the same information, but without all the extraneous visuals that carry no information, i.e., colors and 3D shapes. Figure 1b makes it clear that sales growth is beginning to wane. It reveals the true trend because the vertical axis includes zero (every bar graph should), which eliminates the visual exaggeration of Figure 1a . While Figure 1b is not as visually stimulating, it communicates the main point — sales growth is declining in 2018. While Rule 1 assures that your graph is relevant, Rule 2 and Rule 3 keep the presentation on track and focused. Rule 4 advises using the right graph, as each type of graph is best suited to a particular application ( Table 1 ) (2) .
A graph that is good for one thing may be bad for another. Consider the synchronized line charts of Figure 2 , which show operating data for a furnace. The graph follows the four rules. The colors serve a purpose, distinguishing the various charts (Rule 1). The graphic fulfills its intention according to the caption, which states that NOx remains below its maximum permitted limit (Rule 2). It is reasonable to presume that the audience understands the legal and moral ramifications of remaining in legal compliance (Rule 3). The chart also shows how several factors vary with time, which is a strength of line charts (Rule 4).  ▲ Figure 2. According to the caption, the intent of these line charts is to show that NOx remains below the permit limit of 100 ppm under normal operating conditions ( i.e., temperature and oxygen percentage). But, what if you want to show how NOx is affected by temperature and oxygen concentration? Line charts are not as effective at displaying this relationship. Instead, you should use a surface or contour plot ( Figure 3 ). While Figure 3 includes both surface and contour plots for the same data, only one graphic is needed. The contour graph (left) is best if you want your audience to ascertain the exact values of temperature, oxygen, and NOx. However, if you are concerned with highlighting a trend, the surface plot is the better option (right). If your main goal is to show that NOx emissions are in compliance, Figure 2 best serves this purpose.  ▲ Figure 3. Both of these plots show how NOx fluctuates with temperature and oxygen. The contour plot (left) shows the data values, while the surface plot (right) better depicts the overall trend. Guidance for the accompanying voice-over. No matter how great your graphics may be, they will require an accompanying verbal description. In a body of text, such as what you are reading, there is no opportunity for additional clarification, so every graphic must be able to stand on its own. In a presentation, graphics should still follow the four rules, but can be accompanied with an oral description. Even so, it is still prudent to include a title and caption for all graphics. Including all of the necessary information in the visual is helpful for those with hearing impairments and those who cannot hear you due to poor room acoustics. It can also be beneficial for anyone who wants to review the slides after the presentation. Tips for the presentationFear of public speaking is a common anxiety, but the more familiar you get with doing it, the less anxious you will feel. Rehearsing is a good way to feel more prepared, but that may not be enough for you. Consider joining an organization such as Toastmasters International (3), which provides its members the opportunity to practice public speaking and receive constructive feedback. My fear of public speaking abated when I began to perform in community theater. For me, it was easier to present someone else’s words. These experiences teach you that no one dies from a less-than-perfect presentation and nearly everyone in the audience is on your side. Focus on being authentic. Some people like to start with a related and humorous anecdote, but being yourself is more important than being funny or witty. Wit and charm will come naturally if you feel like yourself. Radio hosts convey 100% of their message verbally, and they can serve as a source of inspiration as you formulate your voice-over style. If you listen closely, you will notice they never use stall words, e.g., ums and ahs. If you catch yourself at a loss for words, stop, think, and then speak. For help with visual presentations, observe television newscasters. Watch their posture, facial expressions, and general demeanor, which are obviously important when your audience can see you, but are also important when you are not on screen. Voice and physicality are connected. Your chest should be up and shoulders back to allow your voice to project. Your facial expressions and gestures enhance the expression of your voice. Preparation and rehearsal will make for a genuinely confident presentation. For online videos, the quality of the videography is also important. Consider lighting, color balance, angle, and frame. Depending on the formality of your presentation, you may want to hire a professional videographer, allowing you to focus on the content and the delivery. What to do if you flubThe big day has come, you present, and it goes perfectly. Or, so you would hope. If not, keep in mind that nearly all learning is based on failure and discomfort, and you should consider any flubs your friend, rather than your foe. If you are less than perfect, you will get better. Over time, you will notice that your presentations have become less forced, more natural, and maybe even fun. Literature Cited
 Would you like to access the complete CEP Article?No problem. You just have to complete the following steps. You have completed 0 of 2 steps. You must be logged in to view this content. Log in now. AIChE MembershipYou must be an AIChE member to view this article. Join now. Copyright PermissionsWould you like to reuse content from CEP Magazine? It’s easy to request permission to reuse content. Simply click here to connect instantly to licensing services, where you can choose from a list of options regarding how you would like to reuse the desired content and complete the transaction. Small Data, Big ResultsPurchase a qualified valve for your operation, closing the gaps in cybersecurity, career catalyst feature: communicate, get your research published, departments, books: november 2019, calendars: november 2019, catalyzing commercialization: a cost-effective process for creating sustainable, alternative protein foods, looming deadline prompts cybersecurity concerns, institute news: november 2019, aiche journal highlight: probabilistic modeling to drive pharmaceutical development, new products: november 2019, cep: news update, process safety beacon: what does that button do, safety minute: fix information overload: include a visual summary of important documents, technical entity trends: advancing biotechnology in asia, young professionals point of view: cultivate a fertile network. | ||||||||||||||||||||||||||||||||||||||||||||||||||||||||||||||||||||||||||||||||||||||||||||||||||||||||||||||||||||||||||||||||||||||||||||||||||||||||||||||||||||||||||
IMAGES
COMMENTS
ideo Presentation RubricCriteria1 point2 point3 point4 pointOrganizatio. The presentation was difficult to follo. due to disorganization of the uttera. .The presentation was not easy to follo. y to follow. The presentation was very easy to follow.Accuracy of la. ge useIt was hard to understand due to incorrect use of.
video footage are mostly in focus and well composed. Most of the movement of the camera is smooth. resolution of the video are consistently low. Stills and video footage are often not in focus and ineffectively composed. The movement of the camera is often wobbly. resolution of the video are inadequate for presentation. Stills and video footage
No citations are included. The storyboard illustrates the video presentation structure with thumbnail sketches of each scene. Notes of proposed transition, special effects, sound and title tracks include: text, background color, placement & size of graphic, fonts - color, size, type for text and headings.
STUDENT VIDEO CONTESTJudging RubricComponents are measured on a scale o. 1 - 4; 4 being the highest score. Listed bel. w are the criteria for a score of 4.35% - Content Clarity: Does the video cle. rly describe the student's vision?• The content of the video clearly describes a way to make education. etter for this student and/or peers.35 ...
Using video for assessment Video assessment criteria categories You can employ a model like Schwartz and Hartman's to determine the type or genre of video you want student's to produce and the appropriate way to assess it in line with your desired outcomes. ... Video pitch/presentation, commentary, expository, modelling, identification ...
Here are some things to include when developing a video project rubric: Content: Clearly state what information and how much of it students should include. For example, in a biography project, students might be expected to include five interesting facts about their person in order to get the highest number of points on the rubric.
rubric for video presentation - Free download as Word Doc (.doc / .docx), PDF File (.pdf), Text File (.txt) or read online for free. The rubric outlines criteria for evaluating video or PowerPoint presentations created by students in teams with a maximum of 40 points. It includes categories for content, organization, creativity, quality of information, diagrams/illustrations, mechanics, viewer ...
Student Names: Criteria. Evaluation Strong (4 points) Effective (3 points) Emerging (2 points) Incomplete (0-1 point) SCORE. Video Content. +Video clearly identifies a social injustice in the City of La Crosse/ La Crosse county and explains what makes it an injustice + Video explores some of the history/causes behind the injustice (providing ...
How to create a video presentation. Step 1. Plan and prepare. Proper planning and preparation can help the rest of your presentation creation process run smoothly. Think about what you'll say, and use a storyboard to build out a visual plan of your presentation ideas.
Rubric for Multimedia Presentation. Task description: You will create a multimedia presentation and present the project to a class at the observation site or a class at the high school. Presentation will include: designing and delivering a 15-minute lesson using multimedia tools. teaching a skill or knowledge represented in the TEKS for a ...
Tip #3 - Voiceovers can become your best friends. The whole point behind a video presentation is not to create a boring one-person video speaking in front of the camera. Use voiceovers effectively to introduce charts, data feedback, etc., with your voice connecting the points of the entire presentation.
A video presentation is a presentation that can be shared and viewed as a video. Technically, for a presentation to be a video presentation, it must be an MP4 or MOV file type. A video presentation can be shared online on YouTube, Vimeo and other social media platforms. The best part of a video presentation with audio is that you can share it ...
Step 1: On the File menu, select Save to make sure you have saved all your recent work in PowerPoint presentation format (.pptx). Step 2: On the File menu, select Save As. Step 3: Select the folder location where you want to store your PowerPoint Show file. Step 4: In the Save as type box, choose PowerPoint Show (*.ppsx).
Bite-sized statistics or facts. Graphs and charts. Relevant images. Even the occasional funny GIF or meme can keep your audience more engaged with your presentation (not to mention lighten the mood and inspire a little chuckle). 6. Use breakout sessions to boost engagement.
Download. Russell Sadberry. 1,664 Views. 9th - 12th Grade 6th - 8th Grade. Film & Media Studies. Once my video students have learned the basics of planning, shooting and editing their media projects, I use this general video scoring rubric to grade their projects. The rubric changes slightly for each project. Learning Objectives Tools.
It rates these criteria as excellent, very good, or good based on depth of content covered, level of originality, variety of shots, camera angles, effects, zooming, and quality/focus of the video.
Between 8 and 15 minutes. File format compatible with YouTube. Cleanly edited. Clear audio. Adequate lighting Criteria: The video is of appropriate quality by including the following characteristics: (1) between 8 and. 15 minutes long, (2) file format is compatible with YouTube, (3) video is cleanly edited, (4) the audio is clear, and (5) the ...
Then explain how you would grade the presentation as an instructor. This will help your students internalize the rubric as they prepare for their presentations. 4. Use the Rubric Consistently. Rubrics help maintain fairness in grading. When presentation time arrives, use a consistent set of grading criteria across all speakers to keep grading ...
Technical graphics can either clarify or confuse. Follow these four rules to ensure your graphics do the former: Rule 1. Show the necessary information and little more ( i.e., avoid "chart-junk") (1) Rule 2. Use one graphic per idea and no more than one graphic every one to two minutes. Rule 3.
Criteria 1 point 2 point 3 point 4 point Organization The presentation was difficult to follow due to disorganization of the utterances. ... Some background noises not related to the presentation are heard. The audio and video effects are of acceptable quality. There are few distracting aspects to the audio/video.
Submitting Video Presentations to ForagerOne Symposium. 4. If you are submitting a 2-3 minute video entry for the Piranha Tank Competition, please indicate this on the Competition Option field. 5. Upload your video's YouTube link. Again, we recommend marking the video as "unlisted" to ensure the ... criteria: • Ability to ...
The video was produced but had very little editing. Video was fragmented and choppy with little to no audio reinforcement. Video was unedited without transitions or audio support. Originality The video shows many considerable original works of the student. The video shows several considerable original works of the student.
Criteria for video presentation - Free download as Word Doc (.doc), PDF File (.pdf), Text File (.txt) or read online for free. The document outlines criteria for evaluating a video project on interestingness, education, and relevance of the subject (30%), quality and effectiveness of the content and language (30%), and technical aspects like camera work, lighting, sound, and editing (40%).