
How to Save PowerPoint as PPTX: Easy Steps
Have you ever wondered why your PowerPoint presentations face compatibility issues when shared across different devices? In today’s digital landscape, knowing how to save PowerPoint as PPTX is not just a nice-to-have skill, but a necessity. This step-by-step guide will walk you through the crucial process of converting PowerPoint files from the older PPT format to the more versatile PPTX format. Not only does the PPTX format offer enhanced features, but it also ensures that your presentations look seamless and professional, no matter where they’re viewed. Let’s dive in and learn how to make this important conversion!
Understanding the Importance of PPTX Format
The transition from the PPT to PPTX format plays a significant role in enhancing presentation quality. Users encounter numerous benefits of PPTX that cater to modern needs. This format, introduced with Office 2007, optimizes file size, making it easier to share and store presentations. The reduced file size does not compromise the content, allowing for efficient usage without lag.
The importance of PowerPoint formats extends beyond mere aesthetics. PPTX files offer superior data recovery options, ensuring that valuable content remains safeguarded even after unexpected disruptions. This aspect is crucial for users relying on smooth presentations without the fear of data loss.
In addition to these features, PPTX supports advanced multimedia capabilities not available in the older PPT format. Users can utilize enhanced transitions and animations, elevating audience engagement. The availability of these PPTX features can transform an ordinary presentation into a dynamic experience. Understanding these advantages encourages users to adopt the PPTX format for an improved presentation experience.
Why You May Need to Convert from PPT to PPTX
Many users encounter specific challenges that prompt them to seek reasons to convert PPT to PPTX . One primary issue involves file size. Presentations in the PPT format can often become bloated, making them cumbersome to open and share. The PPTX format offers a more efficient storage solution, helping to significantly reduce file sizes.
Another crucial factor is the compatibility with modern devices. While older software may support the PPT format, the PPTX format is optimized for newer versions of Microsoft PowerPoint and other applications. This compatibility ensures a seamless user experience across various platforms and devices.
Furthermore, users often experience slowness when opening PPT files, particularly with large presentations or multimedia content. Switching to PPTX can enhance loading times, making it easier for users to access their presentations quickly.
The conversion benefits extend to functionality as well. The PPTX format supports a wider range of features, including better multimedia integration, improved graphics capabilities, and enhanced collaborative tools. Embracing PPTX can lead to a more dynamic and interactive presentation experience, catering to the needs of modern audiences.
How to Save PowerPoint to PPTX
Saving your PowerPoint presentation in the correct format is vital for compatibility and future editing. To successfully save PowerPoint to PPTX , you first need to confirm the file format of your existing presentation. This ensures that any necessary conversions are carried out smoothly, especially when converting .ppt files .
Confirming the Current File Format
To confirm the file format, you can follow these steps:
- Locate the PowerPoint file in your file explorer.
- Right-click on the file and select “Properties.”
- In the properties window, check the “Type of file” section to confirm if it is indeed a .ppt file.
Steps to Convert .ppt Files to .pptx
Once you confirm the file format, proceed with the conversion process by following these steps:
- Open the PowerPoint presentation you wish to convert.
- Navigate to the File menu.
- Select Save As from the options.
- Choose PowerPoint Presentation (*.pptx) from the “Save as type” dropdown menu.
- Click Save to complete the conversion.
Before finalizing, it’s a good practice to back up your original files. After converting, verify the content to ensure everything looks correct, as sometimes small changes may occur during the conversion process.
Converting PPT with Macros to PPTM
For presentations including macros, saving as PPTM is essential to retain macro functionality. Before you initiate the process, it’s important to understand how to identify macros in your PowerPoint presentation and the steps necessary to complete the conversion.
Identifying Macros in Your Presentation
To manage macros effectively, first, access the Developer tab in PowerPoint. If it’s not visible, you can enable it through PowerPoint Options. Once you access the Developer tab, select the Macros button. This will display a list of any macros that exist within your presentation, allowing you to confirm their presence before proceeding with the conversion.
Steps to Save as PPTM
- Open your presentation file that contains macros.
- Click on “File” in the top left corner.
- Select “Save As” from the menu.
- In the dialog box, choose the file format option.
- Select “PowerPoint Macro-Enabled Presentation (*.pptm)” from the dropdown list.
- Click “Save” to complete the process of saving as PPTM .
Following these steps ensures that you successfully convert PPT with macros to a PPTM format, preserving all necessary functionality in your presentation. This is crucial for any future uses where macros play a key role in enhancing presentation interactivity.
Managing Compatibility Mode in PowerPoint
Understanding and managing compatibility mode PowerPoint is essential for users transitioning between different file formats. This mode is triggered automatically when saving a presentation in an earlier version format, like PPT. Working in compatibility mode can limit some features and hinder collaboration. Turning compatibility mode on and off provides control over how presentations function and appear. Below are steps for easily managing compatibility settings.
Turning on Compatibility Mode
Compatibility mode is activated when you save your presentation in an older format. To manually turn on compatibility mode, follow these simple steps:
- Open your presentation in PowerPoint.
- Go to the File menu.
- Select Save As .
- Choose an earlier version, such as PowerPoint 97-2003 (*.ppt).
Upon saving, the presentation enters compatibility mode, allowing users to edit in a familiar format.
Turning off Compatibility Mode
If you prefer to work in the most updated format, turning compatibility mode off is straightforward:
- Open your presentation while in compatibility mode.
- Go to the File menu again.
- Pick the PowerPoint Presentation (*.pptx) format.
Saving in this manner will effectively disable compatibility mode, allowing full access to the latest features. Users can easily manage compatibility and enhance their workflow with these quick adjustments.
Using the Compatibility Checker
The compatibility checker PowerPoint is a valuable tool designed to assist users in ensuring their presentations maintain functionality across different versions of the software. When opening a presentation, compatibility issues may arise that could affect how the content appears to others. This built-in feature allows users to identify potential problems before sharing or presenting their work.
To utilize this feature, navigate to File , then select Info , and click on Check for Issues . Choose Check Compatibility . This process will automatically highlight any elements that may not work as intended in earlier versions of PowerPoint. It provides an opportunity to make necessary adjustments, allowing users to resolve compatibility issues effectively.
Key aspects of using the compatibility checker include:
- Identifying features or formats that may be lost in older versions.
- Offering suggestions for adjustments to maintain presentation integrity.
- Enabling users to check presentation compatibility before finalizing their documents.
By implementing the compatibility checker, users can ensure their presentations are accessible and visually appealing, regardless of the platform on which they are viewed.
Setting Your Default File Format in PowerPoint
To enhance your workflow in PowerPoint, it’s beneficial to set your default file format to PPTX. This adjustment ensures that every new presentation you create is automatically saved in the preferred format, sparing you from the extra step of changing it each time. By navigating to File > Options > Save within PowerPoint settings , you can easily change the default save format to meet your needs.
Once in the Save settings, look for the option labeled “Save files in this format.” From there, you can select PPTX as your standard file format. This small tweak can dramatically streamline your process, especially for users who frequently create presentations. The advantage of this setting is that it promotes consistency and saves precious time, allowing you to focus on your content rather than file management.
Establishing the default file format in PowerPoint not only simplifies your workflow but also minimizes the likelihood of compatibility issues with other users or applications. By explicitly choosing PPTX as your default, you’re ensuring a smoother experience in your presentation creation endeavors, which is essential for anyone who relies on PowerPoint for effective communication.
Why is it important to save my PowerPoint presentations in the PPTX format?
Saving your presentations in the PPTX format is crucial because it offers numerous benefits such as a reduced file size, improved data recovery, and enhanced multimedia capabilities. The PPTX format also supports advanced features like new transitions and animations that are not available in the older PPT format.
How can I confirm if my PowerPoint file is in the .ppt format?
You can confirm the format by locating the file in your file explorer. Right-click on the file, select “Properties,” and check the file type. If it’s labeled as .ppt, you will need to convert it to .pptx for better functionality.
What steps should I follow to convert my .ppt file to .pptx?
To convert your .ppt file to .pptx, open the presentation, navigate to File > Save As, choose “PowerPoint Presentation (*.pptx)” as the file type, and select Save. It’s recommended to back up your original file before conversion.
What do I do if my presentation has macros?
If your presentation contains macros, it is important to save it as a PPTM file instead. You can identify macros by going to the Developer tab and selecting Macros. Then follow the steps to open the file and save it as “PowerPoint Macro-Enabled Presentation (*.pptm)” to preserve macro functionality.
How does compatibility mode affect my PowerPoint presentations?
Compatibility mode may limit functionality and presentation features when you open a file saved in an earlier format such as PPT. You can turn it off by saving your presentation again as a PPTX, ensuring optimal use of the latest features.
What is the Compatibility Checker and how do I use it?
The Compatibility Checker is a built-in feature in PowerPoint that helps identify any potential issues when opening presentations in earlier versions. To use it, go to File > Info > Check for Issues > Check Compatibility. This will highlight any functionalities that may be lost, helping you maintain your presentation’s integrity.
How can I set my default file format to PPTX in PowerPoint?
To set your default file format to PPTX, navigate to File > Options > Save and select “PowerPoint Presentation (*.pptx)” under Save files in this format. This will streamline your workflow, ensuring that all new presentations are saved in the preferred format without needing to convert each time.
- Recent Posts

- How to Clear PowerPoint Cache: Simple Steps - September 14, 2024
- How to Clear Formatting from a Table in PowerPoint - September 14, 2024
- How to Add Clip Art to PowerPoint: Quick Guide - September 14, 2024
Similar Posts
How to copy from paint 3d to powerpoint: expert tips.
Learn how to easily copy images and 3D models from Paint 3D to PowerPoint with this step-by-step guide. Enhance your presentations with custom visuals.
How to Recover Saved Over PowerPoint Files? (4 easy Methods)
Recover your saved-over PowerPoint files with our easy guide for Windows and Mac. Learn how to restore previous versions and prevent future data loss.
How to Move PowerPoint Slides to Appendix
Learn the straightforward steps for how to move PowerPoint slides to an appendix, ensuring a concise and impactful presentation.
Using Laser Pointer in PowerPoint Recordings: Pro Tips
Elevate your presentations by learning how to use a laser pointer in PowerPoint recording with our essential tips and tricks for impactful slides.
How to Freeze the Last Slide in PowerPoint Presentations?
Learn how to freeze the last slide in PowerPoint using slideshow settings, hyperlinks, or the “end show” command for professional presentations.
How to Make PowerPoint Slides Advance Automatically?
Learn how to make PowerPoint slides advance automatically with step-by-step instructions, tips, and best practices for seamless presentations.
Leave a Reply Cancel reply
Your email address will not be published. Required fields are marked *
Save my name, email, and website in this browser for the next time I comment.
© 2024 pptbliss.com - All Rights Reserved
- Quick Answers
- Remote Teaching
How do I save a PowerPoint file in .pptx format?
The latest format for Powerpoint presentations is .pptx . Saving in this format becomes particularly important when you are recording a presentation . If you use .ppt, the audio you record will not save properly.
To save in .pptx format instead, follow these steps:
- With your presentation open, click File , Save as .
- Name your presentation, and then click the Save as type dropdown menu underneath.
- Select PowerPoint Presentation . It is usually the first option in the list, and may include the file extension, PowerPoint Presentation (*.pptx) .
- Click Save .
- Ignore any prompts to make the file 97-2003 compatible, as this will save in the older format.
If you want to check that your file has saved in the right format:
- Find the file where you saved it.
- Right click on the file.
- Select Properties .
- Look for the line that says Type of file and check that it is .pptx .

Share this article:
Was this article helpful.
Macro-Free and Worry-Free: How to Save a PowerPoint Presentation Without Macros
Are you tired of dealing with pesky macros in your PowerPoint presentations? Do you struggle to share your files with others because they’re concerned about potential security risks? You’re not alone! Macros can be a real hurdle when it comes to collaborating with others or sharing your presentations online. Fortunately, there are ways to save a PowerPoint presentation without macros, and in this article, we’ll explore the various methods to do so.
Table of Contents
Why Save A PowerPoint Presentation Without Macros?
Before we dive into the how-to, let’s first discuss why saving a PowerPoint presentation without macros is important.
Security Risks: Macros can pose a significant security risk to your computer and others who may open your presentation. A macro can contain malicious code that can spread viruses, steal sensitive information, or even take control of your system. By removing macros, you can significantly reduce the risk of your presentation being infected with malware.
Collaboration: When you’re working on a team project, macros can become a major obstacle. If your colleagues don’t have the necessary permissions or software to run the macros, they may not be able to open or edit your presentation. By saving your presentation without macros, you can ensure that everyone on your team can access and contribute to the project.
Compatibility Issues: Macros can also cause compatibility issues when sharing your presentation with others. Different versions of PowerPoint may not support the same macros, which can lead to errors or formatting issues. By removing macros, you can ensure that your presentation looks and functions as intended, regardless of the version of PowerPoint used.
Methods For Saving A PowerPoint Presentation Without Macros
Now that we’ve discussed the importance of saving a PowerPoint presentation without macros, let’s explore the various methods to do so:
Method 1: Save As A PowerPoint Macros-Free File (PPTX)
The simplest way to save a PowerPoint presentation without macros is to save it as a PPTX file. This file format is the default for PowerPoint 2007 and later versions, and it does not support macros.
To save your presentation as a PPTX file:
- Open your PowerPoint presentation.
- Click on the “File” tab in the top-left corner of the screen.
- Click on “Save As.”
- Select “PowerPoint Presentation” (.pptx) from the file type dropdown menu.
- Choose a location to save your file and click “Save.”
Method 2: Remove Macros Using The ” Inspect Document” Feature
If you’re using PowerPoint 2010 or later, you can use the “Inspect Document” feature to remove macros from your presentation.
To remove macros using the “Inspect Document” feature:
- Click on “Info.”
- Click on “Inspect Document” in the “Prepare for Sharing” section.
- Check the box next to ” macros” and click “Inspect.”
- PowerPoint will prompt you to remove the macros. Click “Remove” to confirm.
- Save your presentation as a PPTX file (as described in Method 1).
Method 3: Use A Third-Party Macro Remover Tool
If you’re working with an older version of PowerPoint or prefer a more automated solution, you can use a third-party macro remover tool. These tools can scan your presentation for macros and remove them with just a few clicks.
Some popular macro remover tools include:
- PowerPoint Macro Remover by ASAP Utilities
- Macro Remover by PPTools
- PPTX File Converter by SmallPDF
To use a third-party macro remover tool:
- Download and install the tool on your computer.
- Open the tool and select your PowerPoint presentation.
- Follow the tool’s instructions to scan and remove macros.
Method 4: Save As A PDF
If you’re looking for a foolproof way to share your presentation without macros, consider saving it as a PDF. PDFs are a universal file format that can be opened by anyone, regardless of the software or operating system they’re using.
To save your presentation as a PDF:
- Select “PDF” from the file type dropdown menu.
Tips And Best Practices For Working With Macros-Free Presentations
Now that you know how to save a PowerPoint presentation without macros, here are some additional tips and best practices to keep in mind:
Always Save a Copy: When saving your presentation without macros, make sure to save a copy of the original file as well. This will ensure that you don’t lose any important data or formatting in the process.
Test Your Presentation: After saving your presentation without macros, test it to ensure that it looks and functions as intended. This will help you catch any errors or formatting issues before sharing it with others.
Use Alternative Animation Techniques: If you’re using macros to create animations or transitions, consider using alternative techniques such as GIFs or built-in PowerPoint effects. This will help you achieve the same visual effects without the security risks associated with macros.
Collaborate with Others: Share your presentation with others and ask for feedback. This will help you identify any potential issues or formatting problems that may arise when sharing your presentation without macros.
Saving a PowerPoint presentation without macros is a great way to ensure security, collaboration, and compatibility when sharing your files with others. By following the methods outlined in this article, you can remove macros from your presentation and share it with confidence. Remember to always save a copy, test your presentation, and use alternative animation techniques to ensure the best results. With these tips and best practices, you’ll be well on your way to creating macro-free and worry-free PowerPoint presentations.
What Are Macros In PowerPoint And Why Are They A Concern?
Macros are a set of automated commands or instructions that can be added to a PowerPoint presentation to perform specific tasks or functions. While they can be useful, macros can also pose a security risk as they can be used to spread viruses or malware. This is because macros can execute arbitrary code, allowing hackers to exploit vulnerabilities in the system.
When a PowerPoint presentation contains macros, it can be flagged by security software or blocked by email attachments, causing inconvenience to the presenter and the audience. Moreover, if the macros are malicious, they can compromise the system’s security, leading to data breaches or system crashes. Therefore, it’s essential to save PowerPoint presentations without macros to ensure a worry-free sharing and presentation experience.
What Are The Common Scenarios Where Macros Are Used In PowerPoint?
Macros are often used in PowerPoint to automate repetitive tasks, create custom tools or interfaces, or integrate with other applications. For instance, a macro can be used to automatically resize images, apply a consistent design theme, or create a custom menu. Additionally, macros can be used to interact with external data sources, such as databases or web services, to fetch real-time information or update the presentation content dynamically.
However, with the evolution of PowerPoint features and third-party add-ins, many tasks that previously required macros can now be accomplished using built-in functionality or alternative tools. Moreover, the risks associated with macros have led many organizations to restrict or ban their use altogether. By saving PowerPoint presentations without macros, users can ensure compliance with organizational security policies and avoid potential security risks.
How Do I Know If My PowerPoint Presentation Contains Macros?
To check if your PowerPoint presentation contains macros, follow these steps: Open your PowerPoint presentation, navigate to the “Developer” tab, and click on the “Visual Basic” button. If the “Visual Basic Editor” window opens, it indicates that your presentation contains macros. Alternatively, you can also look for the “Security Warning” message that appears below the ribbon when you open a presentation with macros.
If you find that your presentation contains macros, it’s essential to evaluate the risks associated with them. If you’re unsure about the macros’ origin or purpose, it’s best to remove them to avoid potential security risks. You can remove macros by clicking on the “Developer” tab, selecting “Visual Basic,” and then deleting the macros from the editor. However, if you’re not familiar with Visual Basic programming, it’s recommended to seek assistance from a qualified IT professional.
What Are The Consequences Of Saving A PowerPoint Presentation With Macros Enabled?
Saving a PowerPoint presentation with macros enabled can have serious consequences, including security risks, compatibility issues, and potential data loss. When a presentation contains macros, it can be flagged by security software or blocked by email attachments, causing inconvenience to the presenter and the audience. Moreover, if the macros are malicious, they can compromise the system’s security, leading to data breaches or system crashes.
Furthermore, presentations with macros may not be compatible with all systems or devices, limiting their portability and accessibility. Additionally, if the macros are corrupted or outdated, they can cause errors or crashes during the presentation, leading to embarrassing situations or loss of confidence. By saving PowerPoint presentations without macros, users can avoid these risks and ensure a smooth, worry-free presentation experience.
How Do I Save A PowerPoint Presentation Without Macros?
To save a PowerPoint presentation without macros, follow these steps: Open your PowerPoint presentation, click on the “File” menu, select “Save As,” and then choose “PowerPoint Presentation” as the file type. In the “Save As” dialog box, click on the “Tools” button, and then select “Save Options.” In the “Save Options” window, uncheck the box next to “Save macros with the presentation” and click “OK.”
By doing so, you’ll save a copy of your presentation without macros, which can be safely shared or presented without any security concerns. If you’re working on a new presentation, you can avoid adding macros altogether by using built-in PowerPoint features or alternative tools to achieve your goals.
What Are The Alternatives To Using Macros In PowerPoint?
There are several alternatives to using macros in PowerPoint, including built-in features, add-ins, and third-party tools. For instance, PowerPoint’s “Quick Parts” feature allows you to create reusable content, such as headers, footers, and sidebars, without using macros. Additionally, you can use PowerPoint’s “Shapes” and “SmartArt” tools to create custom graphics and diagrams.
Third-party add-ins, such as PowerPoint add-ins from Microsoft or other vendors, can also provide advanced functionality without the need for macros. Moreover, many tasks that previously required macros can now be accomplished using PowerPoint’s built-in features, such as “Tell Me What You Want to Do” or “Designer.”
What Are The Best Practices For Creating And Sharing PowerPoint Presentations?
To ensure a worry-free experience when creating and sharing PowerPoint presentations, follow these best practices: Avoid using macros whenever possible, and instead, use built-in features or alternative tools to achieve your goals. Always save your presentations in a macro-free format, such as PowerPoint Presentation (.pptx), to prevent potential security risks.
When sharing presentations, use cloud-based services or secure file transfer protocols to prevent data breaches or unauthorized access. Moreover, always scan your presentations for viruses or malware before sharing them, and ensure that your system and software are up-to-date with the latest security patches.
Leave a Comment Cancel reply
Save my name, email, and website in this browser for the next time I comment.
- Billing Plan
- Payment Method
- Notifications
- OCR Converter
- Video Converter
- Audio Converter
- E-book Converter
- Image Converter
- Archive Converter
- Vector Converter
- Document Converter
- Video to MP3
- PDF Converter
- Image to PDF
- Image to Word
- Unit Converter
- Time Converter
- Video Compressor
- Image Compressor
- GIF Compressor
- MP3 Compressor
- WAV Compressor
- Compress PDF
- Compress JPEG
- Compress PNG
- Video to GIF
- WEBM to GIF
- APNG to GIF
- GIF to APNG
- Image to GIF
- Video Trimmer
- API Job Builder
- API Documentation
- File Conversion API
- Image Conversion API
- Audio Conversion API
- Document Conversion API
- PDF Conversion API
- MP4 Conversion API
- Video Conversion API
- JPG to PDF API
- Video to MP3 API
- HEIC to JPG API
- PDF to JPG API
- Webp to PNG API
- PDF to WORD API
- MP4 to MP3 API
- Webp to JPG API
- WORD to PDF API
- HTML to PDF API
- Website Screenshot API
- Video Compression API
- Compress PDF API
- Image Compression API
PPT to PPTX Converter
Convert PPT to PPTX online, for free.
- From Device
- From Dropbox
- From Google Drive
- From OneDrive

Drop any files here!
By proceeding, you agree to our Terms of Use .
- Reset all options
- Apply from Preset
- Save as Preset
How to Convert PPT to PPTX?
- Click the “Choose Files” button to select your PPT files.
- Click the “Convert to PPTX” button to start the conversion.
- When the status change to “Done” click the “Download PPTX” button
Easy to Use
Simply upload your PPT files and click the convert button. You can also batch convert PPT to PPTX format.
Best Quality
We use both open source and custom software to make sure our conversions are of the highest quality. In most cases, you can fine-tune conversion parameters using “Advanced Settings” (optional, look for the icon).
Free & Secure
Our PPT to PPTX Converter is free and works on any web browser. We guarantee file security and privacy. Files are protected with 256-bit SSL encryption and automatically delete after a few hours.
Our Users Love Us
- MP4 Converter
- MP3 Converter
- HEIC to JPG
Document & Ebook
- PDF to Word
- EPUB to PDF
- EPUB to Mobi
Archive & Time
- Pound to KG
- KG to Pound
- Feet to Meter
- Collage Maker
- Image Resizer
- Color Picker
Mobile Apps
- Collage Maker Android
- Collage Maker iOS
- Image Converter Android
- Image Converter iOS
© FreeConvert.com v2.24 All rights reserved (2024)
- Bahasa Indonesia
- PRO Courses Guides New Tech Help Pro Expert Videos About wikiHow Pro Upgrade Sign In
- EXPLORE Tech Help Pro About Us Random Article Quizzes Request a New Article Community Dashboard This Or That Game Happiness Hub Popular Categories Arts and Entertainment Artwork Books Movies Computers and Electronics Computers Phone Skills Technology Hacks Health Men's Health Mental Health Women's Health Relationships Dating Love Relationship Issues Hobbies and Crafts Crafts Drawing Games Education & Communication Communication Skills Personal Development Studying Personal Care and Style Fashion Hair Care Personal Hygiene Youth Personal Care School Stuff Dating All Categories Arts and Entertainment Finance and Business Home and Garden Relationship Quizzes Cars & Other Vehicles Food and Entertaining Personal Care and Style Sports and Fitness Computers and Electronics Health Pets and Animals Travel Education & Communication Hobbies and Crafts Philosophy and Religion Work World Family Life Holidays and Traditions Relationships Youth
- Browse Articles
- Learn Something New
- Quizzes Hot
- Happiness Hub
- This Or That Game
- Train Your Brain
- Explore More
- Support wikiHow
- About wikiHow
- Log in / Sign up
- Computers and Electronics
- Presentation Software
- PowerPoint Presentations
How to Save a PowerPoint Presentation
Last Updated: May 26, 2022
wikiHow is a “wiki,” similar to Wikipedia, which means that many of our articles are co-written by multiple authors. To create this article, volunteer authors worked to edit and improve it over time. This article has been viewed 53,829 times. Learn more...
A PowerPoint presentation is an excellent way of presenting information or ideas to an audience. The software is easy to use and offers a lot of cool effects for your slideshows, too. But, what's all the use of this if you don't even know how to save your finished PowerPoint? This wikiHow will teach you how to save your file.
Design your PowerPoint presentation.

- You don't have to wait until you're totally finished to save your work. It can help to save along the way, too, to ensure you don't lose any progress.
Open the File menu when you're ready to save.

Choose the Save or Save As option.

Decide where to save the presentation.

Name and save your presentation.

Expert Q&A
You might also like.

About This Article
- Send fan mail to authors
Is this article up to date?

Featured Articles

Trending Articles

Watch Articles

- Terms of Use
- Privacy Policy
- Do Not Sell or Share My Info
- Not Selling Info
wikiHow Tech Help Pro:
Level up your tech skills and stay ahead of the curve
How to Save a Copy of a PowerPoint? [Step-by-Step Guide!]
By: Author Shrot Katewa
![How to Save a Copy of a PowerPoint? [Step-by-Step Guide!]](https://artofpresentations.com/wp-content/uploads/2022/03/Featured-Image-How-to-Save-a-Copy-of-PowerPoint-Presentation.webp "how to save powerpoint presentation as pptx")
When creating a presentation using PowerPoint, you may be used to saving the presentation from time to time in order to prevent any data loss. But, what if you want to create another copy of your presentation? How do you save a copy of your PowerPoint presentation?
In this article, we shall understand the process of saving a copy of any PowerPoint presentation in a step-by-step manner. Plus, we shall also take a look at how to save a presentation as a read-only file! That, and much more!
So, let’s get started!
1. How to Save a Copy of a PowerPoint Presentation?
Let’s address the elephant in the room straight away! How do you create a copy of a PowerPoint presentation?
Microsoft PowerPoint offers a “Save A Copy” feature which allows you to save the changes in your PowerPoint presentation in a separate copied file rather than the original file.
In some versions of Microsoft PowerPoint, the “Save A Copy” option is replaced by the “Save As” option. However, the features available through both options are fully identical.
Let’s understand the process of saving a copy of a PowerPoint presentation in further detail –
1a. How to Save a Copy of PowerPoint to Desktop?
To save a copy of a PowerPoint presentation on your desktop, follow the 3 simple steps.
Step-1: Click on the “File” tab
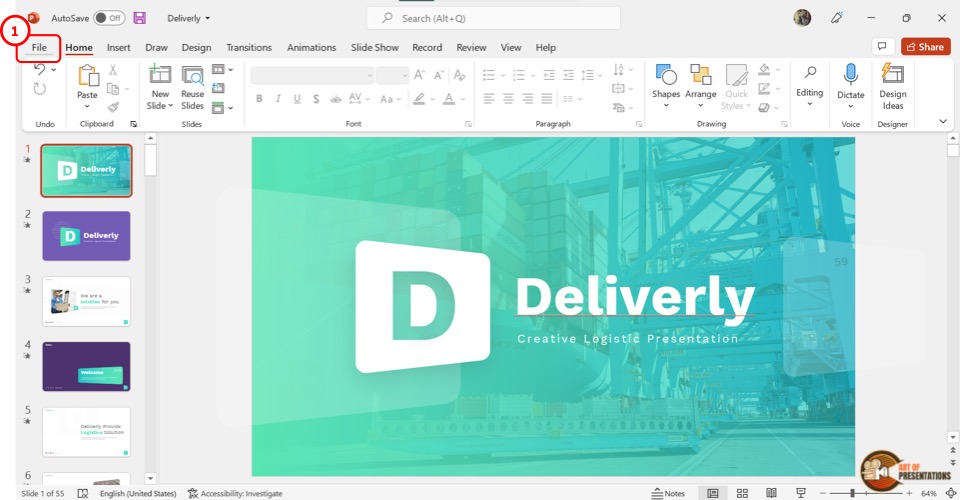
The first step is to click on the “File” tab. It is located on the left corner of the menu ribbon at the top of the screen. This will open the “File” menu.
Step-2: Click on the “Save A Copy” option

Depending on the version of your Microsoft PowerPoint, you have to click on the “Save A Copy” or the “Save As” option from the sidebar located on the left side in the “File” menu.
Step-3: Click on the “Save” button
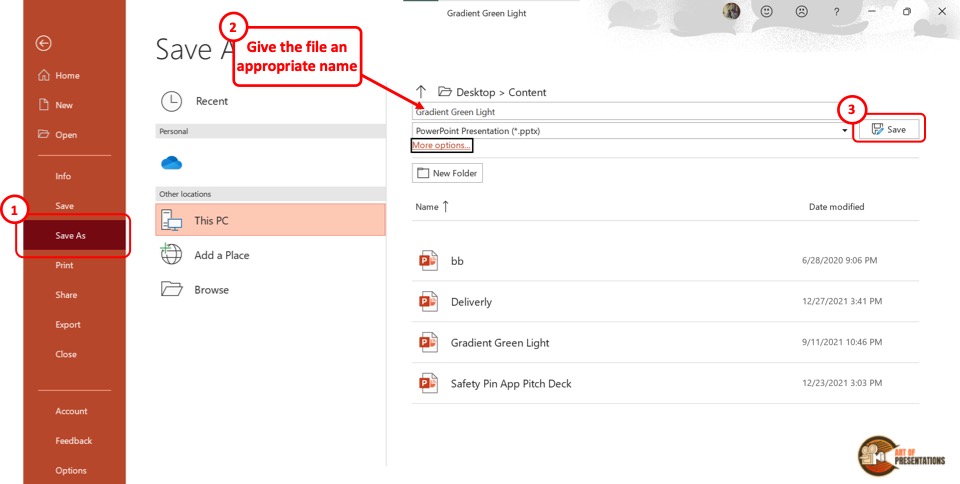
In the “Save A Copy” screen, you can click on the “Save As Options” box and save a copy of your presentation in several different formats. Then all you have to do is click on the “Save” button beside the “Save As Options” box to save a copy of your presentation.
1b. Shortcut to Save a Copy of a PowerPoint Presentation
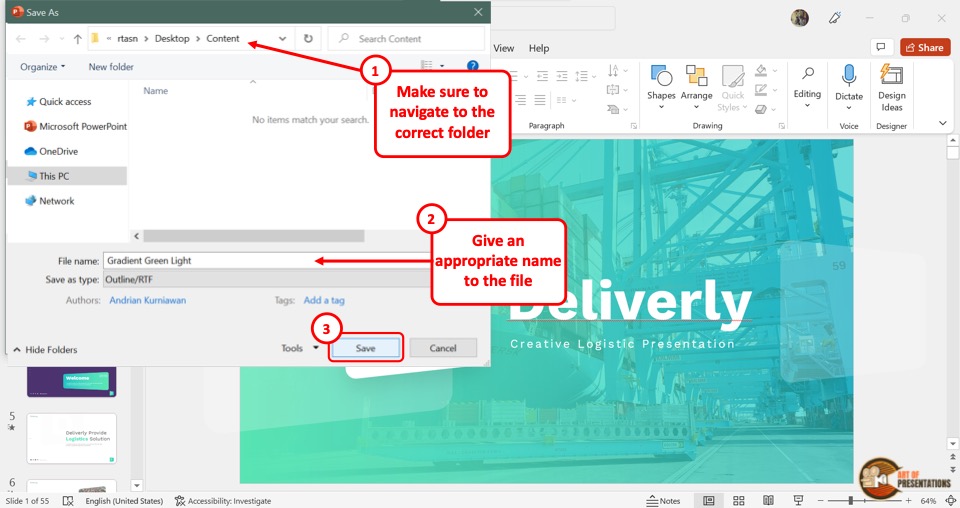
In Microsoft PowerPoint, you can also save a copy of your presentation using the keyboard shortcuts. All you have to do is press the “Alt+F2” keys (Cmd+Shift+S on Mac) on your keyboard.
This will directly open the “Save As” dialog box where you can click on the “Save as type” box to change the file format.
Make sure that you choose the correct location for saving the file from the navigation pane. Give an appropriate name to the file. Finally, click on the “Save” button.
2. How to Save a Copy of a Read-Only PowerPoint Presentation?
By saving the “Read-Only” version of a PowerPoint presentation , you can avoid any accidental edits in the original presentation file. A “Read-Only” PowerPoint file will force the user to create a copy of the presentation if any changes are made.
Thus, the original file is maintained as-in. To save a PowerPoint presentation as a read-only copy, follow the easy steps mentioned below –
Step-1: Click on the “File” Tab
In the menu ribbon located at the top of the screen, click on the “File” tab. In the sidebar located on the left side of the “File” menu, click on the “Info” option.
Step-2: Click on the “Alway Open Read-Only” option
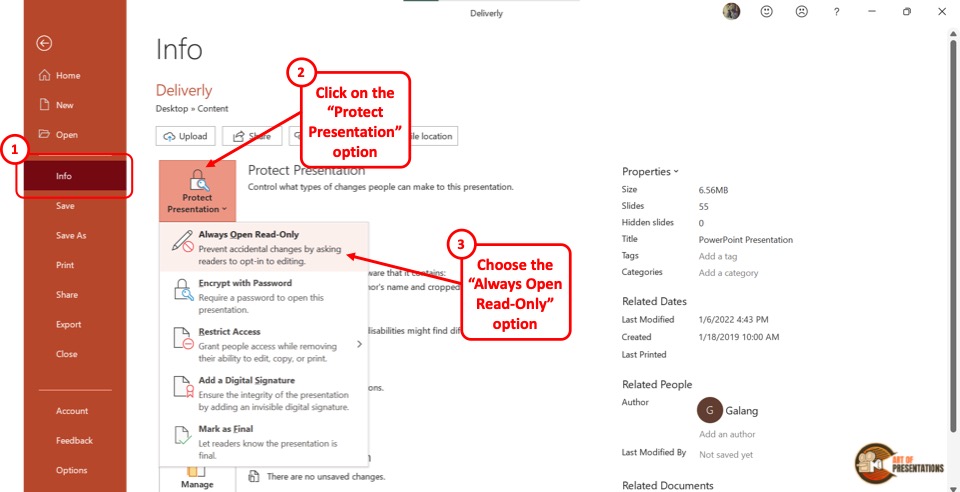
In the “Info” screen, click on the “Protect Presentation” button which is the first button in the left column. In the dropdown menu under “Protect Presentation” , click on the “Always Open Read-Only” option.
Also Read – 7 Ways to Protect Your PowerPoint Presentation from Editing!
Finally, you have to click on the “Save A Copy” option in the sidebar on the left side of the “File” screen. Then click on the “Save” button to save a read-only copy of the PowerPoint presentation.
3. How to Save a Copy of a Shared PowerPoint Presentation?
If your colleague or client has shared a copy of a PowerPoint presentation using PowerPoint for the web or Shared Drive, you can easily download and save a copy of the shared presentation to your device.
Here’s what you need to do –
Step-1: Click on the “Save as” option
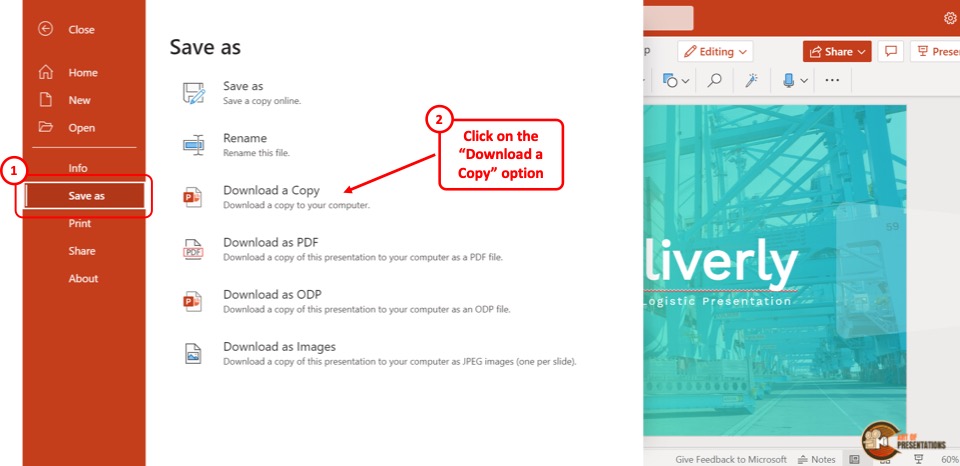
In the menu ribbon located at the top of the screen, click on the “File” tab. Then click on the “Save as” option from the “File” menu. Under the “Save As” option, click on the “Download a Copy” option.
Step-2: Click on “Download”
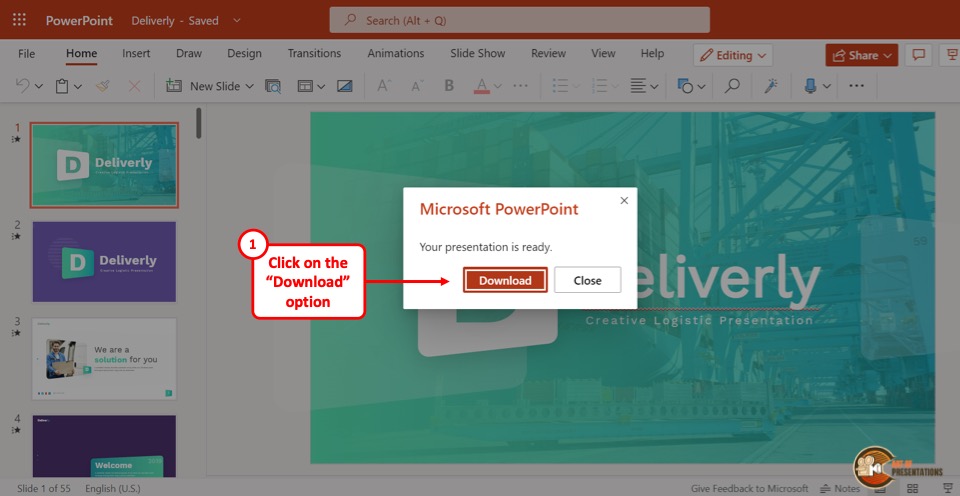
Now all you have to do is click on the “Download” button in the dialog box prompted by Microsoft PowerPoint.
4. How to Save a Copy of PowerPoint Without Notes?
In Microsoft PowerPoint, you can save a copy of the file without the notes.
To do so, you have to first remove the speaker notes, and then use the “Save A Copy” option. Here are 5 quick and easy steps that you can follow in order to save a copy of your PowerPoint file without notes –
In the menu ribbon, click on the “File” tab. Then click on the “Info” option from the “File” menu.
Step-2: Click on “Check for Issues”
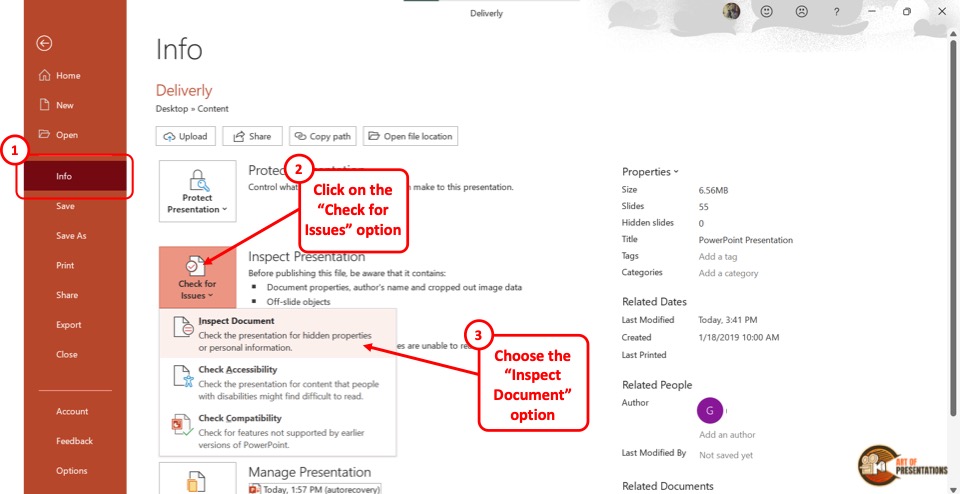
In the “Info” screen, click on the “Check for Issues” button. Then click on the “Inspect Document” option from the dropdown menu. This will prompt a dialog box.
Step-3: Click on the “Inspect” option
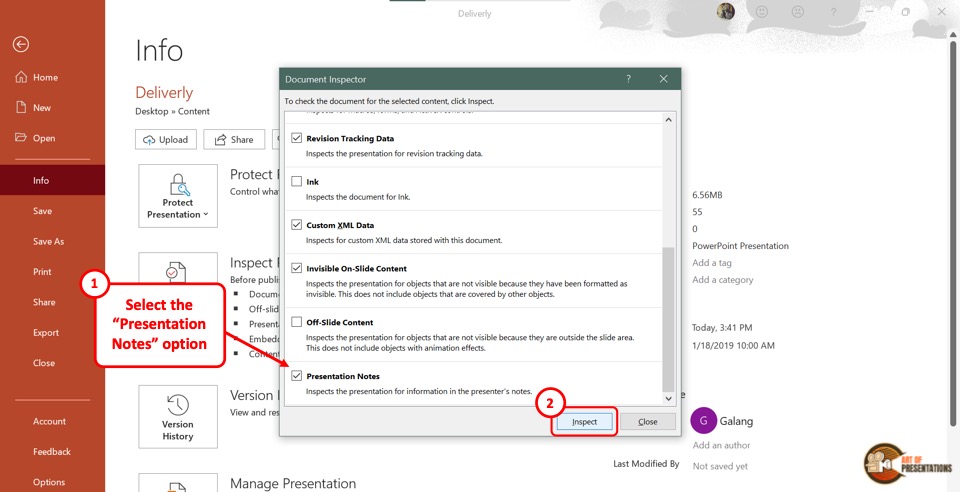
In the “Document Inspector” dialog box, scroll all the way to the bottom and make sure the “Presentation Notes” option is selected. Then click on the “Inspect” button at the bottom of the dialog box.
Step-4: Click on the “Remove All” option
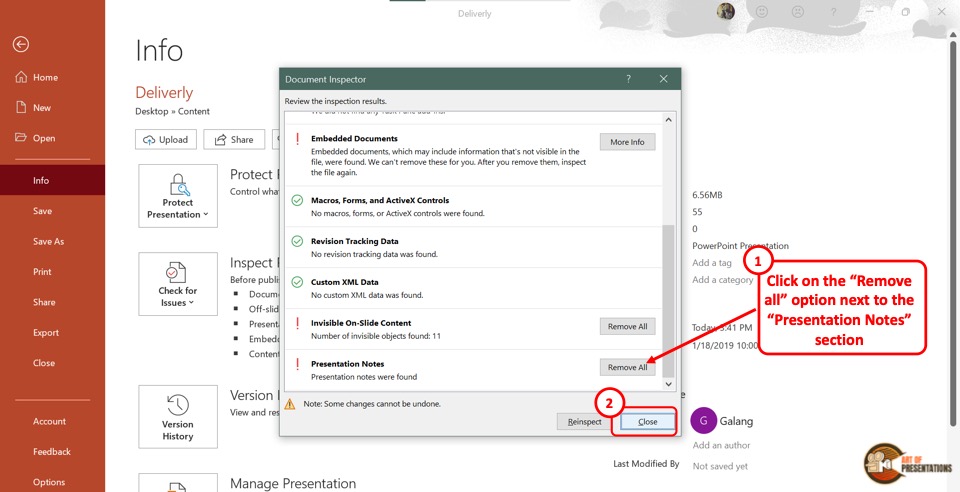
Once the inspection results are shown in the “Document Inspector” dialog, scroll to the bottom again to find the “Presentation Notes” option.
Then click on the “Remove All” button at the right side of the “Presentation Notes” option. Now all you have to do is click on the “Close” button at the bottom of the dialog box to finish the process.
Step-5: Click on the “Save” option
The final step is to click on the “Save A Copy” option in the sidebar of the “File” menu. In the “Save A Copy” screen, click on the “Save” button to save the presentation without notes.
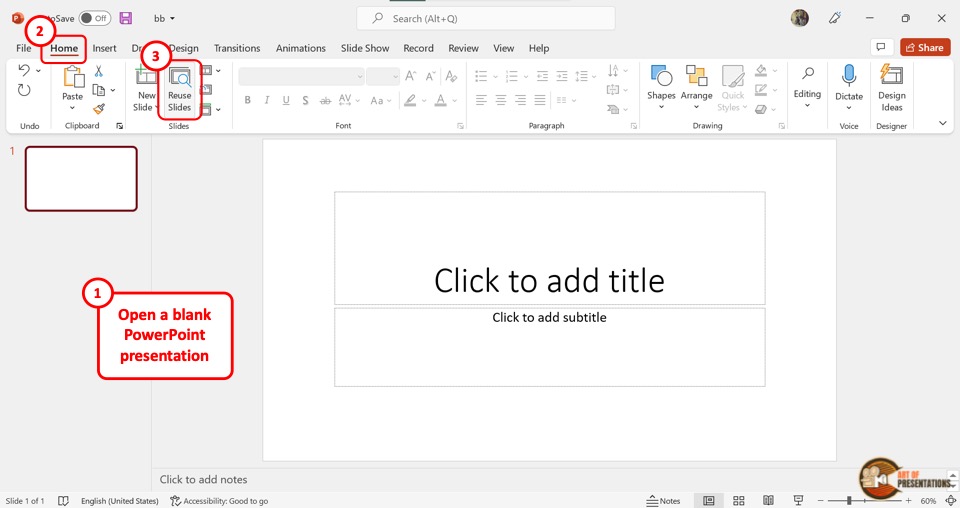
5. How to Create a Copy of an Existing Presentation in a New PowerPoint File?
To create a copy of an existing presentation, you have to first open a new Microsoft PowerPoint file.
Then you can use the “Reuse Slides” feature to copy the existing presentation. The detailed process is explained in the following steps –
Step-1: Click on the “Reuse Slides” button
In the new PowerPoint presentation, click on the “Reuse Slides” button. It is located in the “Slides” group of the “Home” menu. This will open a sidebar on the right side of the screen.
Step-2: Click on “Choose Content”
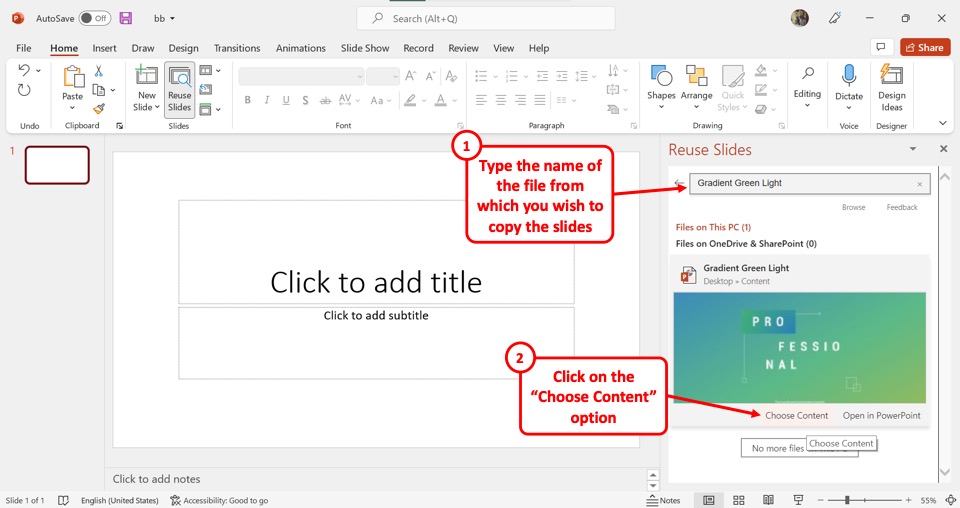
In the “Reuse Slides” sidebar, click on the “Search” box.
Then type in the file name of the presentation which you want to copy. Under the thumbnail of the PowerPoint presentation, click on the “Choose Content” option.
Step-3: Click on the “Insert All” option
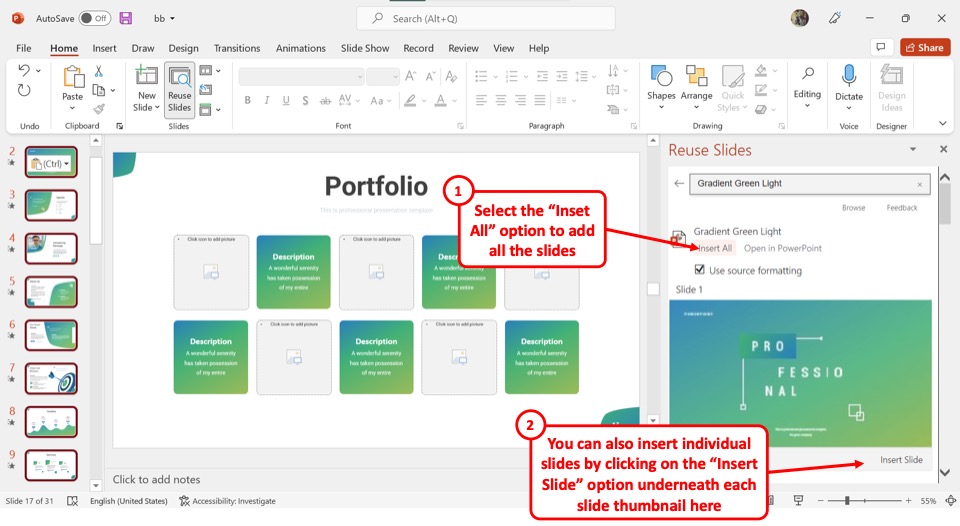
Now all you have to do is click on the “Insert All” option to copy the entire PowerPoint presentation into the new file.
You can also click on the “Insert Slide” option under each slide thumbnail to copy a few selected slides.
6. How to Save a Copy of PowerPoint Presentation in Other Formats?
Microsoft PowerPoint allows you to save a copy of your presentation in multiple file formats. I’ve written an entire article detailing the various formats in which you can save a PowerPoint presentation.
Make sure you check out the other article on “How to Save a PowerPoint Presentation in Multiple Formats” for all the details!
However, in a nutshell, to save a copy of your presentation in other formats, click on the “Save A Copy” option in the “File” menu. In the “Save A Copy” screen, click on the “Save As Type” box which is the second box in the right column.
Now all you have to do is click on your preferred file format from the dropdown menu. For complete details, make sure you check out the article.
Credit to drobotdean (on Freepik) for the featured image of this article (further edited)

- Get started with computers
- Learn Microsoft Office
- Apply for a job
- Improve my work skills
- Design nice-looking docs
- Getting Started
- Smartphones & Tablets
- Typing Tutorial
- Online Learning
- Basic Internet Skills
- Online Safety
- Social Media
- Zoom Basics
- Google Docs
- Google Sheets
- Career Planning
- Resume Writing
- Cover Letters
- Job Search and Networking
- Business Communication
- Entrepreneurship 101
- Careers without College
- Job Hunt for Today
- 3D Printing
- Freelancing 101
- Personal Finance
- Sharing Economy
- Decision-Making
- Graphic Design
- Photography
- Image Editing
- Learning WordPress
- Language Learning
- Critical Thinking
- For Educators
- Translations
- Staff Picks
- English expand_more expand_less
PowerPoint - Saving Presentations
Powerpoint -, saving presentations, powerpoint saving presentations.

PowerPoint: Saving Presentations
Lesson 4: saving presentations.
/en/powerpoint/creating-and-opening-presentations/content/
Introduction
Whenever you create a new presentation in PowerPoint, you'll need to know how to save in order to access and edit it later. As with previous versions of PowerPoint, you can save files to your computer . If you prefer, you can also save files to the cloud using OneDrive . You can even export and share presentations directly from PowerPoint.
Watch the video below to learn more about saving and sharing PowerPoint presentations.
Save and Save As
PowerPoint offers two ways to save a file: Save and Save As . These options work in similar ways, with a few important differences.
- Save : When you create or edit a presentation, you'll use the Save command to save your changes. You'll use this command most of the time. When you save a file, you'll only need to choose a file name and location the first time. After that, you can just click the Save command to save it with the same name and location.
- Save As : You'll use this command to create a copy of a presentation while keeping the original. When you use Save As, you'll need to choose a different name and/or location for the copied version.
About OneDrive
Most features in Microsoft Office, including PowerPoint, are geared toward saving and sharing documents online . This is done with OneDrive , which is an online storage space for your documents and files. If you want to use OneDrive, make sure you’re signed in to PowerPoint with your Microsoft account. Review our lesson on Understanding OneDrive to learn more.
To save a presentation:
It's important to save your presentation whenever you start a new project or make changes to an existing one. Saving early and often can prevent your work from being lost. You'll also need to pay close attention to where you save the presentation so it will be easy to find later.

- If you're saving the file for the first time, the Save As pane will appear in Backstage view .

- The Save As dialog box will appear. Select the location where you want to save the presentation.

- The presentation will be saved . You can click the Save command again to save your changes as you modify the presentation.
You can also access the Save command by pressing Ctrl+S on your keyboard.
Using Save As to make a copy
If you want to save a different version of a presentation while keeping the original, you can create a copy . For example, if you have a file named Client Presentation you could save it as Client Presentation 2 so you'll be able to edit the new file and still refer back to the original version.
To do this, you'll click the Save As command in Backstage view. Just like when saving a file for the first time, you'll need to choose where to save the file and give it a new file name .

To change the default save location:
If you don't want to use OneDrive , you may be frustrated that OneDrive is selected as the default location when saving. If you find this inconvenient, you can change the default save location so This PC is selected by default.

Using AutoRecover
PowerPoint automatically saves your presentations to a temporary folder while you are working on them. If you forget to save your changes or if PowerPoint crashes, you can restore the file using AutoRecover .
To use AutoRecover:
- Open PowerPoint. If autosaved versions of a file are found, the Document Recovery pane will appear.

By default, PowerPoint autosaves every 10 minutes. If you are editing a presentation for less than 10 minutes, PowerPoint may not create an autosaved version.
If you don't see the file you need, you can browse all autosaved files from Backstage view . Just select the File tab, click Manage Presentation , then choose Recover Unsaved Presentations .

Exporting presentations
By default, PowerPoint presentations are saved in the .pptx file type. However, there may be times when you need to use another file type , such as a PDF or PowerPoint 97-2003 presentation . It's easy to export your presentation from PowerPoint to a variety of file types.
- PDF : This saves the presentation as a PDF document instead of a PowerPoint file.
- Video : This saves the presentation as a video.
- Package for CD : This saves the presentation in a folder along with the Microsoft PowerPoint Viewer, a special slide show player anyone can download.
- Handouts : This prints a handout version of your slides.
- Other file type : This saves in other file types, including PNG and PowerPoint 97-2003 .
To export a presentation:
In our example, we'll save the presentation as a PowerPoint 97-2003 file.
- Click the File tab to access Backstage view .

You can also use the Save as type drop-down menu in the Save As dialog box to save presentations in a variety of file types. Be careful to choose a file type others will be able to open.

Sharing presentations
PowerPoint makes it easy to share and collaborate on presentations using OneDrive . In the past, if you wanted to share a file with someone you could send it as an email attachment. While convenient, this system also creates multiple versions of the same file, which can be difficult to organize.
When you share a presentation from PowerPoint, you're actually giving others access to the exact same file . This lets you and the people you share with edit the same presentation without having to keep track of multiple versions.
In order to share a presentation, it must first be saved to your OneDrive .
To share a presentation:

- Open our practice presentation .
- Use Save As to create a copy of the presentation. Name the new copy Saving Challenge Practice . You can save it to a folder on your computer or to your OneDrive .
- Export the presentation as a PDF file.
/en/powerpoint/slide-basics/content/
- Link to facebook
- Link to linkedin
- Link to twitter
- Link to youtube
- Writing Tips
How to Download a PowerPoint Presentation

4-minute read
- 24th January 2024
PowerPoint is Microsoft’s presentation software . It’s frequently used by families, students, and businesses to create slideshows that use text, images, art, and videos.
Whether you want to access lecture slides or presentations showing essential business insights, in this post, we’ll walk you through you how to download PowerPoint presentations so you can work with them offline.
1. Get the Software
If you don’t already have PowerPoint, you will need to download it. Microsoft PowerPoint is part of Microsoft 365 . This is a subscription service, so it does come with a cost.
A free alternative for working with PowerPoint files may be Google slides .
If you choose to download PowerPoint, first make sure your computer will be able to run it:
- Windows Users: Check that your computer is running Windows 10 or higher that your system has the required hardware specifications to run PowerPoint smoothly.
- Mac Users: Confirm that your Mac is running a version of macOS that supports Microsoft’s software .
2. Connect to the Internet
This may seem obvious, but it’s good to make sure you have a reliable internet connection before you try to download anything.
3. Download Your PowerPoint Presentation
Once you’ve got PowerPoint or Google slides set up, you’re ready to download PowerPoint presentations.
First, find the PowerPoint you want to download. This could be in an email, on a website, or on a platform like Google Drive or OneDrive .
Next, make sure you have access to the file and permission to download it. For some websites, you may need to create an account and login.
Downloading a PowerPoint from Email
While each email provider is a little different, the basic steps for downloading a PowerPoint are the same:
1. Open the email that contains the PowerPoint presentation.
2. Click on the Attachment icon to download the file.
3. Once the file is downloaded, click on it to open it with PowerPoint.
4. To save a copy of the presentation, click on the File tab.
5. Select Save As and choose where you want to save the file.
6. Give the file a name and hit Save .
Downloading a PowerPoint from a Website
You can download a PowerPoint presentation from a website in just a few steps:
1. Right-click the presentation link or select File if you are viewing the presentation.
2. Select Save As .
Find this useful?
Subscribe to our newsletter and get writing tips from our editors straight to your inbox.
3. Give the file a name and choose the file format you want to save it in.
4. Click Save .
Some websites use PowerPoint for the web, which is one of Microsoft’s online tools. The steps to download these PowerPoint files are slightly different:
1. Click on the File tab of the main ribbon.
2. Select Download As .
3. From the panel of options on the right, select Download a Copy .
4. A dialog box will confirm that the copy is ready to be downloaded to your computer.
5. Select Download to continue.
Downloading a PowerPoint from OneDrive or Google Drive
You can download a PowerPoint presentation from OneDrive or Google Drive for offline use:
1. Open the appropriate website and sign in to your account.
2. Locate the PowerPoint presentation you want to download.
3. Right-click on the file and select Download .
4. When prompted, select Save or Save As .
5. Choose where to save the file and click Save .
If you’re using Microsoft 365, your PowerPoint presentations may automatically save to your OneDrive. Follow the steps above if you want to save a copy to your computer.
Have the Best PowerPoint Presentation
Now you know how to download a PowerPoint presentation from almost any source!
If you want to make sure you have the best PowerPoint presentations around, have one of our expert proofreaders check them for you. You can even try it free !
Share this article:
Post A New Comment
Got content that needs a quick turnaround? Let us polish your work. Explore our editorial business services.
5-minute read
Free Email Newsletter Template
Promoting a brand means sharing valuable insights to connect more deeply with your audience, and...
6-minute read
How to Write a Nonprofit Grant Proposal
If you’re seeking funding to support your charitable endeavors as a nonprofit organization, you’ll need...
9-minute read
How to Use Infographics to Boost Your Presentation
Is your content getting noticed? Capturing and maintaining an audience’s attention is a challenge when...
8-minute read
Why Interactive PDFs Are Better for Engagement
Are you looking to enhance engagement and captivate your audience through your professional documents? Interactive...
7-minute read
Seven Key Strategies for Voice Search Optimization
Voice search optimization is rapidly shaping the digital landscape, requiring content professionals to adapt their...
Five Creative Ways to Showcase Your Digital Portfolio
Are you a creative freelancer looking to make a lasting impression on potential clients or...
Make sure your writing is the best it can be with our expert English proofreading and editing.
- Frequently Asked Questions (FAQ)
Understanding PowerPoint File Formats
It’s possible to use PowerPoint for years without ever thinking about the various file formats that are available to you. By learning about PowerPoint’s file formats and options, however, you can do a much more effective job of creating presentations, backing them up, sharing them with colleagues, and protecting the information that they contain.
Ordinary PowerPoint Presentations
When you save a simple PowerPoint presentation, you give it a name, and PowerPoint adds the file extension .pptx. Your Sales Presentation file becomes Sales Presentation.pptx .
If your PowerPoint presentation contains one or more macros, PowerPoint will automatically detect their presence and save your presentation as a .pptm file. You can force PowerPoint to save a presentation that includes macros as a .pptx file, but PowerPoint won’t let you play the macros that you’ve included in your slide slow. So it’s best to let it save your file with the .pptm extension.

If you need to share your presentation with a colleague who is using an older version of PowerPoint, then save your slides as a .ppt file. PowerPoint 97 through 2003 cannot open and process .pptx or .pptm files.
If you’re using PowerPoint 2007 or newer, you should always save your work in .pptx format (or in .pptm format if you’ve used macros in your presentation). The options described below are additional ways to save your work. Be sure to save them first as ordinary .pptx or .pptm files before you save them in any of these other formats.
PowerPoint Shows
If you want to give your PowerPoint presentation to a friend or colleague, and you don’t want them to change anything, then save your presentation as a PowerPoint Show file. Your colleagues can display your slides, but they will be unable to change any part of your presentation.
There are three types of PowerPoint Shows: Save an ordinary presentation as a .ppsx file. If you’re using macros in your presentation, save it as a .ppsm file. If you’re sending your slide show to somebody who is using PowerPoint 97 through 2003, then create a .pps PowerPoint Show file.
Be sure to save your presentation as a plain vanilla (.pptx) file or as a macro-enabled (.pptm) file. If you’ve only saved the Show file, you won’t be able to make changes to your presentation.
PowerPoint Picture Presentations
Picture Presentations add an additional layer of protection to your work. To the casual observer, a PowerPoint Picture Presentation looks like an ordinary PowerPoint slideshow. But when you save your work as a Picture Presentation, each slide is converted to a simple image.
Slides contain text objects, image objects, animations, transitions, and many other special effects. By contrast, Picture Presentations contain only snapshots of your slides.
If somebody wants to copy your work, they can see each of the images and retype the text. They can even grab (and re-crop) the images. But they cannot capture any of the magic that is PowerPoint.
If you create a Picture Presentation, be sure to give it a unique name. If you only save the Picture Presentation .pptx file, you won’t be able to modify your presentation in the future.
Windows Media Videos
You can convert your PowerPoint presentation to an ordinary Windows Media Video (.wmv) file, and play it using the built-in Windows Media Player or any other video player. Your .wmv file can be enjoyed by any Windows or Mac user, even if they don’t have PowerPoint installed on their computer.
As always, don’t make your .wmv file the only version of your slideshow or you’ll be very disappointed when you want to make changes to the presentation.
Outline/RTF
PowerPoint lets you turn your slideshow into plain text. This is handy if you want to move some of the presentation’s text to your website or blog.
When you create a rich text format (.rtf) file, you save only the text. You lose all of the images, animations, slide-to-slide transitions, and other non-text objects.
It’s easy to save your presentation as a portable document format (.pdf) file. These .pdf files can be opened on any Windows, Mac, Unix/Linux, iOS, or Android device. The resulting file, however, is a static document. Don’t expect to see slides fade in and out. All of your animated objects will become static.
You can save your slides as an XML Paper Specification (.xps) file. That’s a fancy way to say that if you double-click your .xps file in Windows Explorer, the operating system will open your file using its built-in XPS Viewer.
The XPS format is ideal for sending your slideshow to users who have neither PowerPoint nor Adobe Acrobat Reader installed on their computers. As with the .pdf format above, .xps files have text and images, but no animation.
If you’re happy with this year’s Financial Results slideshow, and you want to create next year’s presentation using the same colors and fonts, then save your current presentation as a template, and use it over and over.
As you may have guessed, save your work as a .potx file for use in PowerPoint 2007 and newer, as a .potm file for a 2007 or newer macro-enabled presentation, and as a .pot file for use on PowerPoint 97 through 2003.
Office Themes and Backups
Because Microsoft PowerPoint is part of Microsoft Office, you can use two Office file types to make your PowerPoint work easier and safer.
You can save your presentation theme as an Office .thmx file. Future PowerPoint presentations, as well as Word documents and Excel spreadsheets, can use this Office theme to set their fonts and colors. This results in a consistent look and feel to all of the Office documents that you present to prospects and customers.
Autosave is built into most Office applications, including PowerPoint. If you experienced a power outage and hadn’t saved your PowerPoint presentation before you lost power, it’s possible that there’s a recent version of your slideshow in the Office Autosave library. If you click File , click Open , and click Recover Unsaved Presentation , you may be pleased by the information that PowerPoint saved for you.
The Bottom Line
There’s no need to memorize all of the PowerPoint file extensions and options that are available. But be sure that you’re including all of these files when you do your regular on-site and off-site backups. And bookmark this blog page so that you can return to it when you need to save or open a PowerPoint presentation in one of the less popular file formats.
- September 20, 2014
About ShapeChef

Blog Categories
- Slides and Objects
- Video and Audio
- Presentation Tips and Techniques
Copyright © 2024 Wulfsoft. All rights reserved.
- Terms of Service
- Legal Notice
- Is the Big Tech Boys Club Failing Women?
- Watch! Wolverine Movies in Order
Change a PowerPoint Show File to a Work File
- Brock University
When you receive a PowerPoint file, whether over a company network or as an email attachment, the file extension indicates whether it's a show file (meant for viewing only) or a working presentation file. The show file has the file extension .ppsx, while the presentation working file uses the file extension of .pptx on the end of the file name. Changing this extension changes the file type.
Instructions in this article apply to PowerPoint 2019, 2016, 2010; PowerPoint for Microsoft 365, and PowerPoint for Mac.
PPTX vs. PPSX
A PowerPoint show is the actual presentation that you view when you are a member of the audience. A PowerPoint presentation file is a working file in the creation stage. They differ only in their extension and the PowerPoint format they in which they open.
PPTX is the extension for a PowerPoint presentation.
PPSX is the extension for a PowerPoint show. This format saves presentations as a slideshow. It is the same as the PPTX file but when you double-click it, it opens in Slide Show view rather than Normal view.
Editing a PowerPoint Show File
Sometimes, you want to make a few changes to the finished product, but all you received from your colleague is the show file with the .ppsx extension. There are a couple of ways to make edits to a .ppsx file.
Open the File in PowerPoint
Open PowerPoint.
Select File > Open and locate the show file with the .ppsx extension on your computer.
Edit the presentation as usual in PowerPoint.
Go to File .
Select Save As .
In the Save As Type box, choose PowerPoint Presentation (.*pptx) to save the file as a regular working presentation file.
Change the File Extension
In some cases, you can just change the extension before opening the file in PowerPoint.
Right-click the show file with the .ppsx extension and choose Open file location .
Right-click on the file name and choose Rename .
Change the file extension from .ppsx to .pptx .
Double-click on the newly named file to open it in PowerPoint as a working presentation file.
Get the Latest Tech News Delivered Every Day
- Create a Default Presentation Template in PowerPoint
- How to Put a GIF in PowerPoint
- How to Fix Audio Playback Issues in PowerPoint Presentations
- How to Do a Voiceover on PowerPoint
- Edit Music, Sound, or Other Audio Settings in PowerPoint
- Tips for Memorial PowerPoint Presentations
- How to Save Sounds From PowerPoint Slideshows
- Create Pictures From PowerPoint Slides
- How to Add PowerPoint Slides Into a Word Document
- Print a PowerPoint Handout in PDF Format Without a Date
- How to Recover an Unsaved PowerPoint
- Play Sound and PowerPoint Animation at the Same Time
- How to Make a Slideshow on PowerPoint
- How to Fix a Red 'X' Picture on a PowerPoint Slide
- How to Create a Timeline in PowerPoint
- How to Insert PDF Files Into PowerPoint Presentations
This browser is no longer supported.
Upgrade to Microsoft Edge to take advantage of the latest features, security updates, and technical support.
How to export high-resolution (high-dpi) slides from PowerPoint
- 10 contributors
- Applies to: PowerPoint for Microsoft 365, PowerPoint 2019, PowerPoint 2016, PowerPoint 2013, PowerPoint 2010, Microsoft Office PowerPoint 2007, Microsoft Office PowerPoint 2003
You can change the export resolution in Microsoft PowerPoint by saving a slide in a picture format. There are two steps to this process: Use the system registry to change the default resolution setting for exported slides, and then save the slide as a picture at the new resolution.
Step 1: Change the export resolution setting
Follow the steps in this section carefully. Serious problems might occur if you modify the registry incorrectly. Before you modify it, back up the registry for restoration in case problems occur.
By default, the export resolution of a PowerPoint slide that you want to save as a picture is 96 dots per inch (dpi). To change the export resolution, follow these steps:
Exit all Windows-based programs.
Right-click Start , and then select Run . (In Windows 7, select Start , and then select Run .)
In the Open box, type regedit , and then select OK .
Locate one of the following registry subkeys, depending on the version of PowerPoint that you're using:
PowerPoint 2016, 2019, PowerPoint for Microsoft 365
HKEY_CURRENT_USER\Software\Microsoft\Office\16.0\PowerPoint\Options
PowerPoint 2013
HKEY_CURRENT_USER\Software\Microsoft\Office\15.0\PowerPoint\Options
PowerPoint 2010
HKEY_CURRENT_USER\Software\Microsoft\Office\14.0\PowerPoint\Options
PowerPoint 2007
HKEY_CURRENT_USER\Software\Microsoft\Office\12.0\PowerPoint\Options
PowerPoint 2003
HKEY_CURRENT_USER\Software\Microsoft\Office\11.0\PowerPoint\Options
Select the Options subkey, point to New on the Edit menu, and then select DWORD (32-bit) Value .
Enter ExportBitmapResolution , and then press Enter.
Make sure that ExportBitmapResolution is selected, and then select Modify on the Edit menu.
In the Edit DWORD Value dialog box, select Decimal .
In the Value data box, specify a resolution of 300 . Or, use the parameters from the following table.
| Decimal value | Full-screen pixels (horizontal × vertical) | Widescreen pixels (horizontal × vertical) | Dots per inch (horizontal and vertical) |
|---|---|---|---|
| 50 | 500 × 375 | 667 × 375 | 50 dpi |
| 96 (default) | 960 × 720 | 1280 × 720 | 96 dpi |
| 100 | 1000 × 750 | 1333 × 750 | 100 dpi |
| 150 | 1500 × 1125 | 2000 × 1125 | 150 dpi |
| 200 | 2000 × 1500 | 2667 × 1500 | 200 dpi |
| 250 | 2500 × 1875 | 3333 × 1875 | 250 dpi |
| 300 | 3000 × 2250 | 4000 × 2250 | 300 dpi |
See the Limitations section for more information when you set this value.
Select OK .
On the File menu, select Exit to exit Registry Editor.
Step 2: Export the slide as a picture
In PowerPoint, open your slide presentation, and then open the slide that you want to export.
On the File menu, select Save As .
In the Save as type box, select one of the following picture formats:
- GIF Graphics Interchange Format (.gif)
- JPEG File Interchange Format (*.jpg)
- PNG Portable Network Graphics Format (*.png)
- TIFF Tag Image File Format (*.tif)
- Device Independent Bitmap (*.bmp)
- Windows Metafile (*.wmf)
- Enhanced Windows Metafile (*.emf)
You may want to change the picture's save location in the Save in box. You may also want to change the name of the picture in the File name box.
Select Save . You will be prompted by the following dialog box:

Select Current Slide Only . The slide is saved in the new format and resolution in the location that you specified in the Save in box.
To verify that the slide is saved in the resolution that you specified, right-click the picture, and then select Properties .
Limitations
When you set the ExportBitmapResolution registry value in PowerPoint, there's a maximum DPI limitation to consider for some versions of PowerPoint.
Maximum DPI is dependent upon the slide size. The formula is as follows: maxdpi = (sqrt(100,000,000 / (slide with * slide height)), where slide width and height are in inches.
For example, for a standard 13.3" x 7.5" slide, the equation would be: sqrt(100,000,000 / (13.333 * 7.5) ) = 1000.
PowerPoint 2019, 2016, 2013, and 365
There is no fixed DPI limit. Slide export is limited only by how large the resulting bitmap gets. PowerPoint can support bitmaps up to 100,000,000 pixels (width x height). For standard widescreen slides (13.3" x 7.5"), this means a maximum DPI of 1,000. For the older style 10" x 7.5" slides, this typically means a maximum DPI of 1,155.
PowerPoint 2010 and older
The maximum resolution that PowerPoint can export is 3,072 pixels, based on the longest edge of the slide. For example, the standard 10" × 7.5" slide has a maximum effective DPI value of 307. The 3,070-pixel result (10 × 307 = 3070) falls within the 3,072-pixel limit. However, any DPI setting that's greater than 307 for a standard slide reverts to the limit of 3,072.
| Decimal value | Pixels (horizontal × vertical) | Dots per inch (horizontal and vertical) |
|---|---|---|
| 307 | 3072 × 2304 | 307 dpi |
The 3,072-pixel limit also applies to saving the slide programmatically.
For example, the following code programmatically saves a picture that has the dimensions of 3072 × 2304 pixels:
More information
For information about changing the size of your slides, see Change the size of your slides .
Was this page helpful?
Additional resources
- Powerpoint Tutorials
How to Convert Presentations from PowerPoint to Google Slides

Have you ever found yourself needing to convert a PowerPoint presentation to Google Slides? It’s easier than you think! Many professionals and educators prefer Google Slides for its ease of sharing and real-time collaboration features. In this blog, we’ll walk you through the process step-by-step. Plus, we’ll share some handy tips and tricks to make your transition smooth.
Step-by-Step Guide to Convert PowerPoint to Google Slides
Step 1: upload your powerpoint file to google drive.
To start, upload your PowerPoint file to Google Drive. Here’s how:
- Open Google Drive.
- Then, click the “New” button available at the top left corner.
- Select “File upload” from the dropdown menu.
- Choose the PowerPoint file (.pptx) you want to convert and upload it.
Step 2: Open the PowerPoint File with Google Slides
Once your file is uploaded to Google Drive, follow these steps:
- Locate the uploaded PowerPoint file in your Google Drive.
- Right-click on the file.
- Then, select “Google Slides” by hovering over the “Open with” option.
Google Slides will automatically convert your PowerPoint file to a Google Slides presentation. This conversion usually retains most of the formatting and content, but it’s always a good idea to review the presentation to ensure everything looks correct.
Step 3: Review and Edit Your Presentation
After opening your PowerPoint file in Google Slides, take some time to review and edit your presentation. Here are some things to check:
- Formatting: Ensure all fonts, colors, and layouts have been preserved correctly.
- Images and Media: Check that all images, videos, and other media elements are displayed properly.
- Animations and Transitions: Some animations and transitions may not convert perfectly. Adjust them as needed.
Step 4: Save and Share Your Google Slides Presentation
Once you’ve reviewed and edited your presentation, it’s time to save and share it. Since your file is already in Google Drive, it’s easy to share with others:
- Click the “Share” button located in the top right corner.
- Enter the email addresses of the recipients you want to share the presentation with.
- Set their access level to Viewer, Commenter, or Editor, depending on their role.
- Click “Send.”
Additional Tips and Tricks: Use Free Presentation Templates
To make your presentation stand out, consider using free presentation templates available online. These templates can save you time and provide a professional look for your slides. SlideEgg offers a variety of free templates that are easy to customize.
Why Convert PowerPoint to Google Slides?
It’s important to understand why you might want to convert your PowerPoint presentations to Google Slides. Here are a few reasons:
- Collaborate in Real-Time: Google Slides supports real-time collaboration, allowing multiple users to work on the same presentation together.
- Cloud Storage: Your presentations are stored in Google Drive, making them accessible from anywhere.
- Automatic Saving: Google Slides automatically saves your work, reducing the risk of data loss.
- Integration with Google Apps: Seamlessly integrate with other Google services like Google Docs, Sheets, and Forms.
When to Choose a Different Path
While Google Slides is fantastic, it might not be the best fit for every presentation. If you’ve got a super complex presentation with lots of animations and fancy multimedia stuff, converting it might be tricky. In this case, consider saving your PowerPoint as a PDF. Don’t miss our guide on “How to Save Your PowerPoint Presentation as a PDF.”
And remember, practice makes perfect. The more you use Google Slides, the better you’ll get at creating awesome presentations. Want to learn more about presentation tips and tricks ? Head over to our page on presentation hacks.
Ready to conquer Keynote next? We’ve got you covered with our guide on “ How to Convert PowerPoint to Keynote: Stepwise Instructions “.
So, what are you waiting for? Give it a try and see how much easier it is to collaborate and share your work. Happy presenting!
Spread Love
Related blogs.

Arockia Mary Amutha
Arockia Mary Amutha is a seasoned senior content writer at SlideEgg, bringing over four years of dedicated experience to the field. Her expertise in presentation tools like PowerPoint, Google Slides, and Canva shines through in her clear, concise, and professional writing style. With a passion for crafting engaging and insightful content, she specializes in creating detailed how-to guides, tutorials, and tips on presentation design that resonate with and empower readers.
Recent Blogs

What is a PPT and How to Make Impactful Presentations with PowerPoint?
PowerPoint Presentations, commonly known as PPTs, have become an essential tool in various fields such as business, education, and even...

How to Create a Jeopardy Game in Google Slides: A Step-by-Step Guide
Jeopardy is a popular quiz game that challenges participants with answers to which they must respond with the correct questions....

Why Roadmap PowerPoint Template Best For Project Management?
Project management, at this time, will be like walking in a maze, where one becomes lost in the middle of...
SIGNUP FOR NEWSLETTER
How-To Geek
How to view and restore old versions of powerpoint files.

Your changes have been saved
Email is sent
Email has already been sent
Please verify your email address.
You’ve reached your account maximum for followed topics.
Quick Links
Requirements, how to see older versions of your powerpoint presentations.
Microsoft PowerPoint lets you view and switch to older versions of your presentations. If you accidentally deleted something important and it got overwritten in PowerPoint, here's how to restore it.
Before you get started, make sure that you have a Microsoft 365 subscription. The ability to view and restore previous versions of PowerPoint presentations can be accessed only through a Microsoft 365 subscription.
Fortunately, this subscription also gives you access to all other Office apps, along with 1TB of OneDrive storage. You can put the cloud storage to good use by automatically saving your presentations to OneDrive.
Also, enabling auto-save on PowerPoint is required for accessing version history. To do so, you'll need to create a new PowerPoint presentation and then turn the "AutoSave" switch on in the document's title bar. When PowerPoint shows you a confirmation pop-up, select "OneDrive."
Related: How to Automatically Save PowerPoint Presentations to OneDrive
Now that you've sorted out the basics, open PowerPoint and load any PowerPoint presentation. There are two ways to check version history here, and we'll show you both.
First, click "File" in the menu bar.

In the left pane, click "Info."

Click "Version History" on the right.

Alternately, you can click the file name at the top of the document that you've opened and select "Version History" from the pop-up menu.

No matter which method you choose, a new pane labeled "Version History" will open up on the right-hand side of your presentation in PowerPoint.
Microsoft PowerPoint sorts older versions of the document by date and time here. To load a previous version of the presentation, click the "Open version" button below the version that you need to go back to.

This will open a read-only file that shows an older version of your PowerPoint presentation. Right below the ribbon menu, you'll see a button labeled "Restore." Click it to go back to the previous version.

Note that this will overwrite your PowerPoint presentation. You can always repeat the same steps to visit the modified version of your document in case you want to copy any additional changes to the older version.
If you use Microsoft 365 apps frequently, you might also be interested in knowing how to restore previous versions of Excel workbooks or Word documents .
Related: How to View and Restore Previous Versions of a Word Document
- Microsoft Office

Save a presentation as a movie file or MP4
To run your presentation on computers that don't have PowerPoint installed, you can save your presentation as a video file.
MOV files can be played in any application that supports QuickTime movies. The MP4 format is an international standard, so it's supported more broadly, especially on hardware devices.
Save in a video format
Select File > Export .

(Don't use Save As , because it doesn't offer video options.)
Open the File Format list and select the video format that you want ( MP4 or MOV ).

If the MP4 and MOV options aren't in your version of PowerPoint, see Requirements below for more information.
Select the video Quality you want: Presentation Quality , Internet Quality , or Low Quality . The higher the video quality, the larger the file size.
If you have recorded timings and want to use them in the video you create from your presentation, make sure the box next to Use Recorded Timings and Narrations is checked. You can also choose to set the amount of time the video will spend on each slide if you don't have a set timing.
When you've made all your selections, choose Export .
Note: When you export your presentation as a video, any narrated audio that was recorded in Slide Show will play, but other embedded media files won't play.
After you've saved your presentation as a video, you can share it just as you would any other video, by using applications or devices that can open and play videos.
Requirements for saving in a video format
|
| PowerPoint for Microsoft 365 for Mac 15.23 and later. Beginning in version 16.19, recorded narration is included in exported video files. : Microsoft 365 Subscription |
| PowerPoint 2019 for Mac 16.19 and later. |
Limitations on presentations saved as movies
When a presentation plays as a movie, each slide appears for a uniform amount of time unless you set individual timings, or record the slide show to establish timing for the entire presentation. For more information about setting slide timings, see Rehearse and set slide timings .
Several transitions play differently in a movie than they do in a presentation. Animation effects don't play in a movie at all.
Animate text and objects
Add, edit, or remove transitions
Record a slide show
Rehearse and set slide timings

Need more help?
Want more options.
Explore subscription benefits, browse training courses, learn how to secure your device, and more.

Microsoft 365 subscription benefits

Microsoft 365 training

Microsoft security

Accessibility center
Communities help you ask and answer questions, give feedback, and hear from experts with rich knowledge.

Ask the Microsoft Community

Microsoft Tech Community

Windows Insiders
Microsoft 365 Insiders
Was this information helpful?
Thank you for your feedback.
IMAGES
VIDEO
COMMENTS
Save your presentation in an earlier version of PowerPoint. In newer versions, you can save files to an earlier version of PowerPoint by selecting the version from the Save as type list in the Save As box. For example, you can save your PowerPoint presentation in the newest PowerPoint Presentation format (.pptx), or as a PowerPoint 97-2003 Presentation (.ppt).
Open the Presentation > Navigate to File > Save As > Browse - which will open the below window. Make sure you are in the right path to save the workbook > Choose PowerPoint Presentation (*.pptx) under Save as type > Select Save. Close and re-open the saved presentation (pptx) for the changes to effect. You will find the converted file in the ...
Steps to Save as PPTM. Open your presentation file that contains macros. Click on "File" in the top left corner. Select "Save As" from the menu. In the dialog box, choose the file format option. Select "PowerPoint Macro-Enabled Presentation (*.pptm)" from the dropdown list. Click "Save" to complete the process of saving as PPTM.
To save in .pptx format instead, follow these steps: With your presentation open, click File, Save as. Name your presentation, and then click the Save as type dropdown menu underneath. Select PowerPoint Presentation. It is usually the first option in the list, and may include the file extension, PowerPoint Presentation (*.pptx).
However, if you convert those presentations to the latest PowerPoint (.pptx) file format, you might get improved performance and additional features. ... After conversion, you are prompted to save the converted presentation: If the original presentation is a PowerPoint 97-2003 (.ppt) presentation, that original is preserved alongside the new file.
To save the PowerPoint presentation as a PDF file, follow the 4 easy steps. Step-1: Click on the "File" Tab. First, click on the " File " tab in PowerPoint to open the back stage view of PowerPoint. Step 2 - Click on the "Save As" option. In the menu ribbon located at the top of the screen, click on the "File" tab.
To save your presentation as a PPTX file: Open your PowerPoint presentation. Click on the "File" tab in the top-left corner of the screen. Click on "Save As." Select "PowerPoint Presentation" (.pptx) from the file type dropdown menu. Choose a location to save your file and click "Save." Method 2: Remove Macros Using The ...
Click the "Choose Files" button to select your PPT files. Click the "Convert to PPTX" button to start the conversion. When the status change to "Done" click the "Download PPTX" button.
Choose the Save or Save As option. Download Article. Click Save to save to the current file, or Save as to create a new file. If you've already saved the file at some point, you'll have the option to click Save, which simply saves your changes to that file. Otherwise, choose Save as to create a brand new file. 4.
To save a PowerPoint presentation as a read-only copy, follow the easy steps mentioned below -. Step-1: Click on the "File" Tab. In the menu ribbon located at the top of the screen, click on the "File" tab. In the sidebar located on the left side of the "File" menu, click on the "Info" option. Step-2: Click on the "Alway ...
In this video, you'll learn more about saving and sharing in PowerPoint 2019 and Office 365. Visit https://edu.gcfglobal.org/en/powerpoint/saving-presentatio...
PowerPoint can convert a PPSX file to a PPTX one. Here's how. First, open "PowerPoint" and choose File > Open to find the file you want to edit. Go to File > Save As to save the file. From the drop-down menu at the top right, choose "PowerPoint Presentation (*.pptx)" to save the file as an editable file you can share with colleagues.
Click the File tab to access Backstage view. Click Export, then choose the desired option. In our example, we'll select Change File Type. Select a file type, then click Save As. The Save As dialog box will appear. Select the location where you want to export the presentation, type a file name, then click Save.
Converting the file is as simple as pressing a button and choosing the file type. Go ahead and open your PPT file, head over to the "File" tab, and then click "Convert.". Windows File Explorer will appear. You'll notice the Save As type is set as "PowerPoint Presentation." This is the PPTX file type. Click "Save.".
Under Save presentations, in the Save files in this format list, choose the file format you want to use by default. See Also Use PowerPoint to open or save a presentation in the OpenDocument Presentation (.odp) format
1. Open the email that contains the PowerPoint presentation. 2. Click on the Attachment icon to download the file. 3. Once the file is downloaded, click on it to open it with PowerPoint. 4. To save a copy of the presentation, click on the File tab. 5.
When you save a simple PowerPoint presentation, you give it a name, and PowerPoint adds the file extension .pptx. Your Sales Presentation file becomes Sales Presentation.pptx. If your PowerPoint presentation contains one or more macros, PowerPoint will automatically detect their presence and save your presentation as a .pptm file. You can force ...
Open the File in PowerPoint. Open PowerPoint. Select File > Open and locate the show file with the .ppsx extension on your computer. Edit the presentation as usual in PowerPoint. Go to File. In the Save As Type box, choose PowerPoint Presentation (.*pptx) to save the file as a regular working presentation file.
A file with the .pptx file extension is a Microsoft PowerPoint Open XML (PPTX) file created by Microsoft PowerPoint. You can also open this type of file with other presentation apps, like OpenOffice Impress, Google Slides, or Apple Keynote. They are stored as a compressed ZIP file, which use a bunch of other files with formatted text, images ...
File > Export helps you change your presentation into a different format, such as PDF, video, or Word-based handouts. All these options are covered below. If you simply want to "export" a file (in its current .pptx format) to a different storage system, such as a flash drive, plug that flash drive into your computer and use File > Save As (or ...
In PowerPoint, open your slide presentation, and then open the slide that you want to export. On the File menu, select Save As. In the Save as type box, select one of the following picture formats: GIF Graphics Interchange Format (.gif) JPEG File Interchange Format (*.jpg)
Choose the PowerPoint file (.pptx) you want to convert and upload it. Step 2: Open the PowerPoint File with Google Slides. Once your file is uploaded to Google Drive, follow these steps: Locate the uploaded PowerPoint file in your Google Drive. Right-click on the file. Then, select "Google Slides" by hovering over the "Open with" option.
First, click "File" in the menu bar. In the left pane, click "Info." Click "Version History" on the right. Alternately, you can click the file name at the top of the document that you've opened and select "Version History" from the pop-up menu. No matter which method you choose, a new pane labeled "Version History" will open up on the right ...
Save in a video format. Select File > Export. (Don't use Save As, because it doesn't offer video options.) Open the File Format list and select the video format that you want (MP4 or MOV). If the MP4 and MOV options aren't in your version of PowerPoint, see Requirements below for more information. Select the video Quality you want: Presentation ...