
How to Create a Talking Presentation in Canva using 'Present and Record' Feature
Cannot present in a live session? No worries, pre-record your presentations with Canva's Talking Presentations.

Canva is a great tool for creating presentations, professional as well as personal. With thousands of templates and a rich content library for images, videos, and graphics, the presentations you can create with Canva are sure to stand out.
But that’s not all Canva is great for. Have you ever seen the words ‘Talking Presentation’ on Canva’s Home Page and wondered what they are? It’s Canva’s solution to a very real problem people face all the time.
A lot of people use presentations in webinars these days, or it’s a part of their website. The point being, presentations aren’t confined to just conference rooms these days. They have far greater reach. But presenting on the internet can be daunting. Talking presentations can help with that. They’re also great for when you cannot be present in person or maybe when some other people couldn’t attend.
Now, obviously, it isn’t really a presentation that talks, as in it doesn’t have any talking elements. You’re the one doing all the talking. It is basically a recording of the presentation with your video and voice-over. Canva studio makes the task so easy that you could do it with your eyes shut (metaphorically speaking, of course).
Creating a Talking Presentation
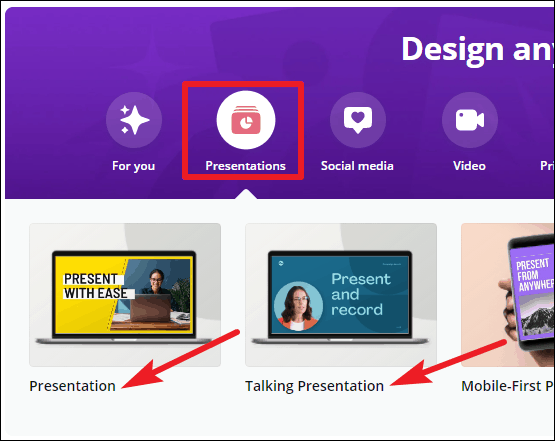
Go to canva.com and click on ‘Presentations’ to get started. It’s better to start with a template instead of a blank slate, but you can do either. Canva has a different category for ‘Talking presentations’. But it doesn’t matter whether you choose ‘Presentations’ or ‘Talking Presentations’, you can record for both types.
Create your presentation as you normally do. You can also go to Canva and open any of your existing presentations to convert them into a talking presentation.
Once your presentation is complete, go to the toolbar at the top of the editor.
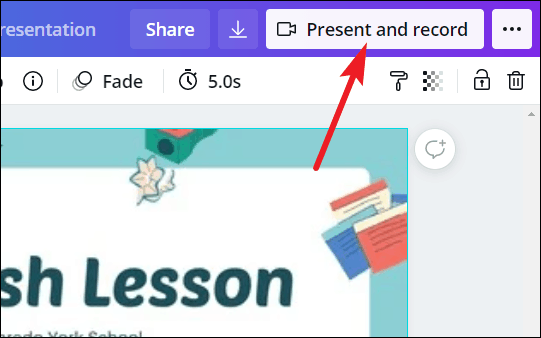
Now, if you chose ‘Talking Presentations’ while creating the presentation, the option for ‘Present and Record’ will appear on the toolbar itself.
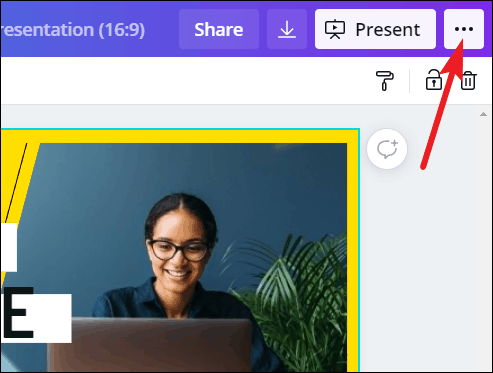
Otherwise, click the ‘three-dot’ icon next to the ‘Present’ button.
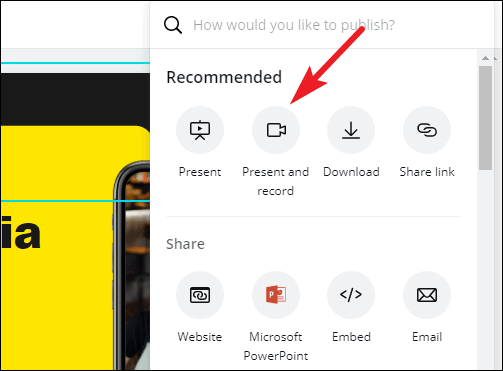
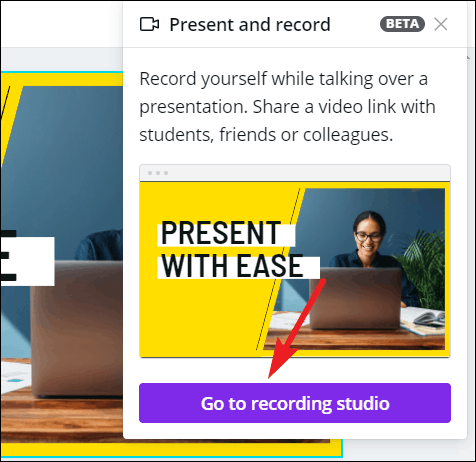
Then, select ‘Present and Record’ from the menu that appears.
Click the ‘Go to Recording Studio’ button.
Recording the Presentation
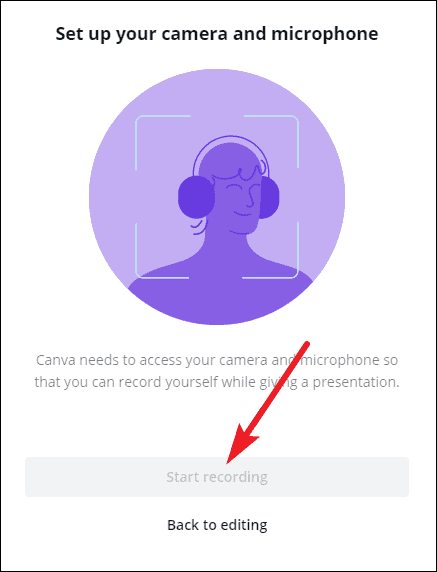
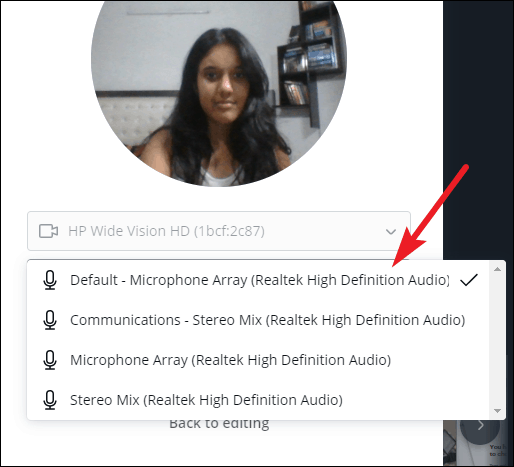
Your browser will display a pop-up that Canva wants access to your camera and microphone. Click ‘Allow’.

Once Canva has access to both, the ‘Start Recording’ button will become clickable. Canva needs access to both your camera and microphone for the Present and Record feature. If for some reason, access to either of these being blocked, you won’t be able to use the functionality.
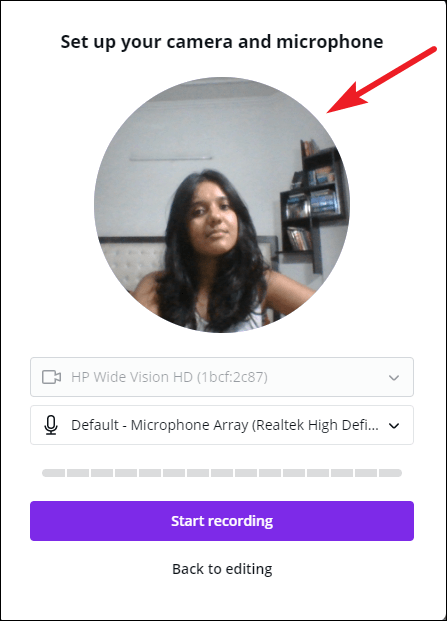
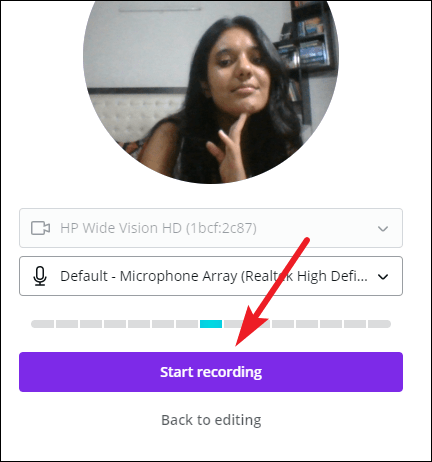
Before proceeding, check that your camera and microphone are working. You can see the preview of your video in the pop-up. You can also adjust your camera based on this preview, as this bubble represents how your video will appear while recording the presentation.
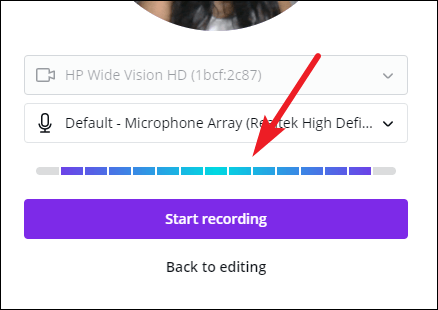
To check your microphone, say something. The bar beneath the microphone option will turn blue from gray if your microphone is working properly and Canva detects sound.
You can also change which camera or microphone to use (in case you have multiple) from the drop-down menus.
Once everything is spick and span, click the ‘Start Recording’ button to begin.
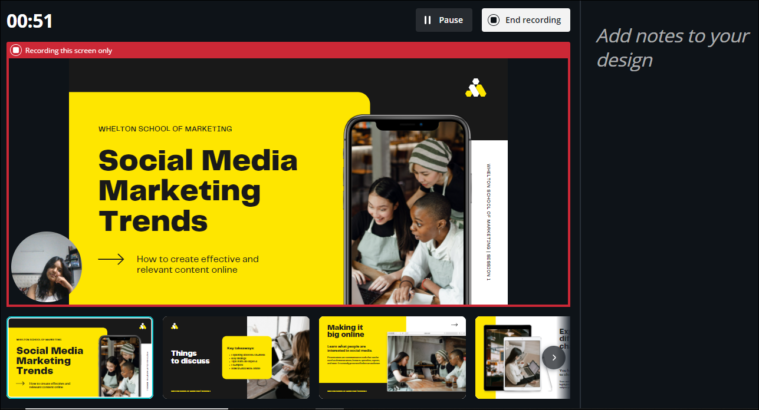
A 3-second timer will display on your screen; ready yourself for the recording during this time.

The recording screen will show all the slides in thumbnails and your notes in the right panel. But in the actual recording, only the presentation part (with your video in the lower-left corner) will be visible, which is highlighted in red during the recording session.
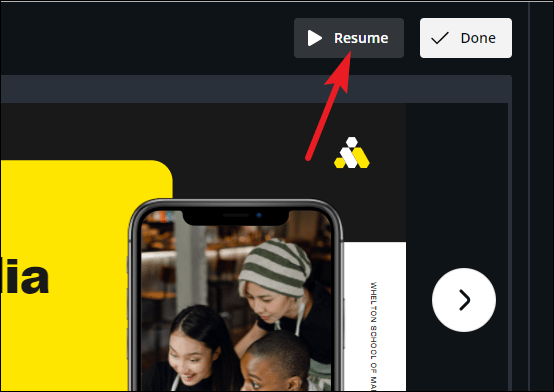
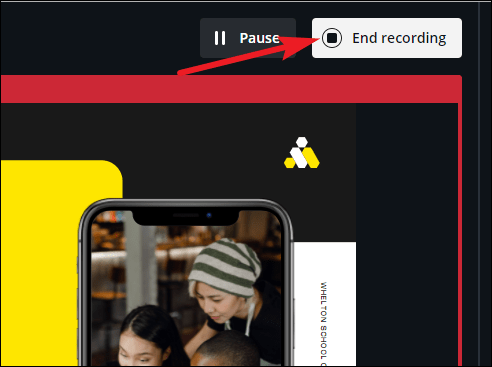
You can pause the recording at any time for a breather. Click the ‘Pause’ button to pause the recording.
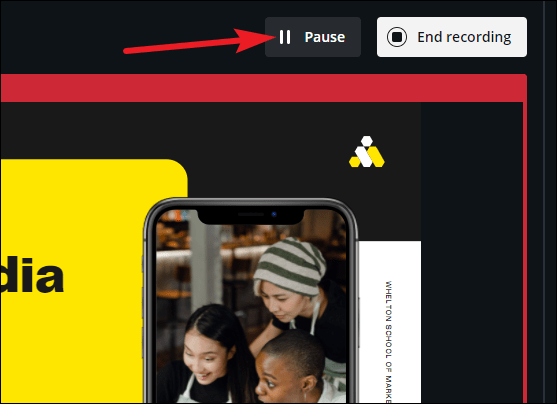
It’ll become the ‘Resume’ button when the recording is paused, click it restart the recording.
When you’re done, click the ‘End Recording’ button next to pause.
Sharing the Presentation
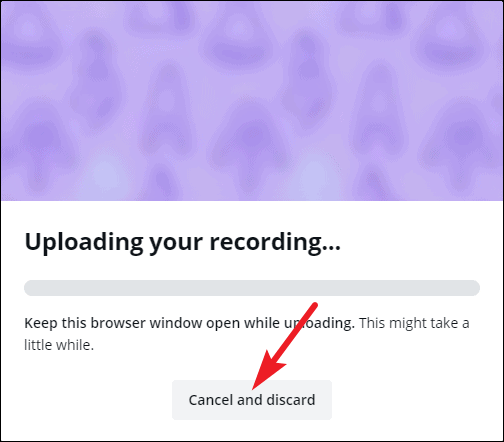
It’ll take a few seconds for your recording to process and upload. You can discard the recording at this stage if you weren’t happy with it and begin again.
Once it uploads, the link for your recording will be ready. You can share it with others directly. Or you can download it on your computer. If you want to watch the recording before sharing it with others, you can either go to the recording link yourself or download it and then watch it.
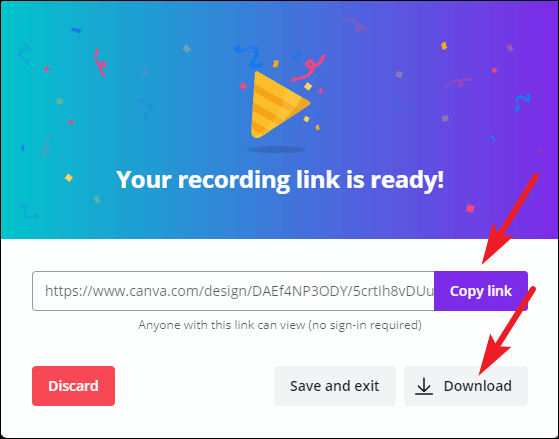
You can also just ‘Save and exit’ instead of choosing from either of the above options. Or click ‘Discard’ if you want to record again.
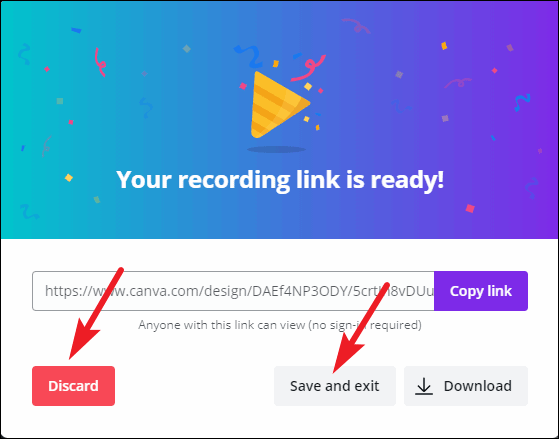
If you click ‘Save and exit’, you can access the recording again at any time. Open the presentation, and click the ‘Present and Record’ button.
The Present and Record menu will open, and it will have the link to the recording as well the options to download and delete it. If you want to re-record, you’ll first have to delete this recording.
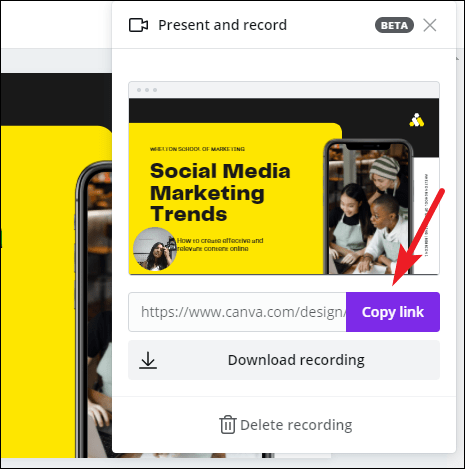
Anyone can go to the link and watch the presentation without any requirement for a sign-in. Or you can download it and upload it to your website, or use it in your webinar. The options are boundless and it’s up to you.
If you want people to no longer be able to watch the presentation recording, simply delete it from the ‘Present and Record’ menu, and the link will no longer show the recording.
Canva is the perfect tool for your presentations. Not only can you create amazing presentations, but it also provides tools for what comes after. Like presenting it in circumstances when you cannot do it live. Recording the presentation adds that personal touch that simply sending it to people cannot capture.
Claude Sonnet 3.5 vs. ChatGPT-4o: Which is better?

5 best AI Web Browsers in 2024

7 best AI search engines in 2024
Get all the latest posts delivered straight to your inbox., member discussion.

How to generate AI videos from text with Pika Labs

How to use ElevenLabs Reader app to listen to any text

How to fix the 'Insecure Download Blocked' warning on Chrome

How to fix YouTube black screen on Android

How to setup and use Passkey Logins for X on Android
How Do You Record and Present in Canva?

Recording and presenting in Canva is a breeze with its user-friendly interface and powerful features. Whether you are creating a tutorial, a presentation, or a video, Canva provides all the tools you need to make your content shine.
Recording in Canva
If you want to record your screen or yourself while presenting, Canva has got you covered. Here's how:
Step 1: Open the Recording Panel
To start recording, click on the "Record" button located at the top right corner of your Canva workspace. This will open the recording panel on the left side.
Step 2: Choose Your Recording Mode
Canva offers two recording modes - Screen and Camera. In the screen mode, you can record your entire screen or select a specific window or tab. In the camera mode, you can record yourself using your webcam.
Step 3: Configure Recording Settings
Before hitting that record button, make sure to configure your recording settings. You can choose to include audio from your microphone, system audio, or both. You can also adjust the video quality and frame rate according to your needs.
Step 4: Start Recording
Once you are ready, click on the "Record" button to start capturing your screen or yourself using the webcam. While recording, you can use various interactive elements provided by Canva like stickers, shapes, and text to enhance your presentation.
Step 5: Stop Recording
To stop recording, simply click on the "Stop" button in the recording panel or press the designated hotkey (by default it's F9). Canva will automatically save your recording in its media library.
Presenting in Canva
Now that you have recorded your content, it's time to present it. Canva offers a seamless presentation mode that ensures your audience stays engaged throughout.
Step 1: Enter Presentation Mode
To enter presentation mode, click on the "Present" button located at the top right corner of your Canva workspace. Your design will now be displayed in full-screen mode.
Step 2: Navigate Through Slides
Use the left and right arrow keys or swipe gestures (if you are using a touchscreen device) to navigate through your slides. You can also use the spacebar or enter key to move forward and the backspace or shift key to go back.
Step 3: Add Interactivity
To make your presentation more interactive, Canva allows you to add clickable links, buttons, and transitions between slides. This helps in creating a smooth and engaging flow for your audience.
Step 4: Share Your Presentation
Once you are done presenting, you can easily share your Canva presentation with others. Simply click on the "Share" button and choose the desired sharing option like generating a link or embedding it on a website.
The Power of Canva for Recording and Presenting
Canva's recording and presenting features empower users to create visually appealing and captivating content. With its intuitive interface and extensive customization options, you can effortlessly record tutorials, presentations, demos, and more. So why wait? Start exploring Canva today!

About the author:

Related posts
How Do I Record a Presentation in Canva? Recording a presentation can be a great way to share your ideas and engage your audience. Canva, the popular design tool, not only allows you to... October 4, 2023 canva -->
How Do I Record My Screen in Canva? Recording your screen can be a helpful way to create tutorials, demos, or showcase your work. Canva, the popular graphic design platform, offers a... October 2, 2023 canva -->
How Do You Make Word Art in Canva? Canva is a versatile graphic design tool that allows you to create stunning designs for various purposes. One of the features that Canva offers is... October 5, 2023 canva -->
How Do You Blend Pictures in Canva? Have you ever wondered how to blend pictures in Canva? Well, you're in luck because today we're going to dive into the world of image blending and... October 4, 2023 canva -->
How Do You Animate a Presentation in Canva? Animating a presentation can add a dynamic touch to your content and make it more engaging for your audience. Canva, a popular graphic design... October 4, 2023 canva -->
How Do You Select and Group Elements in Canva? Are you looking to create stunning designs using Canva? One of the key skills you need to master is selecting and grouping elements. In this... October 2, 2023 canva -->
How Do I Record Video in Canva? Are you looking to create engaging video content using Canva? Recording videos in Canva is a fantastic way to add a personal touch to your designs... October 4, 2023 canva -->
How Do You Freehand Draw in Canva? Are you looking to add a personal touch to your designs in Canva? One way to do that is by incorporating freehand drawings. Freehand drawing... October 4, 2023 canva -->
How Do You Round Corners in Canva? Rounding corners in Canva is a simple yet effective way to add a touch of style and professionalism to your designs. Whether you're creating... October 2, 2023 canva -->
How Do You Get Animated Elements in Canva? Canva is a versatile graphic design tool that allows you to create stunning visuals for various purposes. One of the great features of Canva is the... October 4, 2023 canva -->
You haven't yet saved any bookmarks. To bookmark a post, just click .
How to Record Talking Presentation in Canva
Home » Blog » How to Record Talking Presentation in Canva

Founder of CanvaTemplates.com & Professional Graphic Designer
Jake Tucker
Canva Templates is reader supported. When you buy through links on our site, we may earn an affiliate commission. Learn more
Canva is a popular graphic design tool that allows users to create presentations, social media graphics, flyers, and more. One of the latest features added to Canva is the ability to record a talking presentation directly within the platform. This feature is a game-changer for those who want to create engaging presentations without the need for additional software or equipment.
Recording a talking presentation in Canva is a simple process that can be completed in just a few steps. First, users need to select the presentation they want to record and click on the “Present” button. From there, they can choose to enable the “Talking Presentation” feature and then click on “Present and Record.” Once they are in the recording studio, they can set up their camera and microphone, start recording, and go through their presentation as they would with an audience.
Understanding Canva’s Talking Presentation Feature
What is canva’s talking presentation.
Canva’s Talking Presentation is a feature that allows you to record your voice while presenting your design. With this feature, you can create a video presentation with your voiceover, making it easier for your audience to understand your message. Canva’s Talking Presentation is an excellent tool for educators, business professionals, and anyone who wants to create engaging presentations.
Why Use Canva’s Talking Presentation?
Canva’s Talking Presentation is a powerful tool that can help you create engaging and interactive presentations. Here are some reasons why you should use Canva’s Talking Presentation:
- Easy to use : Canva’s Talking Presentation feature is easy to use, even if you’re not tech-savvy. You can record your voiceover directly in the Canva app, and the platform will guide you through the process.
- Engaging : Canva’s Talking Presentation feature can make your presentation more engaging and interactive. With your voiceover, you can explain your message more clearly, and your audience can better understand your ideas.
- Time-saving : Canva’s Talking Presentation feature can save you time. Instead of creating a separate video presentation, you can record your voiceover directly in Canva. This feature can help you create presentations more efficiently, saving you time and energy.
Canva’s Talking Presentation feature is an excellent tool for anyone who wants to create engaging and interactive presentations. With this feature, you can create a video presentation with your voiceover, making it easier for your audience to understand your message.
Preparing to Record a Talking Presentation in Canva
Before you start recording a talking presentation in Canva, there are a few things you need to do to ensure a smooth recording process. In this section, we will discuss how to create a presentation in Canva, set up your microphone and camera, and add audio and visual elements to your presentation.
Creating a Presentation in Canva
To create a presentation in Canva, you need to have a Canva account. If you don’t have one yet, you can sign up for a free account on the Canva website. Once you have an account, follow these steps to create a presentation:
- Log in to your Canva account and click on the “Create a design” button.
- Select the “Presentation” option from the list of design types.
- Choose a template or start from scratch.
- Customize your presentation by adding text, images, and other design elements.
Setting Up Your Microphone and Camera
To record a talking presentation in Canva, you need to have a microphone and camera set up on your computer. Here’s how to set up your microphone and camera:
- Open your computer’s settings and go to the “Audio” or “Sound” section.
- Make sure your microphone is selected as the default recording device.
- Open your computer’s camera app and make sure your camera is working properly.
Adding Audio and Visual Elements
To make your talking presentation more engaging, you can add audio and visual elements to your presentation. Here’s how to add audio and visual elements in Canva:
- Click on the “Uploads” tab in the left-hand sidebar and select “Audio” or “Video” to upload your audio or video file.
- Drag and drop your audio or video file onto the slide where you want it to appear.
- Adjust the size and position of your audio or video file as needed.
In conclusion, preparing to record a talking presentation in Canva involves creating a presentation, setting up your microphone and camera, and adding audio and visual elements to your presentation. By following these steps, you can create a professional-looking talking presentation that will engage your audience.
Recording Your Talking Presentation in Canva
Creating a talking presentation in Canva is a great way to add a personal touch to your presentation. Here’s how you can record your talking presentation in Canva.
Starting the Recording Process
To start recording your presentation, open your Canva design and click on the “Present” button at the top right corner of the screen. If you have already created a talking presentation, you will see the “Present and Record” option. Click on it to start the recording process.
Recording Your Presentation
Once you click on the “Present and Record” option, you will be taken to the recording studio. Here, you can set up your camera and microphone. Before starting the recording, make sure your camera and microphone are working properly. Click on the “Start Recording” button to begin the recording process.
Pausing and Resuming Your Recording
If you need to take a break during the recording process, you can pause the recording by clicking on the “Pause” button. When you are ready to resume recording, click on the “Resume” button. You can pause and resume the recording as many times as you need to until you are satisfied with your presentation.
Stopping and Saving Your Recording
When you have finished your presentation, click on the “End Recording” button to stop the recording process. Canva will then process your recording and save it to your account. You can access your recorded presentation from the “All Your Designs” section of your Canva account.
In conclusion, recording a talking presentation in Canva is a simple process that can add a personal touch to your presentation. By following the steps outlined above, you can easily create a professional-looking talking presentation that will impress your audience.
Editing Your Talking Presentation in Canva
Once you have recorded your talking presentation in Canva, you can edit it to make it more engaging and professional. Here are some ways to edit your recording:
Trimming Your Recording
If you want to remove some parts of your recording, you can easily trim it in Canva. Simply select the recording from your design, and click on the “Trim” button. You can then drag the sliders to select the portion of the recording that you want to keep, and click on the “Save” button.
Adding Music and Sound Effects
To make your talking presentation more interesting, you can add music and sound effects to it. Canva provides a library of music and sound effects that you can use for free. Simply click on the “Music” or “Sound Effects” button in the editor, and select the audio file that you want to add. You can then adjust the volume and duration of the audio file to fit your presentation.
Adjusting Audio and Video Quality
If you want to improve the quality of your recording, you can adjust the audio and video settings in Canva. Simply click on the “Settings” button in the editor, and select the “Audio” or “Video” tab. You can then adjust the volume, bitrate, and other settings to improve the quality of your recording.
In conclusion, editing your talking presentation in Canva is easy and straightforward. By trimming your recording, adding music and sound effects, and adjusting the audio and video quality, you can make your presentation more engaging and professional.
Exporting and Sharing Your Talking Presentation
Once you have completed your talking presentation in Canva, you can export and share it with others. There are several ways to do this, including saving the presentation in Canva, downloading it as a video file, and sharing it on social media.
Saving Your Presentation in Canva
To save your talking presentation in Canva, click on the “Download” button in the top right-hand corner of the screen. From here, you can choose to save your presentation as a PDF, an image, or a presentation. Select “Presentation” and choose the format you would like to save it in.
Downloading Your Presentation as a Video File
If you want to download your talking presentation as a video file, you can do so by clicking on the “Download” button and selecting “Video.” You will then be prompted to select the resolution and quality of the video. Once you have made your selections, click “Download” to save the video to your device.
Sharing Your Presentation on Social Media
Sharing your talking presentation on social media is a great way to reach a wider audience. To share your presentation, click on the “Share” button in the top right-hand corner of the screen. From here, you can choose to share your presentation on Facebook, Twitter, or LinkedIn. You can also copy the link to your presentation and share it on other social media platforms or via email.
I hope you found this guide covering how to record a talking presentation in Canva, useful! Be sure to check out our blog for more article covering the essential tips, tricks, and advice for Canva! Also, if you haven’t already tried CanvaPro, you can try it for free for 30 days !
Yes To Tech
- Oct 13, 2022
Canva Present And Record Feature: Why You Should Use Canva To Create Presentations And Videos
Wondering how to use the Canva present and record feature in the Canva video editor? In this Canva tutorial for beginners, you'll learn how to use Canva for beginners on how to edit video in Canva. So let's get right into this Canva video tutorial on Canva video editing so that you can make the most out of your Canva social media video and Canva video animation.
First off, if you don't have a Canva account yet, just click on the link in the description box below to sign up for free . To use the Canva present and record feature so that you can record powerful video presentations with talking heads, after you've logged in to your Canva account, either open up an existing Canva presentation design you want to record using the Canva video editor, or create a new Canva presentation design from scratch to then present and record.
To open up an existing document in Canva, click on 'your projects' from the left-hand side panel, on 'designs' up top, and then locate the design you want to present and record. For guidance on how to create a new Canva design from scratch, including a specific tutorial on ' How To Use Canva To Create A Presentation ', make sure to check out my Canva tutorials playlist , which is full of step-by-step Canva tutorials.
I'm going to open up this existing Canva design on how to make a talking presentation to show you how to use the Canva present and record feature. To make your life easier when using the Canva video editor, you can click on 'notes' at the bottom of the screen to access your presenter notes, and type in what you want to say for each slide.
These notes will be displayed in the presenter view, which we'll be accessing in a bit. Up top, you can see which page, or slide, you're currently on, in my case page or slide 1, and you can add a title to it if you wish. For instance, for this first slide, I can type in my notes 'how to make a talking presentation by adding a recording to your Canva presentation in 3 steps'.
If you click on another slide at the bottom, such as on slide 2, you can add notes for that specific slide without having to x out of the presenter notes and having to open them up again. Once you're done adding notes to all of your slides prior to presenting and recording, just click on 'notes' again at the bottom.
Make sure that your Canva presentation design looks the way you wish before you use the Canva present and record feature by editing any existing elements on this Canva presentation design, or by adding new ones from the options on the left-hand side panel. For an entire walkthrough of all of the available elements in Canva that you can add to your presentation, make sure to watch my video on ‘ How To Use Canva ’. I’ll leave the link to it in the description box below.
When you're ready to use the Canva present and record feature, click on the 'present and record' button on the top, right-hand side. This button displays for me since I'm using one of Canva's talking presentation templates. If you're using another Canva presentation design instead, you can access the Canva present and record feature by clicking on the three little dots on the top, right-hand side, and then on the video recorder icon, which is Canva's present and record feature.
Once you click on the present and record button, you can then click on 'go to recording studio' at the bottom to record yourself while talking over a presentation. Don't worry since the video hasn't started to record just yet.
A popup will appear asking you to set up your camera and microphone. In my case, I can either select FaceTime HD Camera or no camera, I'll select FaceTime HD Camera, and then you can see a preview of what you'll look like in your recording in the circle that appears, and for the microphone I'll select my MacBook Pro Microphone (Built-In). Once you're done setting up your camera and microphone, click on the 'start recording' button.
A 3, 2, 1 countdown will appear and then your presentation will in fact start to record using the Canva present and record feature. The only parts that are being recorded are within this red box that says 'recording this screen only'. All the other parts, including the presenter notes and upcoming slides, are not being recorded.
On the top, left-hand side, there is a timer showing you how much time has elapsed since you started recording this presentation using the Canva video editor. You can click on 'pause' to pause the recording if you need to sneeze or take a sip of water, and once you do that you'll be able to see that the recording has indeed paused since the timer will stop, and then red box will be replaced with a black box that says 'recording is paused'.
If you're done recording using the Canva present and record feature, click on 'done', or if you were indeed just taking a break, click on 'resume' to start the Canva recording once more, which will restart the timer, and show the red box with the 'recording this screen only' text. To switch to another slide in your Canva presentation, you can either click on the arrow that appears on the right-hand side of the current slide within the red box to go to the next slide, or click on the next slide or even on a slide you want to jump to from the slides at the bottom.
If you added presenter notes to your slides, those will appear on the right of the screen. Only you can see those, and they will not be recorded. Once you've finished recording your presentation in the Canva video editor using the Canva present and record feature, click on the 'end recording' button up top.
Canva will upload your recording. Keep this browser open while uploading, since it might take a little while. If for some reason you don't want to keep the Canva recording you just saved, click on 'cancel and discard' while the video uploads.
Once the Canva video has been uploaded, a popup will appear saying that your recording link is ready. From here, you can copy the link and share it with your friends, colleagues or students so that they can view your recorded Canva presentation, you can click on 'discard' on the left to delete the Canva presentation you recorded, you can click on 'save and exit' to return to your Canva editor, or you can click on 'download' to save the presentation you just recorded using the Canva present and record feature.
I'm going to click on 'save and exit' to show you how to access these settings again from the Canva editor. All you have to do is click on the 'present and record' button up top if you're using one of Canva's talking presentation templates or on the three little dots on the top, right-hand side and then on 'present and record' to then copy your presentation link, download the recording or delete the recording.
Even if you head back to your Canva homepage or close Canva, you'll be able to access your recorded Canva presentation this way. You can then use the Canva video editor, or download the recording and use iMovie, to edit this video.
For more details on how to use the Canva video editor, make sure to watch my video on ' How To Edit A Video In Canva '. For more details on how to use iMovie, make sure to watch my video on ' How To Edit Videos Fast '. I'll leave the links to both of those videos in the description box below.
If you're serious about using the Canva present and record feature, make sure to sign up for a free Canva account by clicking on the link in the description box below , check out our Canva tutorials playlist for even more Canva tips and tricks, as well as our FREE cheat sheet with brilliant tools that you should use below this video to learn more about how to save time and boost your productivity in your online business.
Leave a comment below and let me know what you'll be using the Canva video editor for. If you liked this video, make sure you give it a thumbs up and subscribe to my channel so that you can navigate the tech side of online business with ease , and stay tuned for our next video which is about Descript video editing. As you wait for my next video to go live, check out these two videos I have right here, and I'll see you in my next video.
CANVA VIDEO EDITOR: Canva Present And Record Feature. Wondering how to use the Canva present and record feature in the Canva video editor? In this Canva tutorial for beginners, you'll learn how to use Canva for beginners on how to edit video in Canva. Watch this Canva video tutorial on Canva video editing so that you can make the most out of your Canva social media video and Canva video animation. If you're looking for social media video ideas for your Canva video presentation, this Canva video maker tutorial is for you, a new canva feature.
SUBSCRIBE FOR NEW VIDEOS EVERY TUESDAY & THURSDAY: http://bit.ly/youtubeyestotech
RESOURCES MENTIONED:
○ FREE Cheat Sheet With Brilliant Tools To Run Your Online Business: https://www.yestotech.com/onlinebusinesstools
○ Try Canva For FREE: https://canva.pxf.io/jA4Q5
○ How To Use Canva: https://youtu.be/Q0M7PSfcL94
○ How To Use Canva To Create A Presentation: https://youtu.be/zQUZdpKPhJw
○ How To Edit A Video In Canva: https://youtu.be/ICko9gaWvcs
○ How To Edit Videos Fast: https://youtu.be/RUvakDustwI
○ Canva Tutorials Playlist: https://www.youtube.com/watch?v=NN54oF5-8Ec&list=PLbLPqE_rHXqt9Jf9Q4gO0dbNaGPZkLiPz
○ Read The Post: https://www.yestotech.com/post/canva-present-and-record-feature
CLICK TO TWEET: https://ctt.ac/IxHXa
RECENT VIDEOS:
○ How To Create A Table In Canva: https://youtu.be/A0P8IzerfsE
○ How To Add Shadow In Canva: https://youtu.be/I3Rtzsevonk
○ How To Remove Background In Canva: https://youtu.be/kadIBPtOKqA
○ How To Make A Logo In Canva: https://youtu.be/srUThS3MP5Y
○ How To Create Mockups In Canva: https://youtu.be/bSTvIcWJ8Hw
TOOLS & SERVICES I USE:
○ Graphic design tool (Canva Pro): https://canva.pxf.io/jA4Q5
○ DIY website builder (Wix): http://bit.ly/wixforfree
○ Landing page builder (Leadpages): https://try.leadpages.com/yestotech
○ Email provider (ConvertKit): https://convertkit.com/?lmref=7SUoRg
○ Surveys & experience management (SurveySparrow): https://surveysparrow.grsm.io/yestotech
○ Quiz, poll & giveaway maker (Interact): https://www.tryinteract.com/#oid=59709_4020
○ Web hosting (Hostinger): https://www.hostinger.com/yestotech
○ Paid products platform (Teachable): https://teachable.sjv.io/c/1134751/933427/12646
○ Pinterest pin scheduler (Tailwind): https://www.tailwindapp.com/i/yestotech
○ Visual content creator (Visme): https://partner.visme.co/?ref=MarinaLotaif
○ Social media management (Viraltag): https://viraltag.grsm.io/MarinaLotaif914
SHOP MY COURSES:
○ Canva Crash Course: https://bit.ly/yttcanvacrashcourse
○ Fill In The Blanks Website: https://bit.ly/fillintheblankswebsite
○ Jumpstart Your Sales: https://bit.ly/yttjumpstartyoursales
○ Brilliant Branding: https://bit.ly/brilliantbrandingcourse
○ Wonder Website: https://bit.ly/wonderwebsitecourse
○ Traffic Takeoff: https://bit.ly/traffictakeoffcourse
○ Webinar Sales Funnel Template: https://bit.ly/webinarsalesfunneltemplate
○ Online Business Templates Vault: https://bit.ly/onlinebiztemplates
○ ConvertKit Tech Training Tutorials: https://bit.ly/convertkittechtraining
○ Power Productivity: https://bit.ly/powerproductivitycourse
SUBSCRIBE FOR MORE VIDEOS: http://bit.ly/youtubeyestotech
MY FAVORITE RESOURCES: https://www.yestotech.com/resources
COME SAY HI!
○ Email: [email protected]
○ Website: https://www.yestotech.com
○ Facebook: https://www.facebook.com/yestotech
○ Pinterest: https://www.pinterest.com/yestotech
○ Instagram: https://www.instagram.com/yestotech
○ Twitter: https://twitter.com/MarinaLotaif
I'm Marina, the brain behind Yes To Tech. Think of me as your fairy godmother of tech, so that you can grow your online business fast without stress or overwhelm. It's my mission to help you navigate the tech side of online business with ease - even if you're not tech savvy! New videos go live every Tuesday and Thursday :)
DISCLAIMER: This video and description may contain affiliate links, which means that if you click on one of the product links, I’ll receive a small commission. This helps support the channel and allows me to continue to make videos like this. I only recommend products that I use and love. Thank you for your support!
#canva #video #graphicdesign
https://youtu.be/ZEFowgPFccw
Recent Posts
Canva Animation: How To Create Videos With Animations And Music In Canva | Canva Video Animation
Canva Video Editor: How To Edit Video In Canva (Canva Tutorial)
How To Create A Typing Effect In Canva | Canva Video Animation Tutorial
(289) 690-2407
RECORD PRESENTATIONS IN CANVA
How to record a presentation in canva, wow…so many great features.
Secondly, the ability to record inside Canva is an efficient way to create a bite size learning resource or a complete pre-recorded presentation. You can talk on camera, while sharing the presentation, which adds a layer of interest. There are also many features that you will see as we go over the recording process, in this step by step tutorial.
Other options
Thirdly, there are many possibilities on how creative you can get. Only your imagination will limit you how far you can go! We will be doing more in-depth videos in the future to showcase many of the great features that make Canva so much fun to work in. You can also check out our many Canva tutorials in our YouTube playlist. Here are some options to consider:
- You can add music, elements, animations and more when you create your presentation.
- Then when you record your presentation within Canva, you are creating a new layer of interest.
- You also have the ability to live chat, if you share your presentation during a live stream – through Canva.
- If you share your screen in a live or real time ZOOM meeting, you can also just share the presentation slides – in the different present modes or options. Check out our ZOOM tutorial about only sharing part of your screen.
Why this is fantastic
Our video shows just how fast you can create something wonderful and how easy it is to record, download, copy and share your files. Having a variety of training tools and presentations ready and available to you in Canva, also means that this is a great back-up option if you are experiencing technical difficulties. If you have to quickly switch devices when you are presenting, you could even share screen via your phone! I will create a tutorial about this in the near future!
But Currently:
- Short video clips from CANVA does work within a slide. It doesn’t look like it’s working when you record, but the playback shows the animation movement.
- When I tried a video clip that I uploaded into a slide, it did NOT work.
If you aren’t already using Canva
Here’s a link for you to learn and enjoy Canva for yourself: https://www.canva.com/affiliates/CCCPR45
Regular Quick Tips & Full Tutorials
I share quick tips and tutorials with you, saving you time, and helping you create engaging online learning experiences! Keep following us on social media for regular quick tips, our videos for weekly insights and tutorials and our blogs to access added highlights! If you have not subscribed to our YouTube channel, we invite you to do this. It just lets you know when a new video is posted. Not all videos are included in blogs. However our Blogs provide additional tips!
How to Record Presentations in Canva Tutorial:
Online Course: ‘Engaging Online Learning Events’

Click for your exclusive offer
Don’t Forget About: Our Free Quiz , about different learning preferences.
Author Patricia with Regier Educational Services, helping facilitators engage the variety of learning types in your online audience. Education includes a Master of Adult Education, a BA in Psychology, and twenty years experience developing and facilitating workplace, community and collaborative training. Online learning experience designer and facilitator. Utilizing teaching adults best practices, and innovative multi-media resources to emphasize your message. Engaging content creator, facilitator and online production partner.
Engage Your Audience
- Sign-up for Facilitator Tips & Resources email member news
- Subscribe to our YouTube channel!
- Follow on Twitter & Instagram
- Like us on Facebook
- Pin this on Pinterest
- Share on LinkedIn
- Listen as a Podcast

Complimentary 30 Minute Meeting
Affiliate Links:
LATER Referral Program: https://later.com/r/7bb9ed
Canva Affiliate Link: https://www.canva.com/affiliates/CCCPR45
PresenterMedia Affiliate Link: https://bit.ly/2YqBk7H
ZOOM Affiliate Link: http://bit.ly/2DZ3gWE
CyberLink PowerDirector: https://bit.ly/2Tn4bZz
Tubebuddy: https://www.tubebuddy.com/PatriciaRegier
SurfShark VPN: https://surfshark.club/friend/8epqkB3N?locale=en
Melon Live Streaming APP: https://melonapp.com?ref=patricia
Want More Tips & Resources?
Join our email list , and gain access to downloads, resources and tools you can use, through our secret and exclusive member web page. Get this free two-page download, packed with TIPS, when you join the email list.
To request more information about learning and development opportunities, or book Patricia as a speaker please use the contact form below or Email [email protected]
You also might be interested in

COURSE PLATFORMS – WHAT I LOOK FOR
What I look for, when comparing online course authoring tools and platforms.

MY STREAM DECK
Join me as I open my new Stream Deck. It's a customizable studio control that you can use to create more engaging online experiences.

ZOOM ACTIVITY IDEAS WITH FEATURES
Two Zoom activity ideas with new features for group icebreakers, including custom avatars and screen capture.
© 2024 Regier Education Inc. | Online Learning, Workshops & Facilitation. Designed by Ex Nihilo Designs We live and work on the traditional territory of the Haudenosaunee, Anishinaabe, Mississauga and Mississaugas of the Credit First Nation Lands.
Type and press Enter to search
Privacy Overview
- More Networks
How to Record on Canva Presentation
Canva is a popular free online design and publishing tool that allows users to create beautiful graphics, presentations, videos and more. One handy feature of Canva is the ability to record video presentations directly within the editor. This allows you to add a personal touch to your presentation by including a video of yourself explaining the content.
Step 1: Create Your Presentation
First, open Canva and start a new presentation design. You can choose from a variety of professionally designed templates or create your own custom layout from scratch.
Step 2: Set Up Your Recording Equipment
Before recording your presentation, you’ll need to set up your video and audio equipment. At minimum, you’ll need:
Position your camera properly so that you are clearly visible. Frame yourself from mid-chest up with your face taking up a reasonable portion of the screen.
Step 3: Start Your Recording Session
In Canva, click on the “Present” button near the top menu bar and select “Present & Record”. This will launch Canva’s integrated recording studio.
When ready, click the round red “Record” button to start your recording session. Your camera feed will appear in the bottom right corner so you can monitor yourself during recording.
Step 4: Deliver Your Presentation
With the recording started, shift your focus to delivering your presentation. Speak clearly and confidently as you explain each slide. Use natural hand gestures as needed to emphasize important points.
Feel free to pause and resume the recording as needed if you make a mistake or just need a short break.
Step 5: End Your Recording
After presenting the final slide, click the square “End Recording” button to finish capturing your presentation video.
Canva will now process and compile your full video, combining your webcam video with the presentation slides and any accompanying animations.
Once processing is complete, Canva will display a preview of your recorded presentation video. Review the playback to ensure proper video and sound quality.
Step 6: Export and Share Your Video
You can also directly share the link to your Canva presentation or send the exported video file via email or file transfer service.
Additional Tips for Recording Presentations in Canva
About the author, vegaslide staff, related posts, how to add timer to canva presentation, how to share a canva presentation with someone, how to rotate canva slide, how to record canva presentation without camera.
How To Record Presentation In Canva: New Feature Introduced by Canva.com
Canva Introduced an awesome feature, now you can record your presentation in Canva and share the link or share the video with your audience. Currently, This feature is in beta stage you can try it with free or pro account of Canva.
If you don’t know about Canva, Canva is a graphic design platform, used to create social media graphics, presentations, posters, documents and other visual content. It contains different types of template that user can use to create graphics quickly.
How to use presentation recording feature in Canva?
To use this feature you need an account of Canva.com. It’s free to create account on Canva.com, with free account you can create awesome graphics and with Canva pro account you can use millions of templates and photos in your design there are many other benefits of using Canva Pro.
Step 1: You need Chrome browser to use this function because right now this feature is available only for Chrome browser. If you don’t have chrome browser you can download it from here: Download Chrome
Step 2: Create a free account on Canva.com. Click Here To Create Free Account and get 30 days Free Trail (Affiliate link)
Step 3: Click on “Create a Design” button on top Right corner. Type “Presentation” in search bar. (You can choose any other design like Instagram Post or Facebook post or any other). Click on “Presentation”. Time Stamp - 00:34
Step 4: On the right panel click on “Templates” tab and select any template you want. Time Stamp — 00:52
Step 5: Now, click on three dots on top right corner and click on “Present and record”. Time Stamp — 01:08
Step 6: Click on “Present and record” option. If you are trying out this feature for the first time then it will ask you to download the software you’ve to download and install that to use this feature. Time Stamp — 01:21
Step 7: Click on “Go to recording” This will enable your camera and microphone. Click on “Start Recording” button. Your recording will start. You can go through all the slides and give presentation to your audience. At anytime you can pause or resume the recording if you need to take a break. Click on End recording to end the recording and save it. After clicking on end recording it will upload your recording. Time Stamp — 01:51
For full video tutorial you can watch the below video.
I hope this article helped you to understand how you can record and share your presentation with your audience. To read more articles like this(about designing, editing and social media) please follow me. Thanks for your love and support. Keep creating!

Written by Varun
Content Creator, Tech Expert, Social Media and Loves designing and editing. Watch videos on Editing, Designing and social media youtube.com/creatorsanchor
Text to speech
IMAGES
VIDEO
COMMENTS
This is the Canva presentation tutorial video where you can learn to create a presentation, Present, record, and download it all in Canva. This Canva present...
Here's a great feature built right into Canva! You can record yourself talking over your slides without having to use any third-party service. Design your presentation and make a video ...
However, I will show you some Canva tricks to cutting and editing your videos in this Canva presentation tutorial. You can also do a presentation voice over with the present and record tool.
Recording a presentation can be a great way to share your ideas and engage your audience. Canva, the popular design tool, not only allows you to create visually appealing presentations but also lets you record them. In this tutorial, we will explore how to record a presentation in Canva using simple steps.
Canva is a great tool for creating presentations, professional as well as personal. With thousands of templates and a rich content library for images, videos, and graphics, the presentations you can create with Canva are sure to stand out.
Canvahas integrated recording into the editor so you can record your presentations and export audio files if necessary. I'll show you how to make that happen so you can simplify your virtual presentations in the future. Without further ado, let's hop in. CanvaPresentation is an incredible way for you to design powerful and engaging presentation ...
Recording and presenting in Canva is a breeze with its user-friendly interface and powerful features. Whether you are creating a tutorial, a presentation, or a video, Canva provides all the tools you need to make your content shine.
How to record video presentations in Canva (with your face in the corner!) Gemma Bonham-Carter 6.72K subscribers 178 16K views 2 years ago
First, go to Canva and create a new design and select "Presentation". Select a template to begin designing your presentation, or create your own from scratch. Once you're done, click on Present and Record. Once you click on "Present and Record", you will see a window asking if you'd like to head to the "recording studio".
Canva is a popular graphic design tool that allows users to create presentations, social media graphics, flyers, and more. One of the latest features added to Canva is the ability to record a talking presentation directly within the platform. This feature is a game-changer for those who want to create engaging presentations without the need for additional software or equipment.
To use the Canva present and record feature so that you can record powerful video presentations with talking heads, after you've logged in to your Canva account, either open up an existing Canva presentation design you want to record using the Canva video editor, or create a new Canva presentation design from scratch to then present and record.
Secondly, the ability to record inside Canva is an efficient way to create a bite size learning resource or a complete pre-recorded presentation. You can talk on camera, while sharing the presentation, which adds a layer of interest. There are also many features that you will see as we go over the recording process, in this step by step tutorial.
If you've been recording presentations via Loom or Zoom, you no longer need to add that step. Canva has integrated recording into the editor so you can recor...
Canva is a popular free online design and publishing tool that allows users to create beautiful graphics, presentations, videos and more. One handy feature of Canva is the ability to record video presentations directly within the editor. This allows you to add a personal touch to your presentation by including a video of yourself explaining the content.
Canva Introduced an awesome feature, now you can record your presentation in Canva and share the link or share the video with your…
Learn how to easily record yourself for group presentations that can be published and shared at a later date. Record yourself presenting in advance, so you d...
This video explores Canva's new feature - present & record. This will allow you to create beautiful slide video lectures, which you can use for your online classrooms.